 Estate Omnichannel
 Growth Omnichannel
TABLE OF CONTENTS
- Prerequisites
- Email AI Agent overview
- Email AI Agent's workflow
- Use cases & implementation examples
- Key considerations for configuring Email AI Agent
- Components of configuring Email AI Agent
- Analytics & Reporting
- See More
NOTE: For information about the latest Email AI Agent as part of AI Agent Studio, please refer to Email AI Agent setup and configuration
The Email AI Agent uses generative AI to automatically respond to customer queries via email using knowledge base content and contextual understanding. It helps customer support teams reduce manual workloads, improve first-response times, and maintain high-quality service at scale.
The Email AI Agent generates relevant replies based on ticket context and customer language preferences, all without human intervention, and supports deeper automation for post-response actions such as tagging or escalation.
Prerequisites
- Ensure you are on the Pro or Enterprise plan.
- Ensure you have administrator privileges.
- Ensure your knowledge base contains published public solution articles.
- Ensure at least one support email address is configured.
- Ensure required languages are enabled in your account settings and across portals.
- Define ticket automations for tagging or escalation workflows - Optional.
Email AI Agent overview
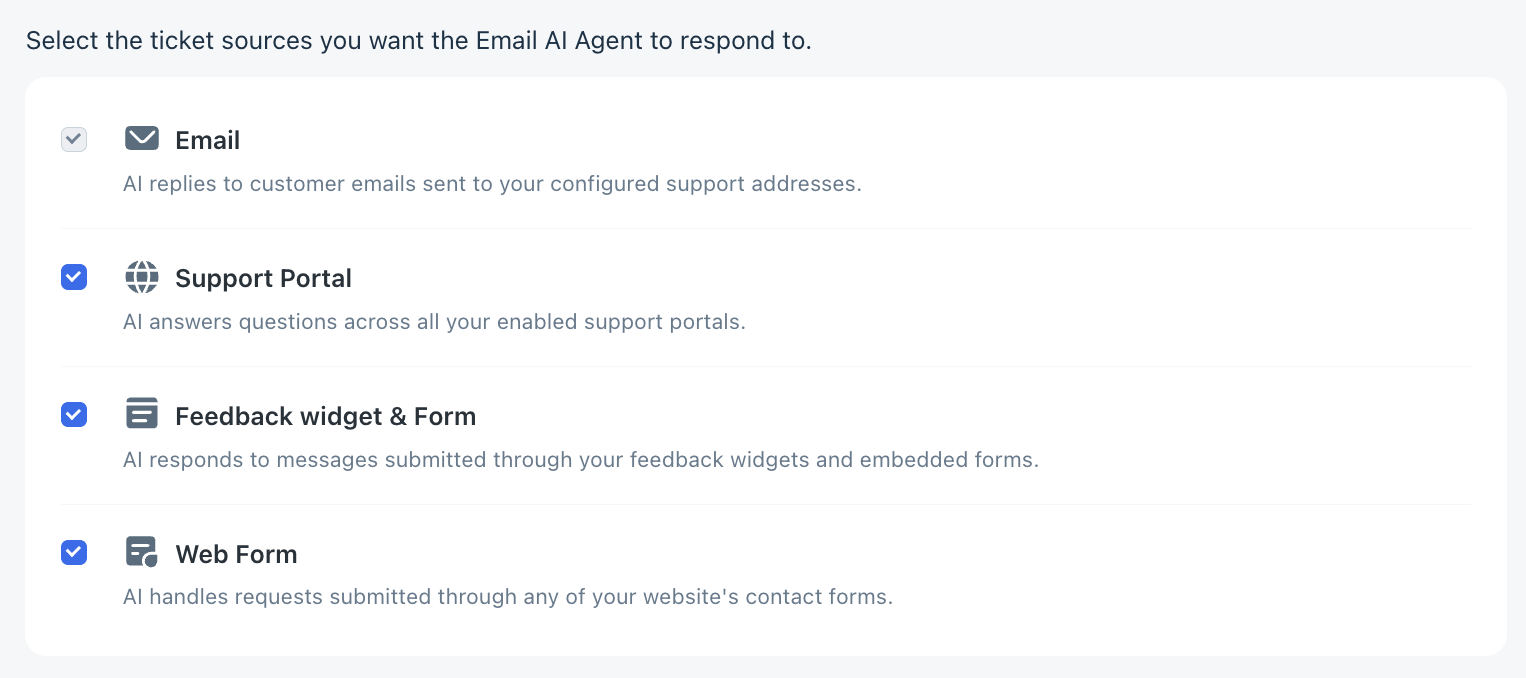
The Email AI Agent automatically responds to newly created tickets where the mode of communication is email-based. While traditionally triggered for tickets originating from email, it can now be deployed across all ticket sources where responses are delivered in email format.
This includes tickets created via:
- Email channels
- Support portals (Submit Ticket)
- Feedback widgets and forms
- Website contact forms
Across all these sources, the requester’s email address is mandatory. Once the ticket is created, the Email AI Agent generates and sends a structured reply to the requester’s email address, maintaining a consistent and seamless experience.
The agent:
- Understands the customer’s intent
- Searches portal-specific public solution articles
- Generates a summarized response
- Embeds relevant help articles
- Includes an in-email feedback widget
- Automatically closes tickets on positive feedback
If the response is not helpful, the ticket remains open for human agents to intervene.
Note: The AI response is delivered via email. For tickets created through the portal, the AI reply is not displayed within the portal interface.
Email AI Agent's workflow
Ticket creation and trigger
Customers can create tickets through:
- Support portal
- Feedback widget
- Embedded or website contact forms
After submission:
- A ticket is created, assigning a support ticket ID.
- The customer receives an automated acknowledgment.
- The Email AI Agent is triggered based on configured rules.
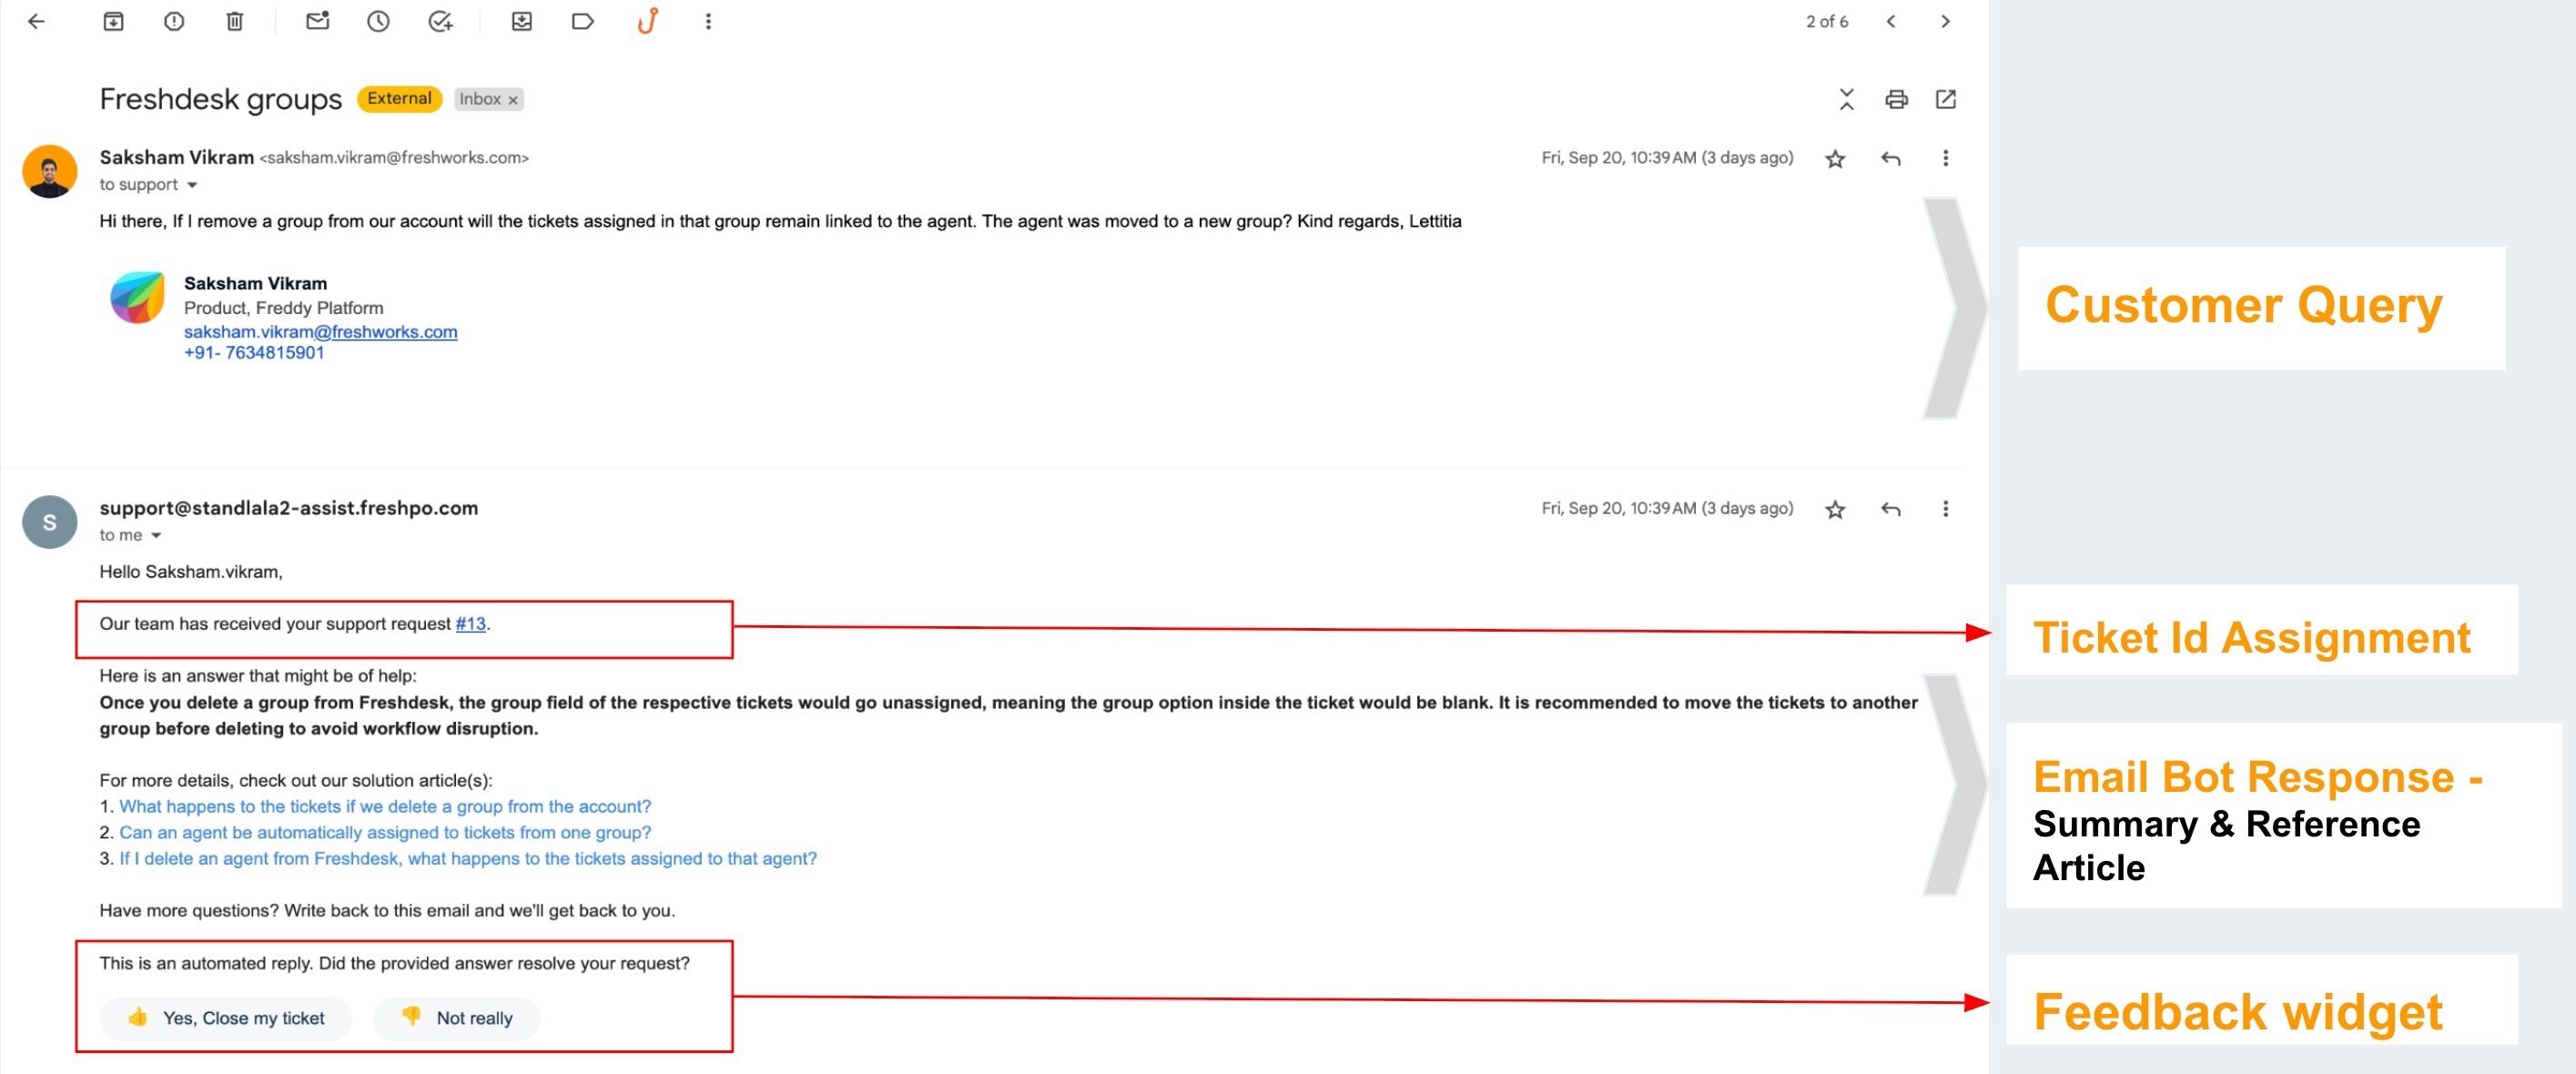
- The agent reads the subject and description and replies to the requester’s email address. The response is sent as a reply to the original ticket, with the subject formatted as "Re: original subject."
- If the customer selects Yes, Close my ticket, the ticket is automatically closed. Otherwise, it stays open for agent follow-up.
Classification and intent detection
Once triggered, the Email AI Agent:
- Filters non-actionable messages (for example, newsletters or out-of-office replies).
- Detects query language independent of account settings
- Supports the following languages
English US Portuguese/Portugal Polish Norwegian Thai German Portuguese BR Turkish Japanese Vietnamese Spanish (LATAM) Swedish Czech Korean Spanish (ES) French Russian Danish Chinese (simplified)
Dutch Italian Finnish Chinese (traditional)
- Identifies the core intent (for example, refund, billing, technical issue).
Knowledge search and response generation
The agent:
- Searches portal-specific public solution articles.
- Selects up to three relevant articles using confidence scoring.
- Crafts a reply that includes:
- A direct summary answer tailored to the specific question in the customer's language.
- A set of linked reference articles that offer deeper context and related information. This gives the customer options to self-serve based on their interest level.
- Formats with proper paragraphs, bullet points, and branding.
- Embeds feedback widgets for continuous improvement.
Ticket Resolution
- Automatically closes tickets receiving positive feedback
- If the answer is unhelpful, human agents can always intervene. Tickets remain with agents, giving them full control while reducing their workload.
- Admins can create automations to flag tickets, assign follow-ups, or escalate conversations—while still keeping agents in control of final resolution.
- To support advanced workflows (such as fallback responses, escalations, or tagging), admins can configure Ticket Update Automations using system events triggered by the Email AI Agent.
 Under Admin → Automations → Ticket Updates, select Action performed by: System, and based on the events, you can choose your actions.
Event When it triggers Example Actions Email AI Agent sends a response When the AI successfully replies to a customer • Add a tag such as AI-Responded
• Move the ticket to Waiting on Customer status
• Trigger a CSAT workflowEmail AI Agent did not reply When the AI does not generate or send a response • Assign the ticket to a human agent
• Send a predefined fallback email
• Escalate the ticket to a priority queueEmail AI Agent marked as spam When the AI response is classified as spam • Notify admins
• Add a review tag (e.g.,AI-Spam-Review)
• Route the ticket to a moderation or quality-check queue
Use cases & implementation examples
| Use case | Business challenge | Implementation approach | AI response behavior | Outcome |
|---|---|---|---|---|
| E-commerce order management | High volume of return and refund queries | Configured keyword-based triggers (“return”, “refund”, “wrong item”) and linked return policy articles | Detects refund intent, summarizes policy, shares timelines, embeds feedback widget | Reduced handling time and improved post-purchase experience |
| SaaS technical support | 24/7 global Tier-1 support demand | Created KB for common errors and billing FAQs; excluded critical or negative sentiment tickets | Identifies error patterns, provides troubleshooting steps, references KB articles | Deflected repetitive Tier-1 queries, improved SLA adherence |
| Portal and widget-based tickets | Manual effort required for non-email ticket sources | Enabled Email AI Agent across portal, widget, and form sources | Sends structured email reply with summarized answer and article links | Expanded automation coverage and increased deflection |
| Billing and subscription queries | Repetitive invoice and payment-related questions | Created billing FAQs and configured billing-related triggers | Detects billing intent, shares invoice access steps and KB links | Reduced repetitive billing workload |
Key considerations for configuring Email AI Agent
Area | Details |
Language Support | English, Spanish, German, French, Dutch, Italian, Portuguese/Portugal, Portuguese BR, Russian, Italian, Polish, Turkish, Czech, Danish, Finnish, Norwegian, Japanese, Korean, Chinese (simplified), Chinese (traditional), Thai, Vietnamese, Spanish (ES), Swedish |
Trigger Rules | Only supported on ticket creation events and runs as the final automation in the ticket creation process. Only works on Email tickets. |
Content Requirements | Requires a populated and up-to-date knowledge base |
Daily Limits | Admins can cap the number of tickets the Email AI Agent responds to per day |
Session Consumption | Every time the Email AI Agent responds, one bot session is consumed. |
Template Behavior | Admins must preserve required placeholders (e.g., answers, articles, feedback widget) |
Plan Eligibility | Pro and Enterprise only |
Version Control | No rollback/versioning for templates at present |
Note: The Email AI Agent does not currently support responding to ongoing email threads — only initial ticket creation.
Components of configuring Email AI Agent
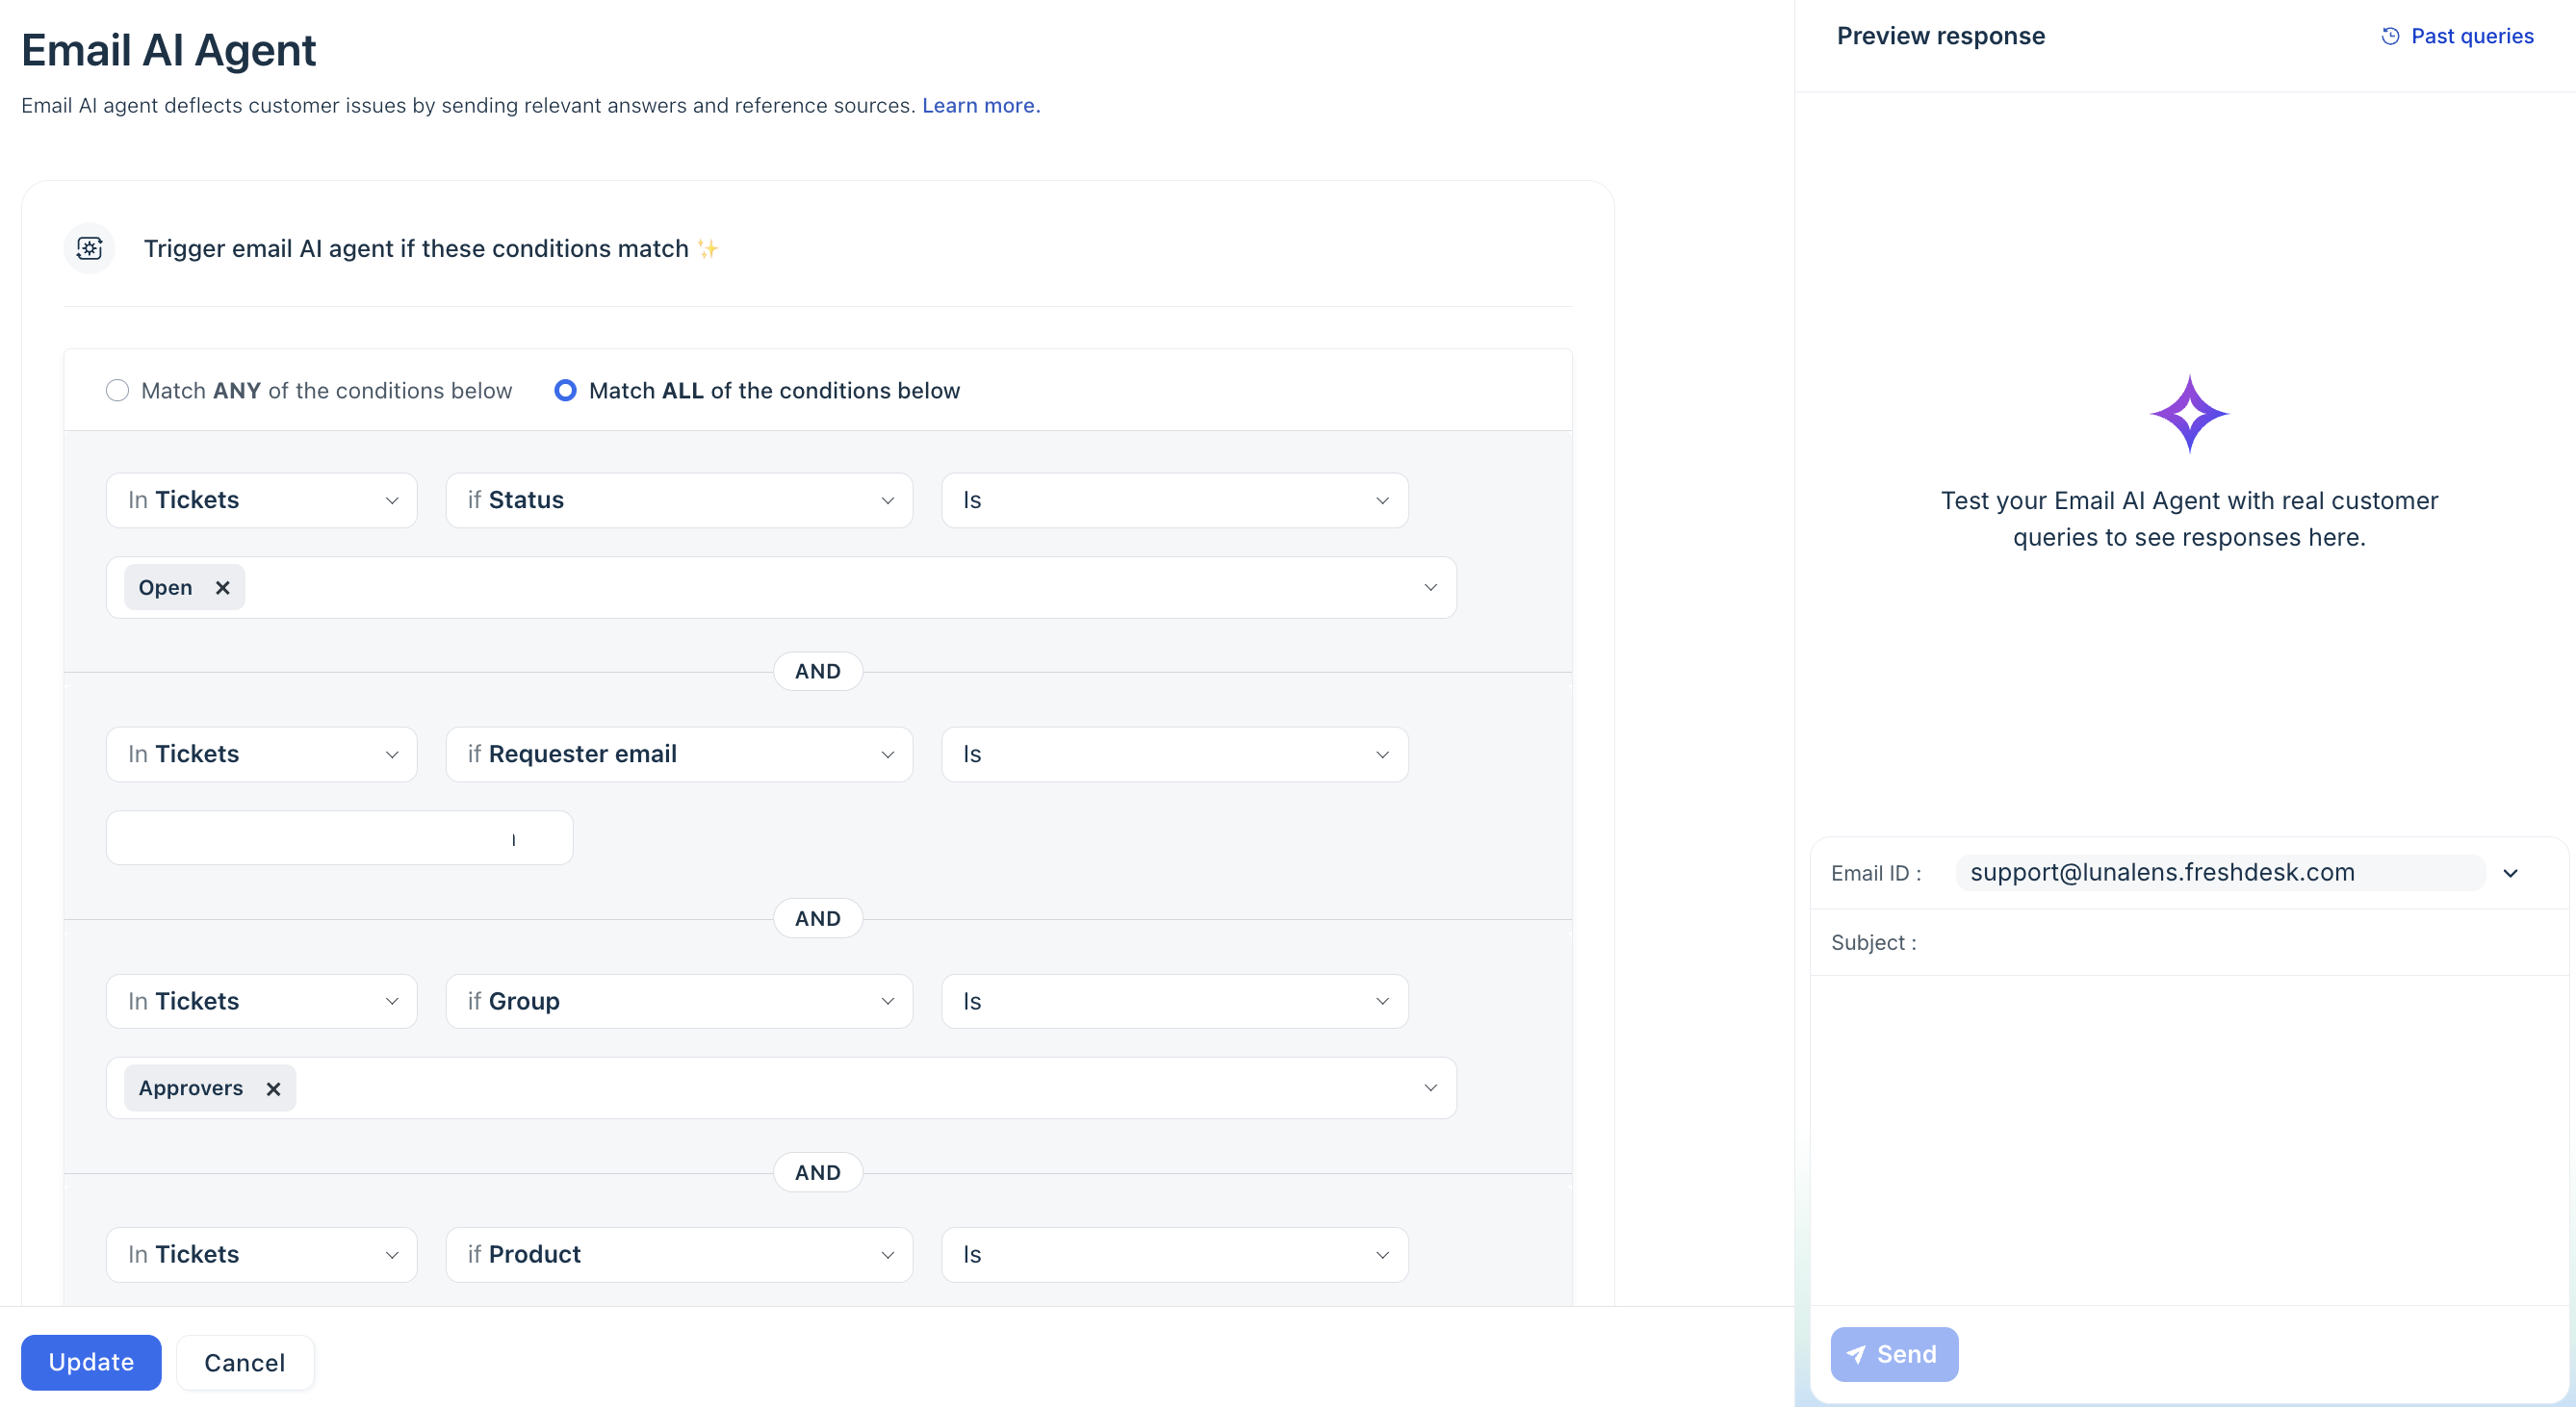
Once you've accessed the Email AI Agent setup area, configuration involves five core components.
- Enabling Email AI Agent
- Setting up trigger conditions
- Managing languages
- Editing email response template
- Setting response limit and applicable sources
Refer to the Email AI Agent Configuration Guide for a detailed step-by-step setup.
Analytics & Reporting
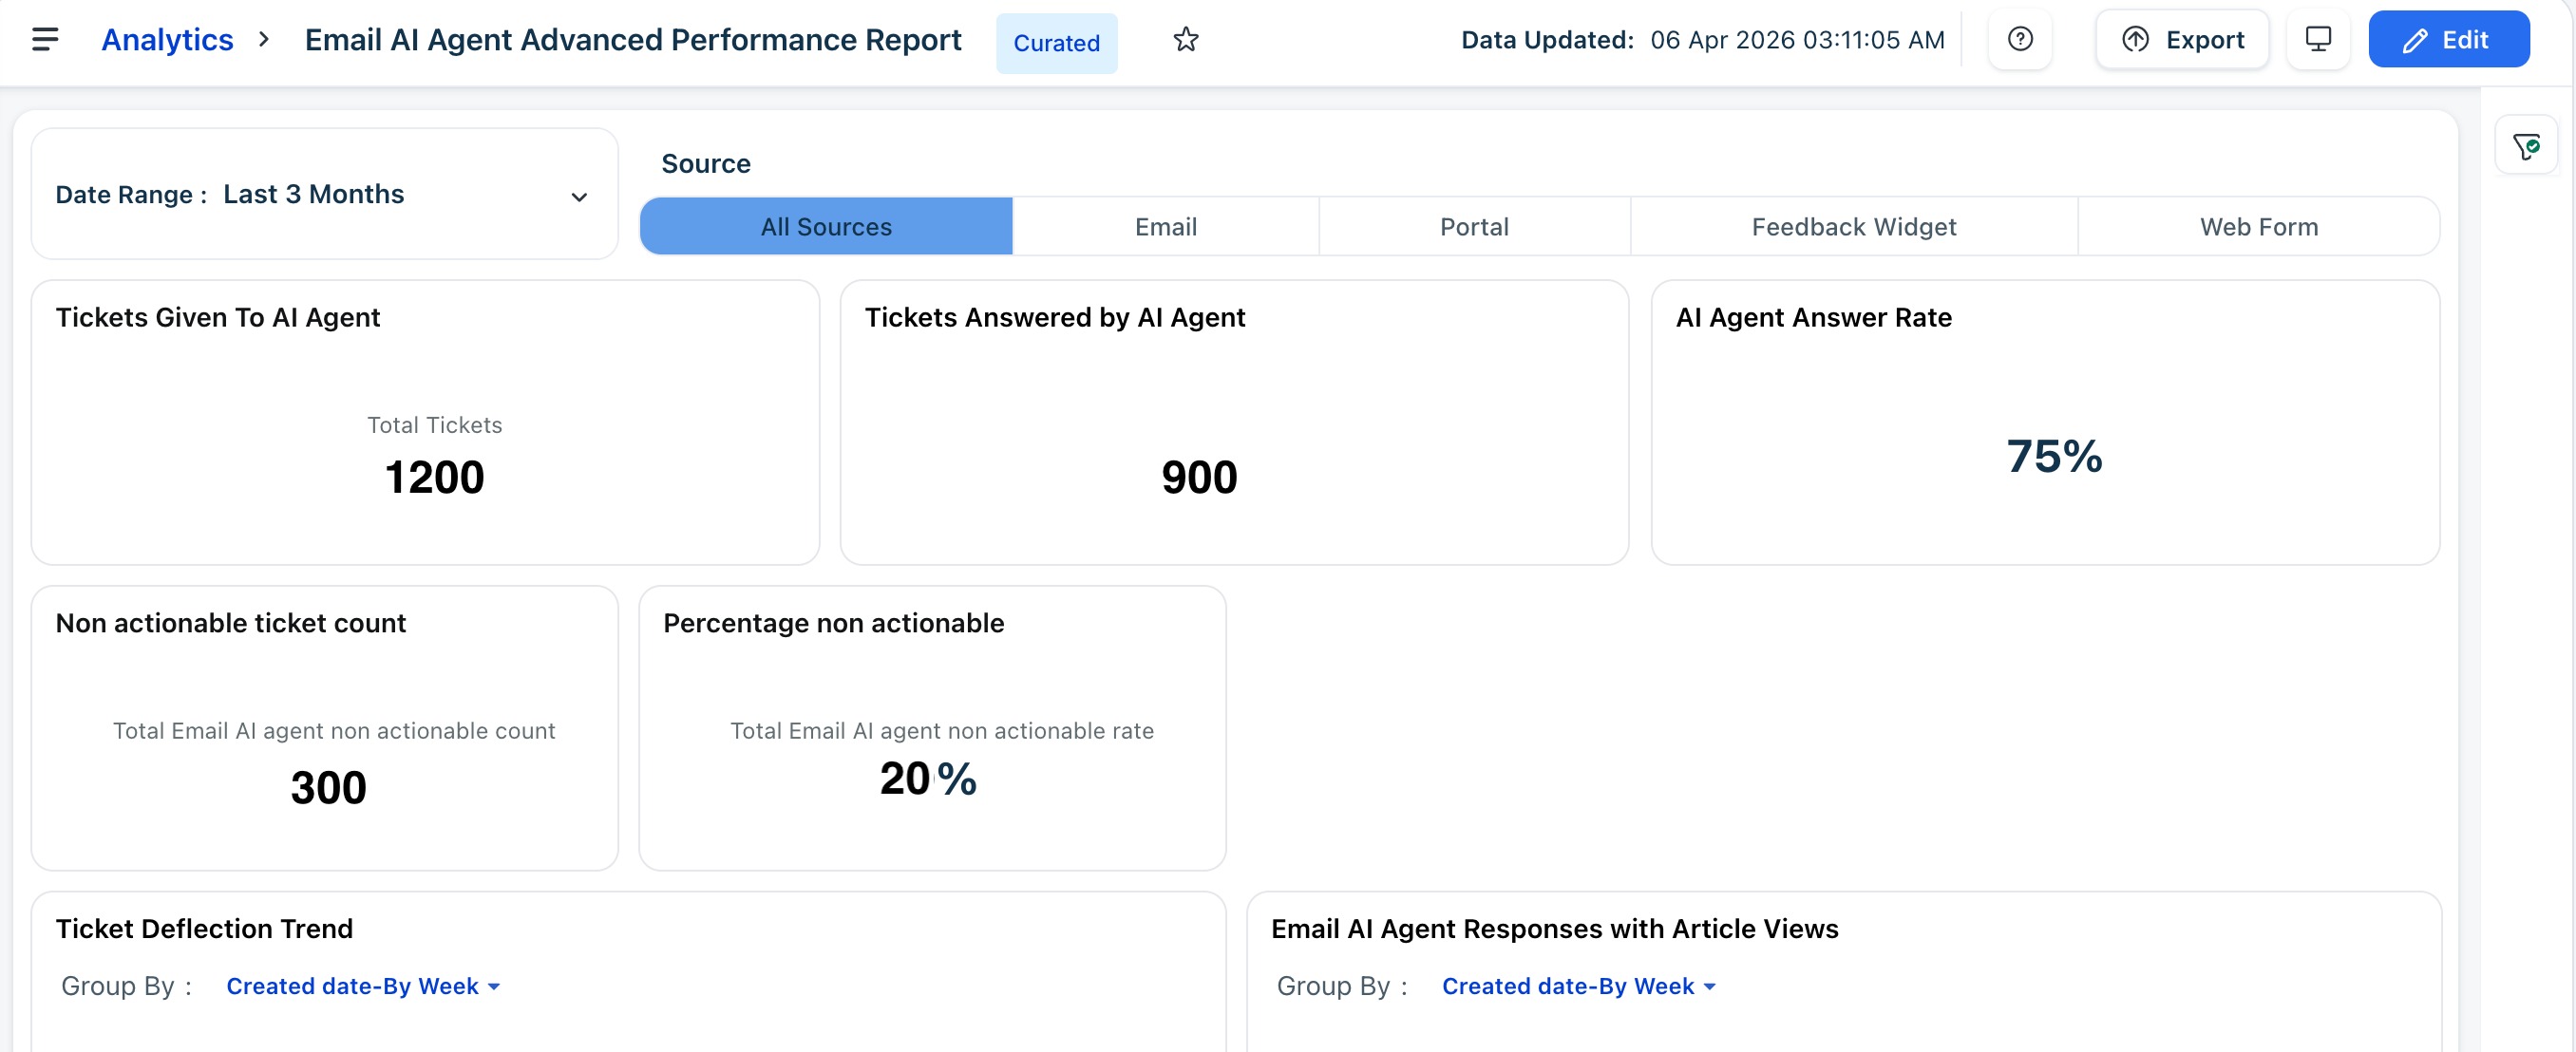
The Analytics module provides a comprehensive view of how the Email AI Agent is performing via the curated Email AI Agent Advanced Performance Report. These insights help admins evaluate effectiveness, troubleshoot issues, and make informed decisions about language support, template tuning, and knowledge base quality. The Email AI Agent curated report has the following tabs:
- Absolute Metrics: Understand the number of email tickets the Email AI Agent is handling, how effective its responses are, and where improvements can be made.
- Sessions Consumption: Measure how many sessions the Email AI Agent consumes and when they occur. This is useful for quota tracking and usage trend analysis.
Learn more about Email AI Agent testing and analytics.