 Estate Omnichannel
 Free
FreeUsing Freshworks Analytics, you can download reports and widgets, send them by email, or schedule them to be emailed on a recurring basis.
Note: Exporting a report or widget differs from using the Data Export option under Analytics Settings. For more information, see Exporting data.
Export Reports
The report export options allow you to send a report by email via Send email, schedule automatic emails via Schedule email, or download the report via download file.
To begin:
- Go to Analytics and open the report you want to export or download.
- Click Export report. The Export report screen opens.

- Export screen opens
The following sections describe the available export actions.
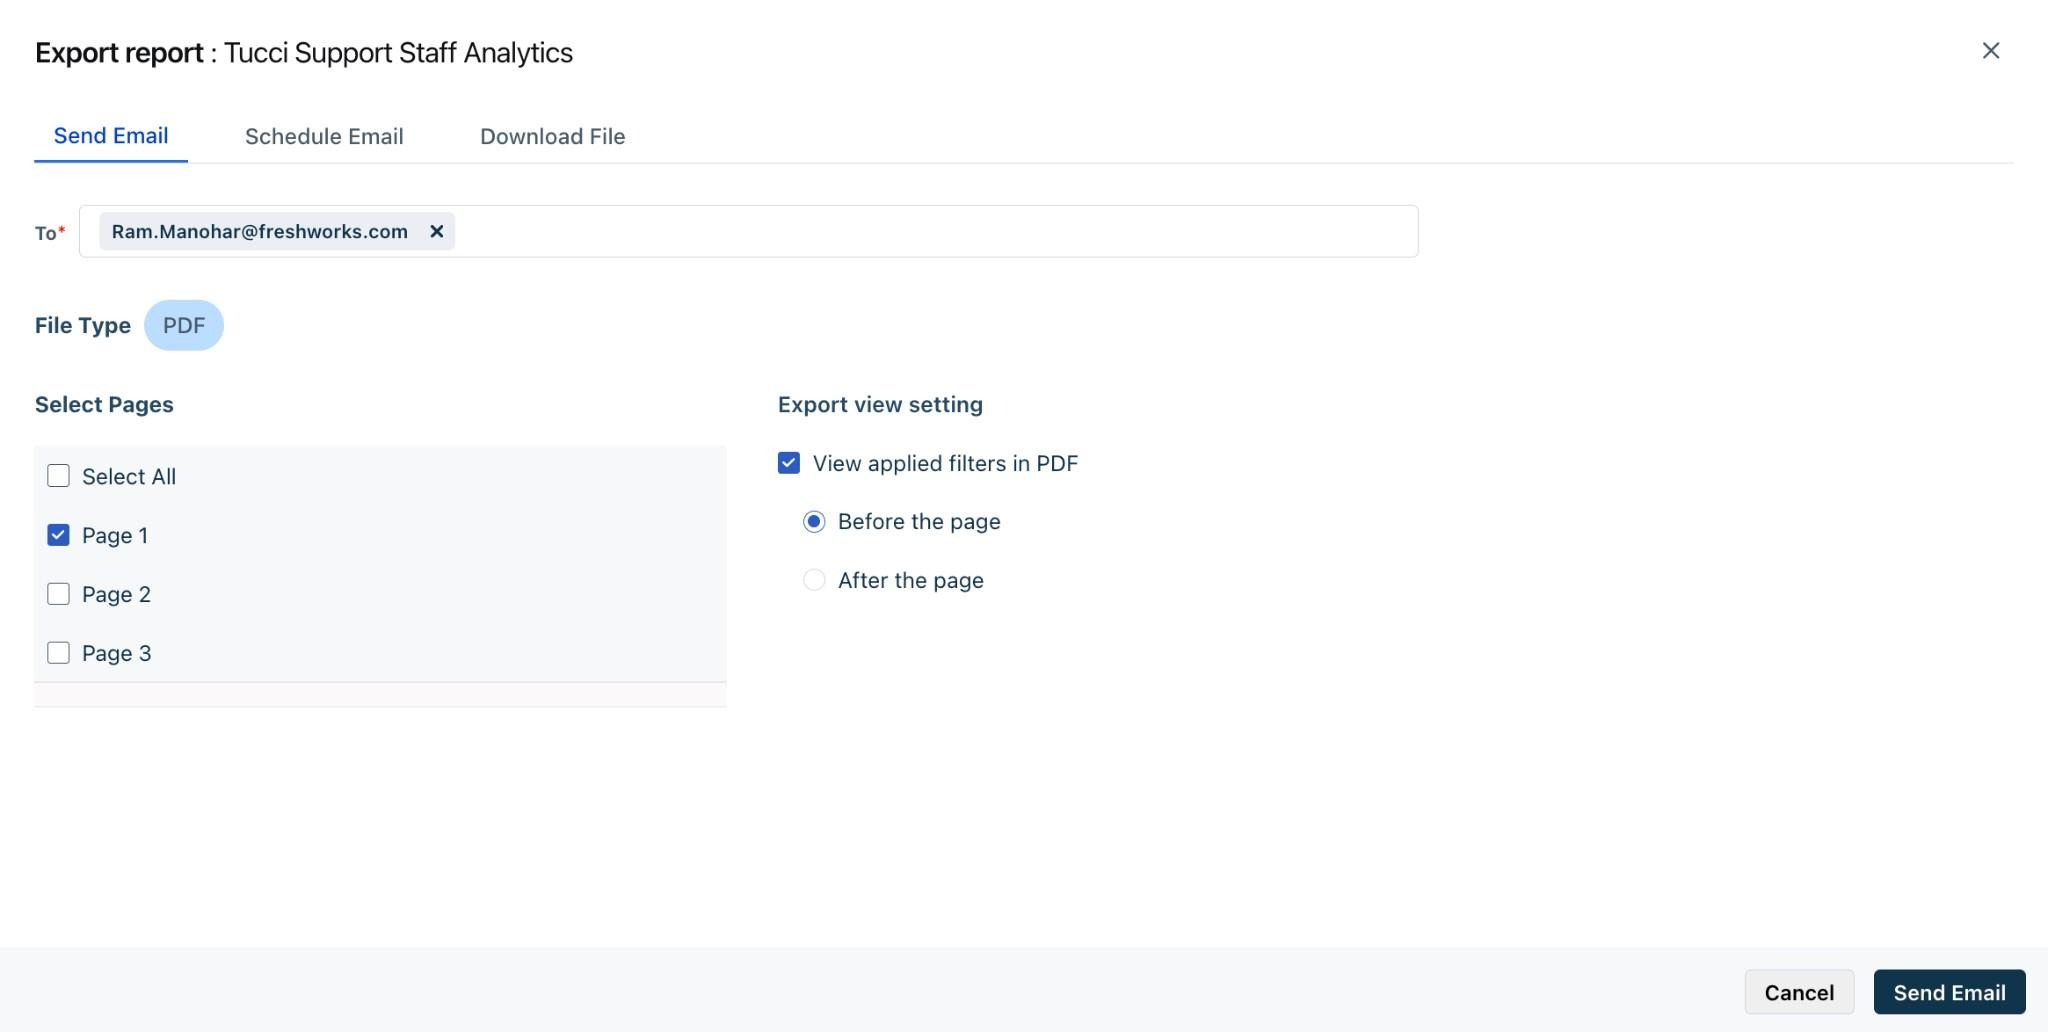
Send email
To send the report by email,
- Select Send email tab. This will also be the default option.

- Select With unsaved changes or Without unsaved changes, depending on whether you want the export to reflect any unsaved changes such as filters or updated chart types.
Note: This appears only when unsaved changes exist.
- Enter the recipient’s email address.
- The file type PDF is selected for you (Report export supports only the PDF format.)
- Under Select pages, choose the pages you want included.
- Configure Export view settings:
○ Select View applied filters if you want filters to be included in the exported file, and choose whether they appear before or after the page.
- Click Send email.
Download file
To download the report, perform the following steps:
- Select the Download file tab.

- Select With unsaved changes or Without unsaved changes when prompted.
- The file type PDF is selected for you (Report export supports only the PDF format.)
- Select the pages to export under Select pages.
- Configure any Export view settings, for options to include applied filters.
- Click Download file to complete the export.
Schedule email
Create a schedule
To create a schedule for a report export, perform the following steps:
- Click Schedule email.
- Enter the recipients, add a schedule name, and set additional options based on the recurrence
○ Daily: Set the time of day.
○ Weekly: Set the day of the week and a time.
![]()
○ Monthly: Set either a specific date (e.g., 19th of every month) or a day-based pattern (e.g., first or last Thursday of every month), along with the time.

- Set the Start date, Time, End date, and Timezone.
Note: The end date defaults to one year from the start date but can be modified.
- Enter the email Subject and Description.
- The file type PDF is selected for you (Report export supports only the PDF format.)
- Click Schedule email. The report will be emailed according to the defined schedule.
Edit a schedule
To update an existing report schedule:
- Open the report and select Export report → Schedule email.
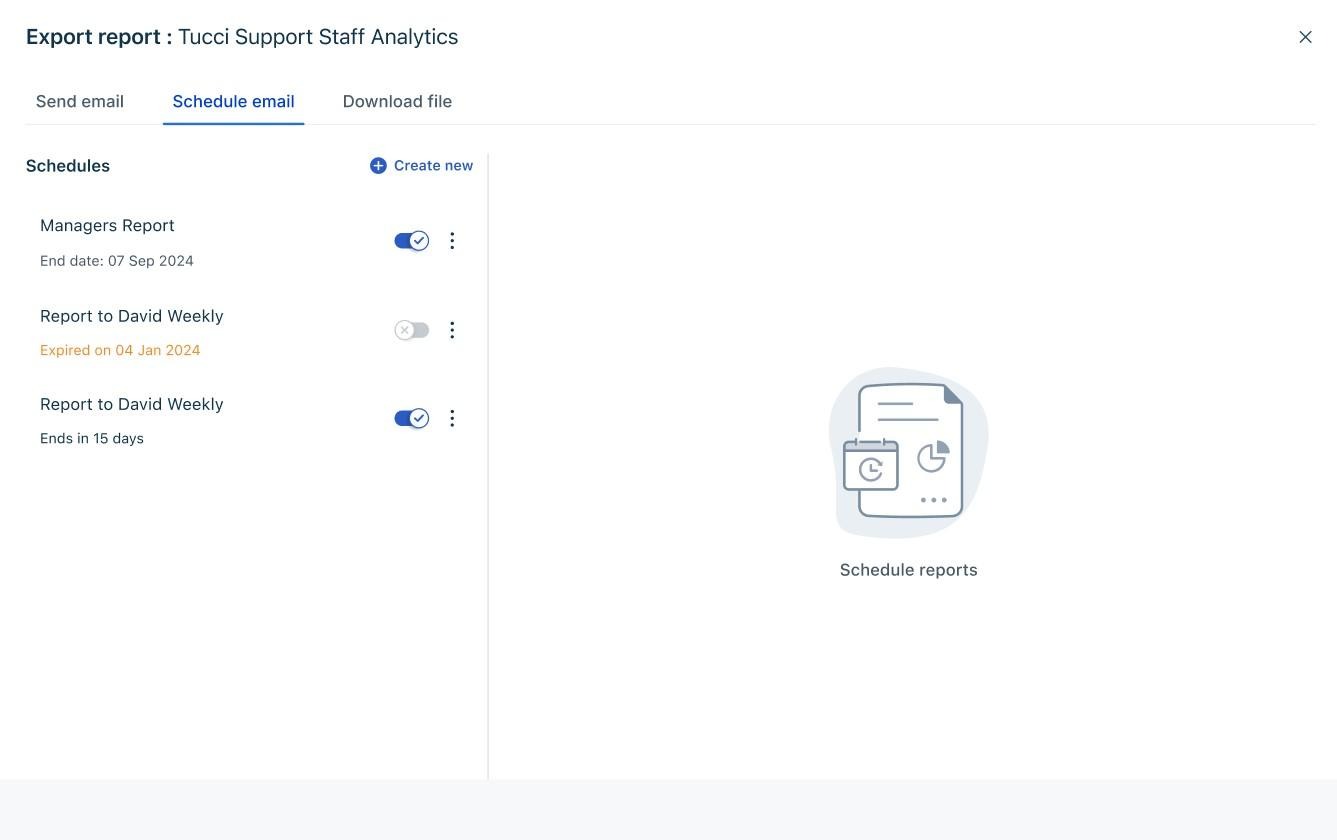
- Choose an existing schedule to edit, or click Create new to add another schedule for the same report.
- You can also manage all schedules by navigating to Analytics > Settings > Schedules, where you will see a list of scheduled widgets and reports.

Export Widgets
Widgets can also be sent by email, scheduled for recurring email delivery, or downloaded directly.
Select a widget and click Options > Export widget. The export dialog opens.
Send widget via email
To email a widget:
1. Select Send email tab. This will also be the default option.
Select With unsaved changes or Without unsaved changes if applicable.
Note: This option is only available if you have unsaved changes in the report, like applied filters or updated chart type.
- Enter the recipient email address.
- Choose the File Type:
- CSV
- XLSX
- PDF + CSV
- Under Select view, choose how the widget should be exported:
| Select view option | Description | Available in |
| Underlying data | Exports the underlying data used to generate the widget. | CSV, XLSX, PDF, PDF+CSV |
| Summary table | Exports chart data as a table. | |
| Graph | Exports an image of the widget as displayed. | PDF, PDF+CSV |
| Graph with underlying data | Exports both the graph image (PDF) and the underlying data (CSV). |
- If exporting to PDF, configure Export view settings:
a. Select View applied filters if you want filters to be included in the exported file, and choose whether they appear before or after the page.
- Click Send email.
Download widget
To download a widget:
- Click Download file.
- Select With unsaved changes or Without unsaved changes, if applicable.
- Choose the File Type (CSV, XLSX, PDF, or PDF+CSV).
- Select the appropriate view and configure any export settings.
- Click Download file.
Schedule email
To set up a recurring widget export:
- Click Schedule email.

- Enter the recipients, add a schedule name, and set additional options based on the recurrence
○ Daily: Set the time of day.
○ Weekly: Set the day of the week and a time.
![]()
○ Monthly: Set either a specific date (e.g., 19th of every month) or a day-based pattern (e.g., first or last Thursday of every month), along with the time.

- Set the Start date, Time, End date, and Timezone.
Note: The end date defaults to one year from the start date but can be modified.
- Enter the email Subject and Description.
- Choose the File Type (CSV, XLSX, PDF) and the appropriate view.
Note: PDF+CSV option is not available for schedules.
- Click Schedule email. The widget will be emailed according to the defined schedule.
Edit a schedule
To update an existing widget schedule:
- Open the widget and select Export widget → Schedule email.

- Choose an existing schedule to edit, or click Create new to add another schedule for the same widget. You can also manage all schedules by navigating to Analytics > Settings > Schedules, where you will see a list of scheduled widgets and reports.

Export underlying data in a widget
Underlying data represents the complete dataset used to generate a widget. This data can also be emailed or downloaded.
To export underlying data: Open a widget’s underlying data. 
- Click Edit columns (when you are in edit mode) to choose specific columns to include.You may also use filters to refine the dataset.

- Click Export to open the export dialog.
Send underlying data via email
To send the export of the underlying data in an email:
- Select Send email tab. This will also be the default option.

- Enter the recipient email address.
- Choose the File Type (CSV or XLSX).
- Ensure Underlying data is selected under Select view.
- Select additional columns if needed.
Note: the columns selected here apply only for the export and are not persisted
- Click Send email.
Download underlying data as a file
To download the underlying data:
- Select the Download file tab.

- Choose the File Type (CSV or XLSX).
- Ensure Underlying data is selected under Select view.
- Select additional columns if needed.
Note: the columns selected here apply only for the export and are not persisted
- Click Download file.