
 Community
 Video Library
 Agent Training
 Freshservice
 Freshdesk
 Freshchat
 Freshcaller
 Freshsales
 Freshteam
 Freshworks Neo
 Freshsurvey
Articles in the Freshdesk Omni 2025 upgrade series
|
TABLE OF CONTENTS
- Pre-upgrade tasks
- Start the upgrade process
- Stage 1: Transfer configurations
This article is part 2 of the Freshdesk Omni 2025 migration guide for accounts with high Freshchat usage. It explains how to initiate the upgrade process and transfer configurations, including migrating channels, teams, support operations, workflows, and other supported Freshchat configurations.
Note: This upgrade article applies only to Freshdesk Omnichannel Classic and Freshdesk Omni 2023 (CSS) accounts with active Freshchat usage. If your account has no significant Freshchat configurations, follow the standard upgrade process described in the Freshdesk Omni 2025 upgrade overview.
Prerequisites:
- Ensure that you have account admin or admin permissions
Note: While admins can transfer or copy configurations and data, only account admins can initiate the upgrade process and confirm the final upgrade. - Before proceeding with this article, ensure that you have read the Detailed upgrade guide for Freshdesk Omni 2025. This provides a comprehensive summary of the upgrade, including the various stages involved.
Pre-upgrade tasks
Before you can start the Freshdesk Omni 2025 upgrade, ensure you complete the required pre-upgrade tasks to prepare your account for the updated data model and ensure your existing configurations work correctly after the upgrade.
Depending on your account configuration, you may need to complete one or both of the following tasks.
- Log in to your account as an account administrator.
- Click on the Upgrade icon from the left navigation bar.
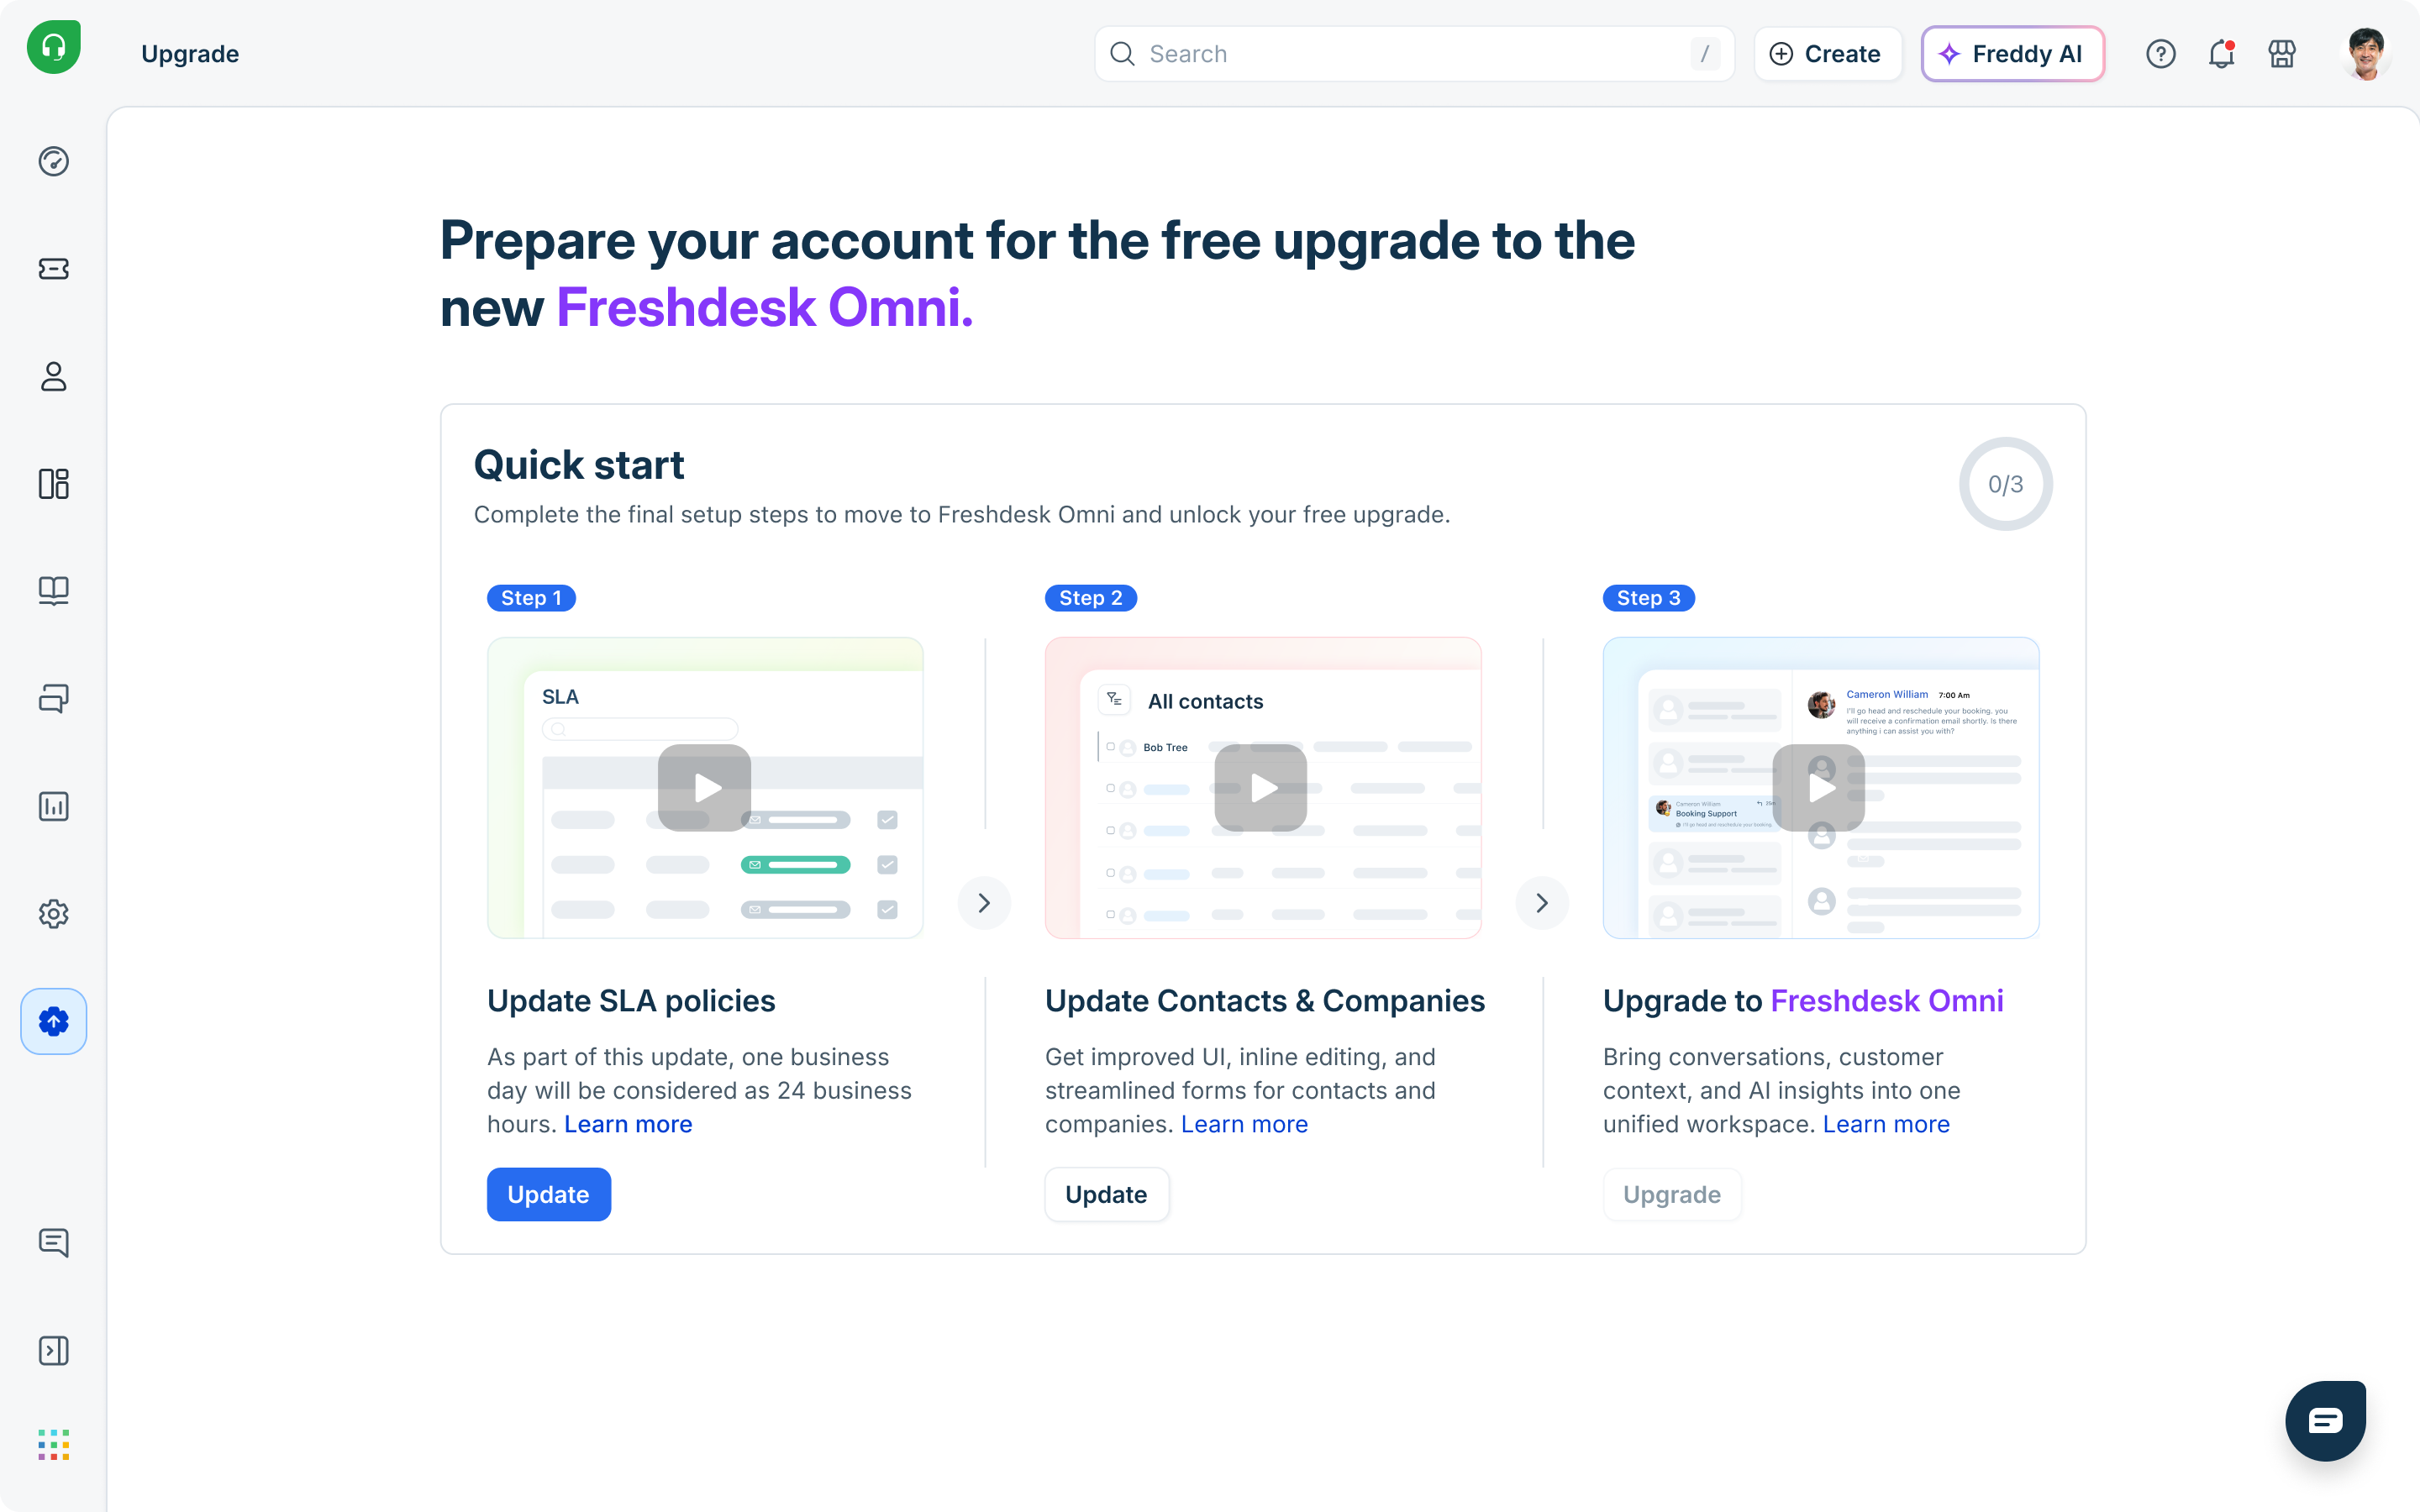
- Depending on your account setup, one or both steps will be required.
- Update SLA policies
Ensure response and resolution targets are calculated correctly under the updated model, where one day equals 24 hours. For more details, see Upcoming changes to SLAs. - Update contacts & companies
Ensure customer records are structured correctly under the new data model, enabling consistent identification across channels. For more details, see Manage customer data.
- Update SLA policies
- After all required tasks are complete, click Upgrade to start the upgrade.
Review analytics and reporting changes (Freshdesk Omnichannel Classic only)
If you're upgrading from Freshdesk Omnichannel Classic, review the analytics and reporting changes before proceeding.
The following analytics changes apply after the upgrade:
- Reports retained: Curated and custom reports that contain only Freshdesk widgets are retained.
- Reports not retained: Reports that contain Freshchat or Freshcaller widgets are not retained. If a report contains a mix of Freshdesk and Freshchat/Freshcaller widgets, only the Freshdesk widgets are retained.
- Historical data: Retained reports display data only for the default date range that you select during the upgrade. You can change the date range for individual reports after the upgrade.
To review the analytics changes and continue, follow the steps below:
- Review the analytics and reporting changes. Based on your subscription plan, the reports will be retained.
- If you are on a Growth plan, the last two years of report data are retained automatically. Reports containing older data display only the available data within this period.
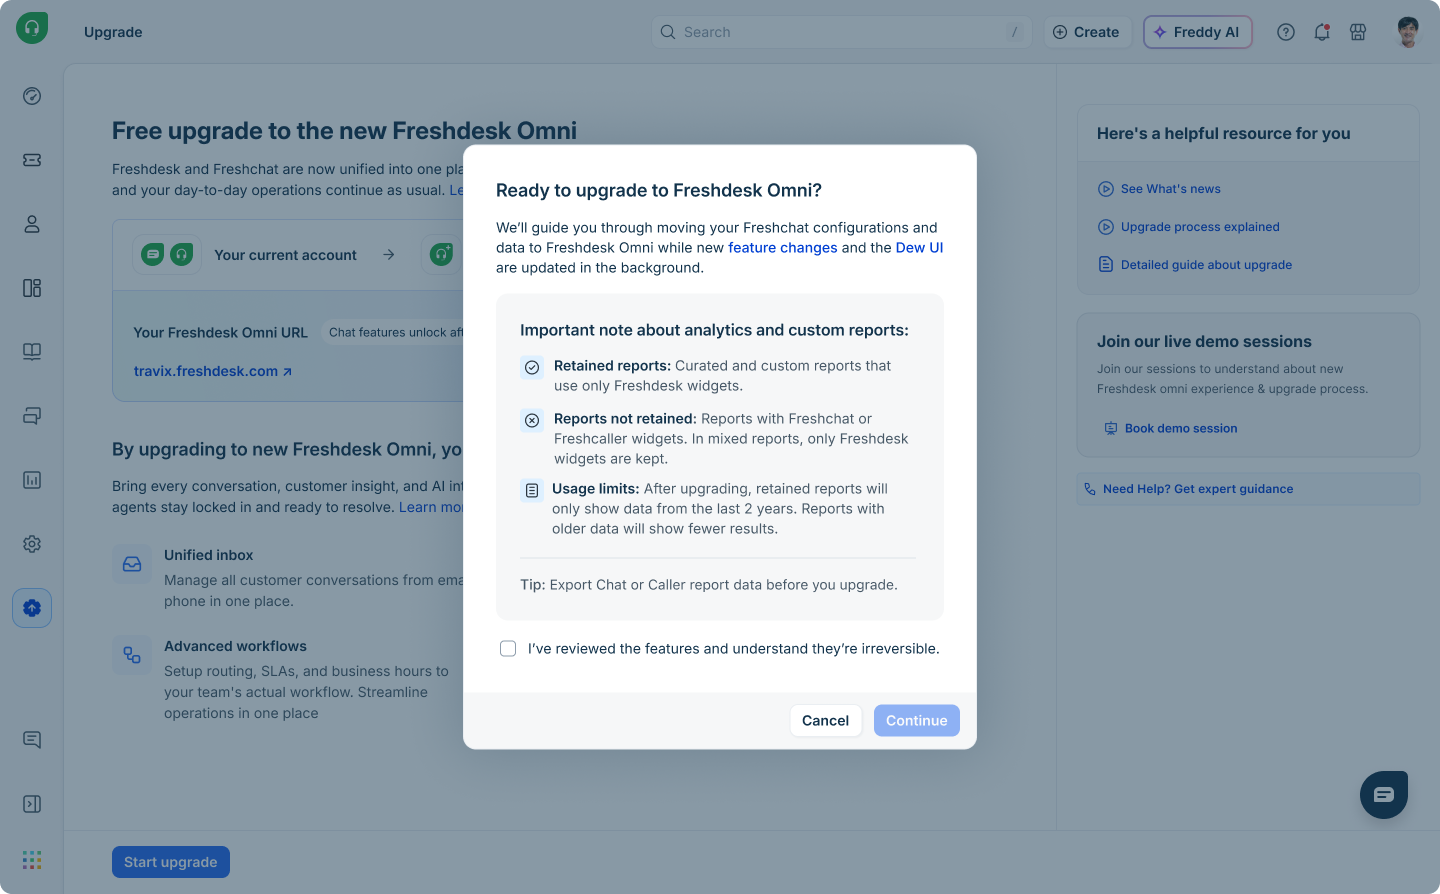
- If you're on the Enterprise plan, select the default report date range to retain. This date range is applied to all retained reports by default and can be changed for individual reports after the upgrade.
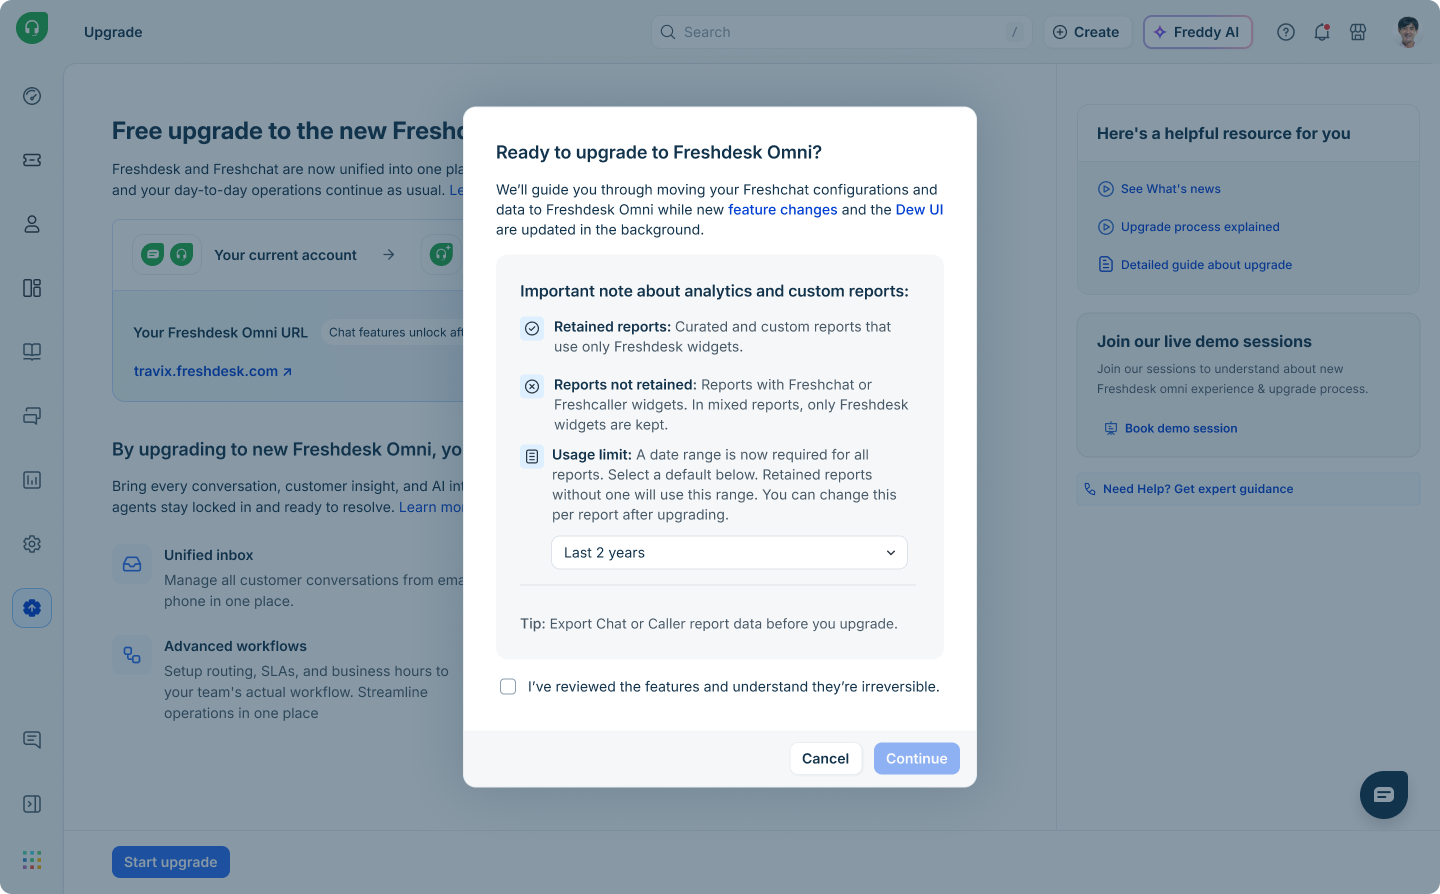 Tip: Export your Freshchat and Freshcaller analytics data before starting the upgrade to retain historical reporting outside the supported date range.
- If you are on a Growth plan, the last two years of report data are retained automatically. Reports containing older data display only the available data within this period.
- Select I've reviewed the features and understand they're irreversible.
- Click Continue.
Start the upgrade process
The upgrade is designed as a guided, multi-stage process to ensure a seamless transition. Before you begin, we recommend reviewing the migration stages in the Detailed upgrade guide for Freshdesk Omni 2025 to get a clear picture of how the process works and what to expect at each step.
Note: Freshdesk Omnichannel Classic customers will be prompted to review analytics and reporting changes before continuing with the migration. For details, see Review analytics and reporting changes.
To start the upgrade:
- Log in to your account as an account administrator.
- Click on the Upgrade icon from the left navigation bar.
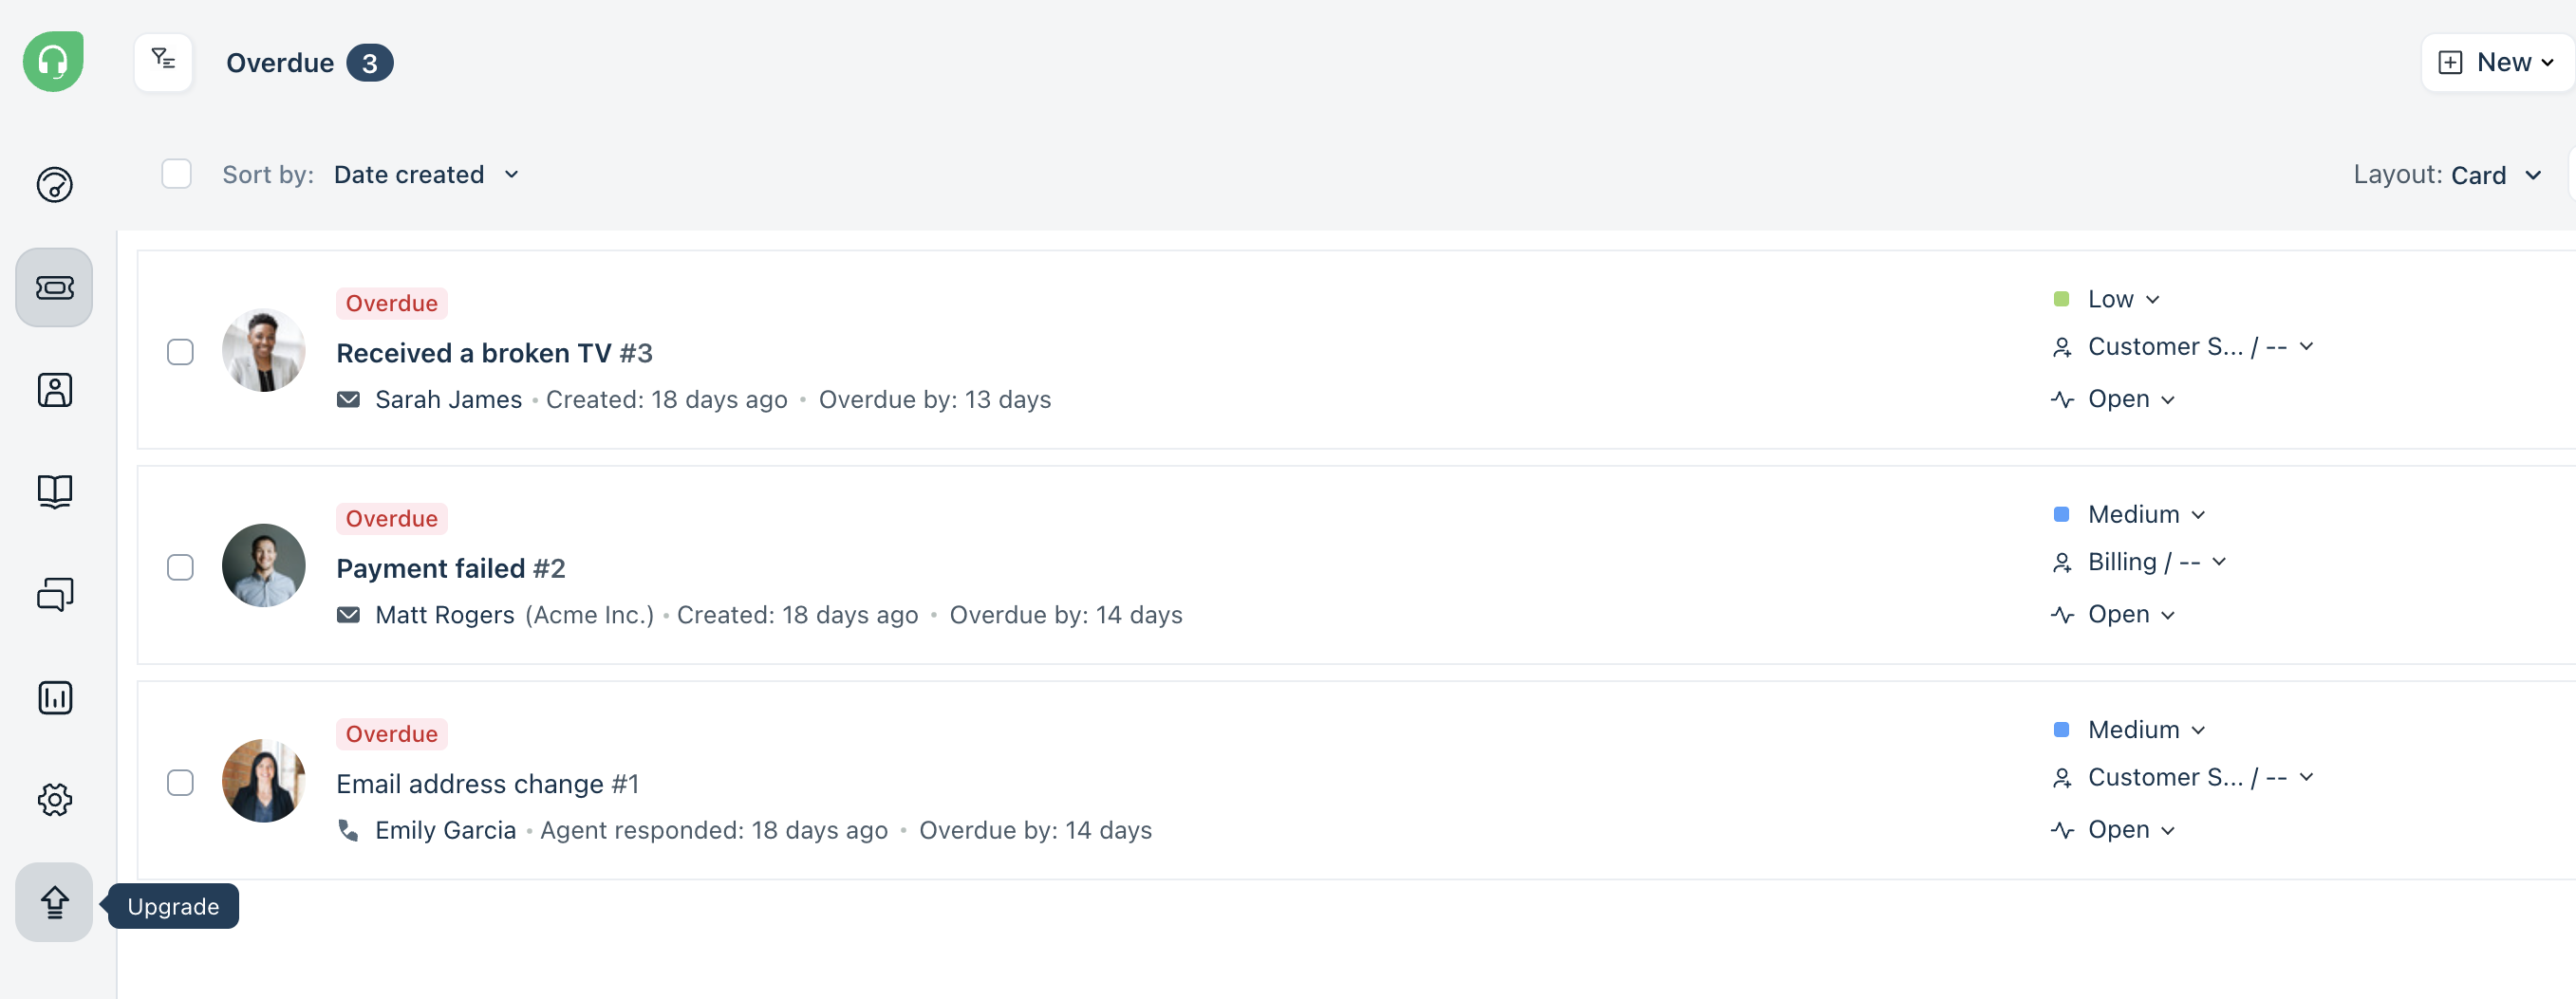
- Click Start Upgrade.
- Select I've reviewed the features and understand they're irreversible.
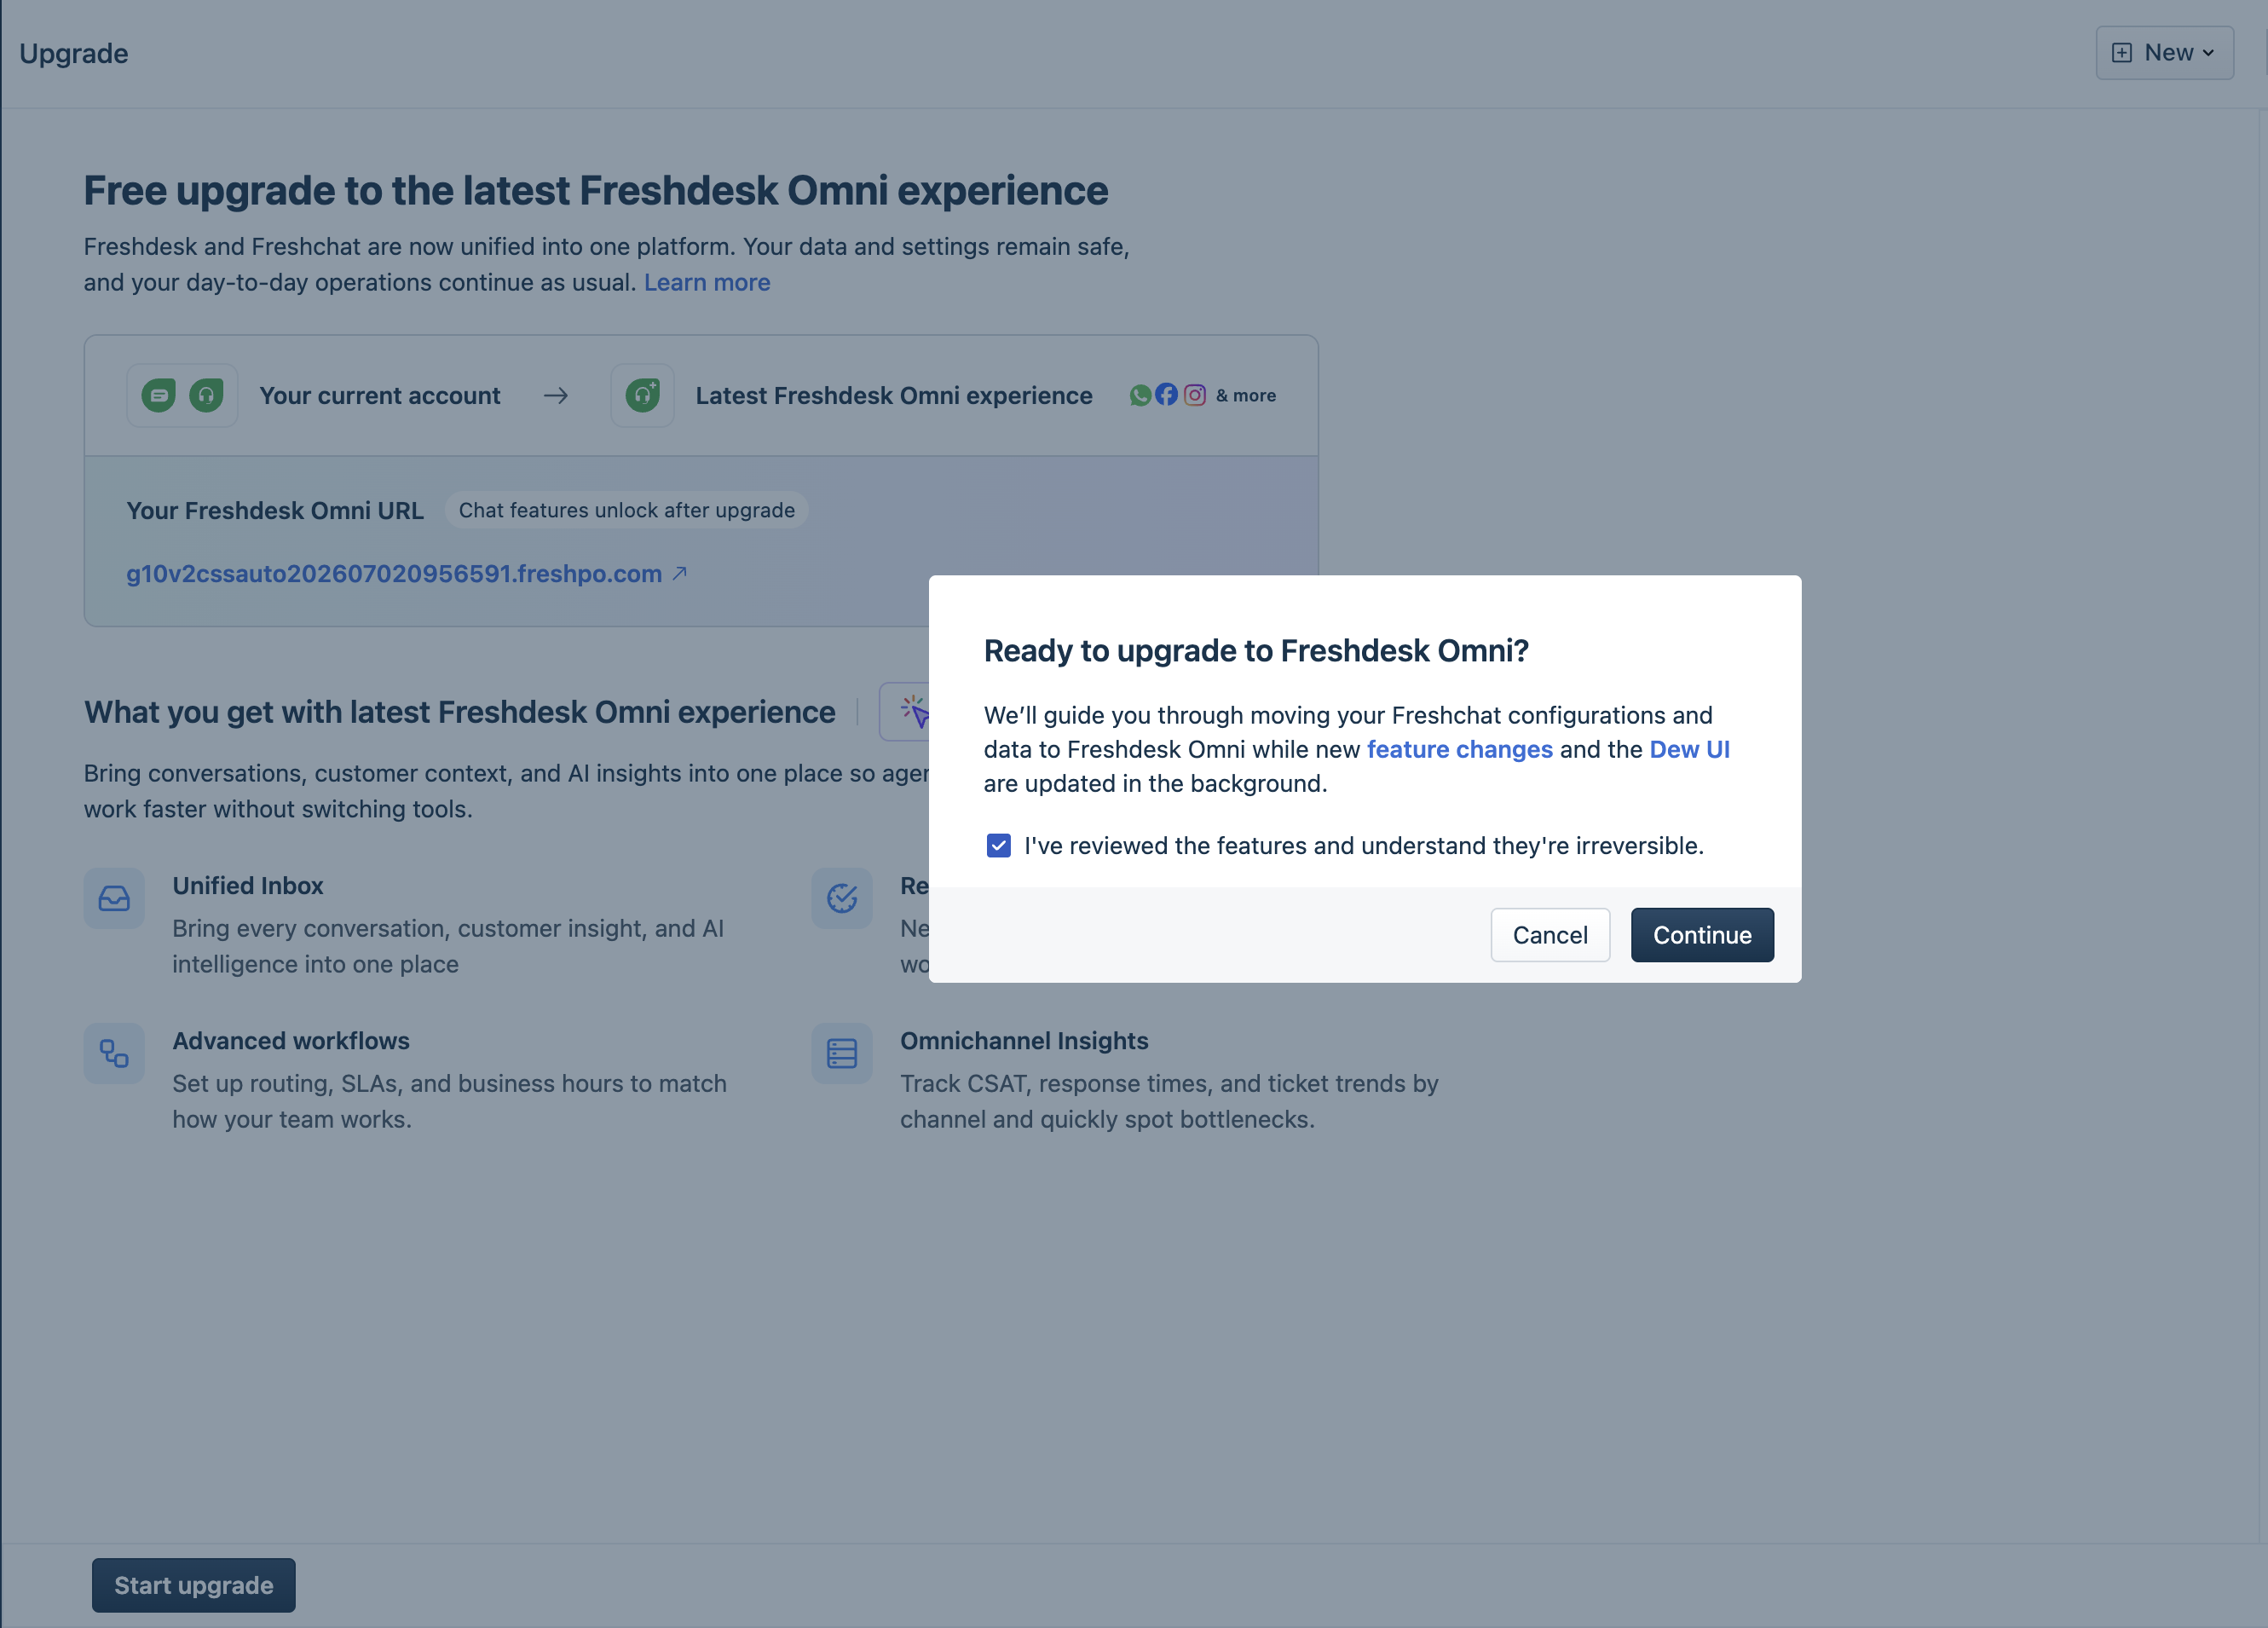
- Click Continue.
Stage 1: Transfer configurations
In this stage, you will transfer supported Freshchat configurations to Freshdesk Omni 2025. The upgrade wizard guides you through each configuration type, allowing you to review and transfer the configurations you want to migrate.
However, customer conversations continue to be routed through your existing Freshchat channels until you reconnect the channels and complete the final upgrade in Stage 3: Connect channels and go live.
You can transfer the following Freshchat configurations to Freshdesk Omni 2025:
- Channel configurations
- Team configurations
- Support operations
- Agent productivity
- Workflows
- Contacts and conversation data
Important:

A few things to note before you transfer the configurations:
- Transfer configurations over multiple sessions: You can complete the transfer in multiple sessions. For example, if you have five WhatsApp Business phone numbers, you can transfer two today and the remaining three later.
- Complete one transfer at a time within a section: Only one transfer can run at a time within a section. For example, within the channel configurations, if email accounts are being transferred, wait for the transfer to complete before starting the SMS configuration
Terminology changes
Some Freshchat configurations are renamed or reorganized in Freshdesk Omni 2025. Review the following table before you begin the upgrade to understand what to expect during configuration transfer.
| Freshchat entity | Freshdesk Omni entity |
|---|---|
Advanced automations | Automations |
Assignment rules | Automations |
CRM tags | Tags |
Accounts | Companies |
Intelliassign | Omniroute |
Conversation properties | Ticket properties |
Chats / Conversations | Tickets |
Note: These changes affect only the configuration's name or location in Freshdesk Omni. The underlying data and settings are preserved when transferred.
Transfer channel configurations
Channel configurations include the communication channels configured in your Freshchat account, such as Email, WhatsApp, Facebook, Instagram, Web Chat, Mobile SDK, and SMS.
Based on the channel type, you can transfer individual channels, accounts, phone numbers, or widgets. After the transfer is complete, reconnect the transferred channels during Stage 3: Connect channels and go live to start receiving new customer conversations in Freshdesk Omni 2025.
Transfer webchat channel configuration
Web chat configurations include the widgets configured in your Freshchat account. Transfer these widgets to continue using your existing web chat experience in Freshdesk Omni 2025 without manually recreating the configuration.
Note: You can transfer up to 100 widgets, with a maximum of 10 topics per widget. Also, the transferred widgets will be suffixed with the tag "Freshchat".
To transfer widgets:
- In the upgrade wizard, go to Transfer Configurations > Channels.
- Click Web Chat.
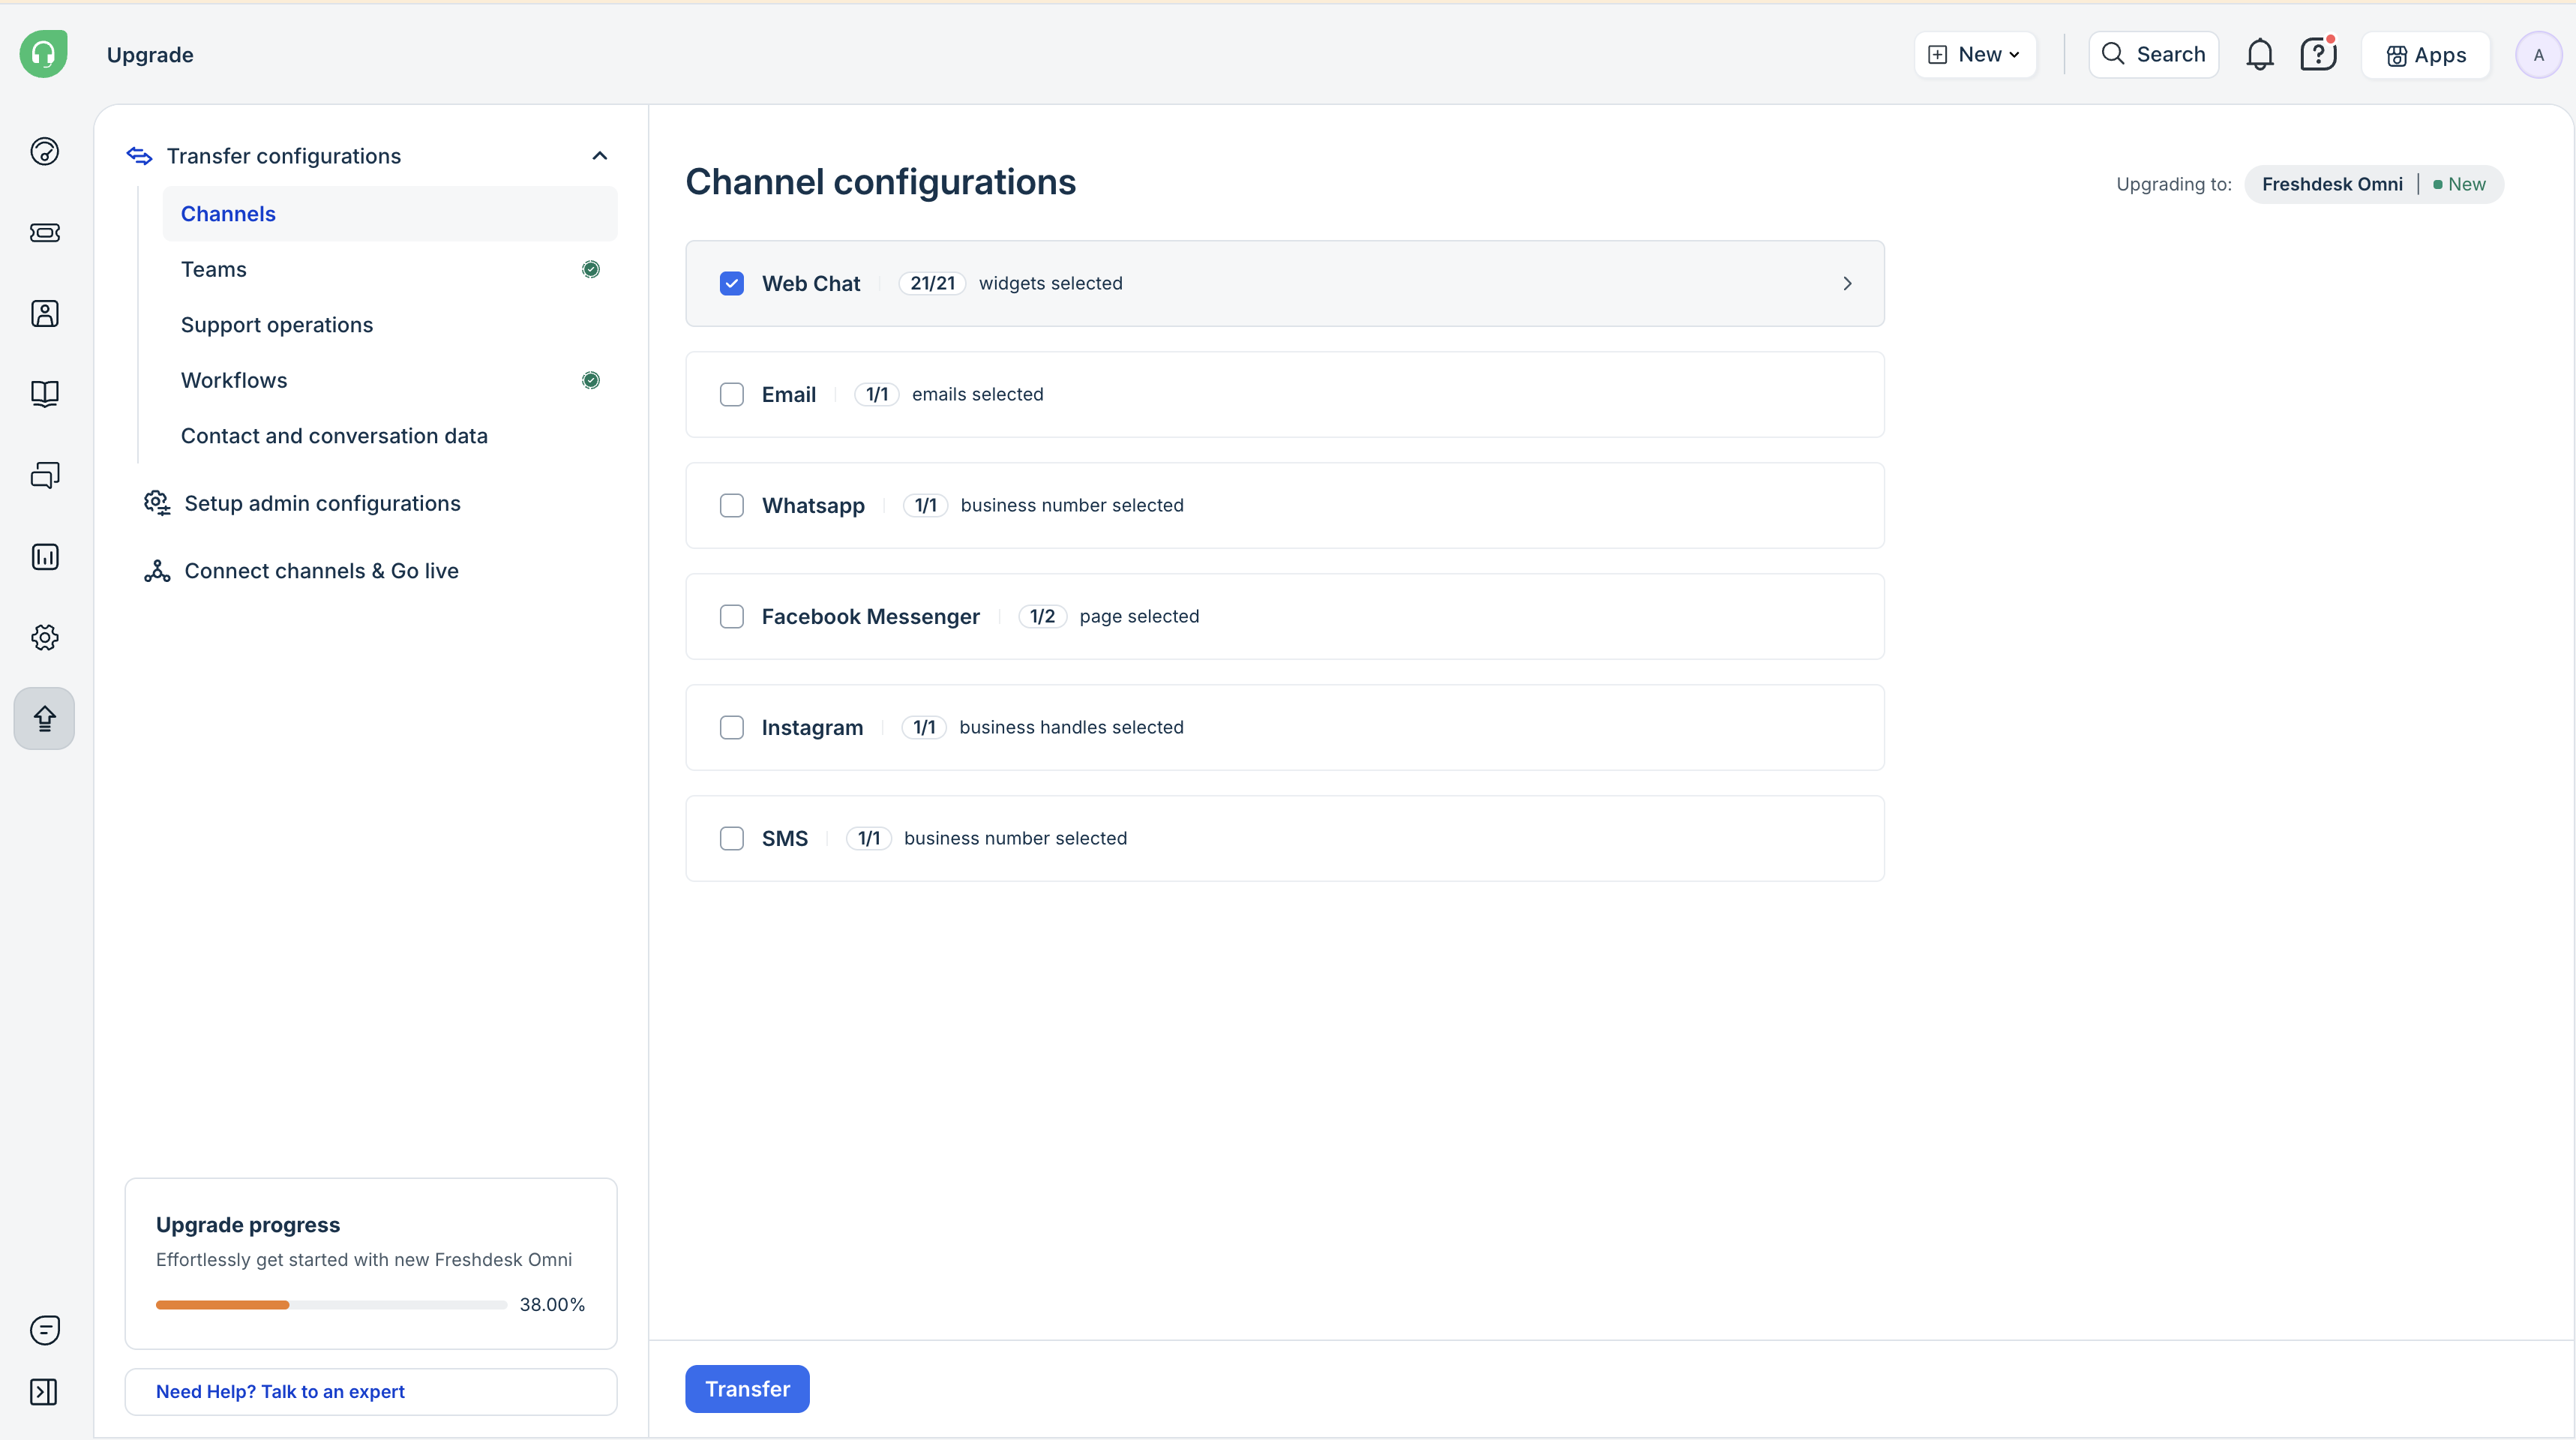
- Review the available web chat widgets and their associated topics.
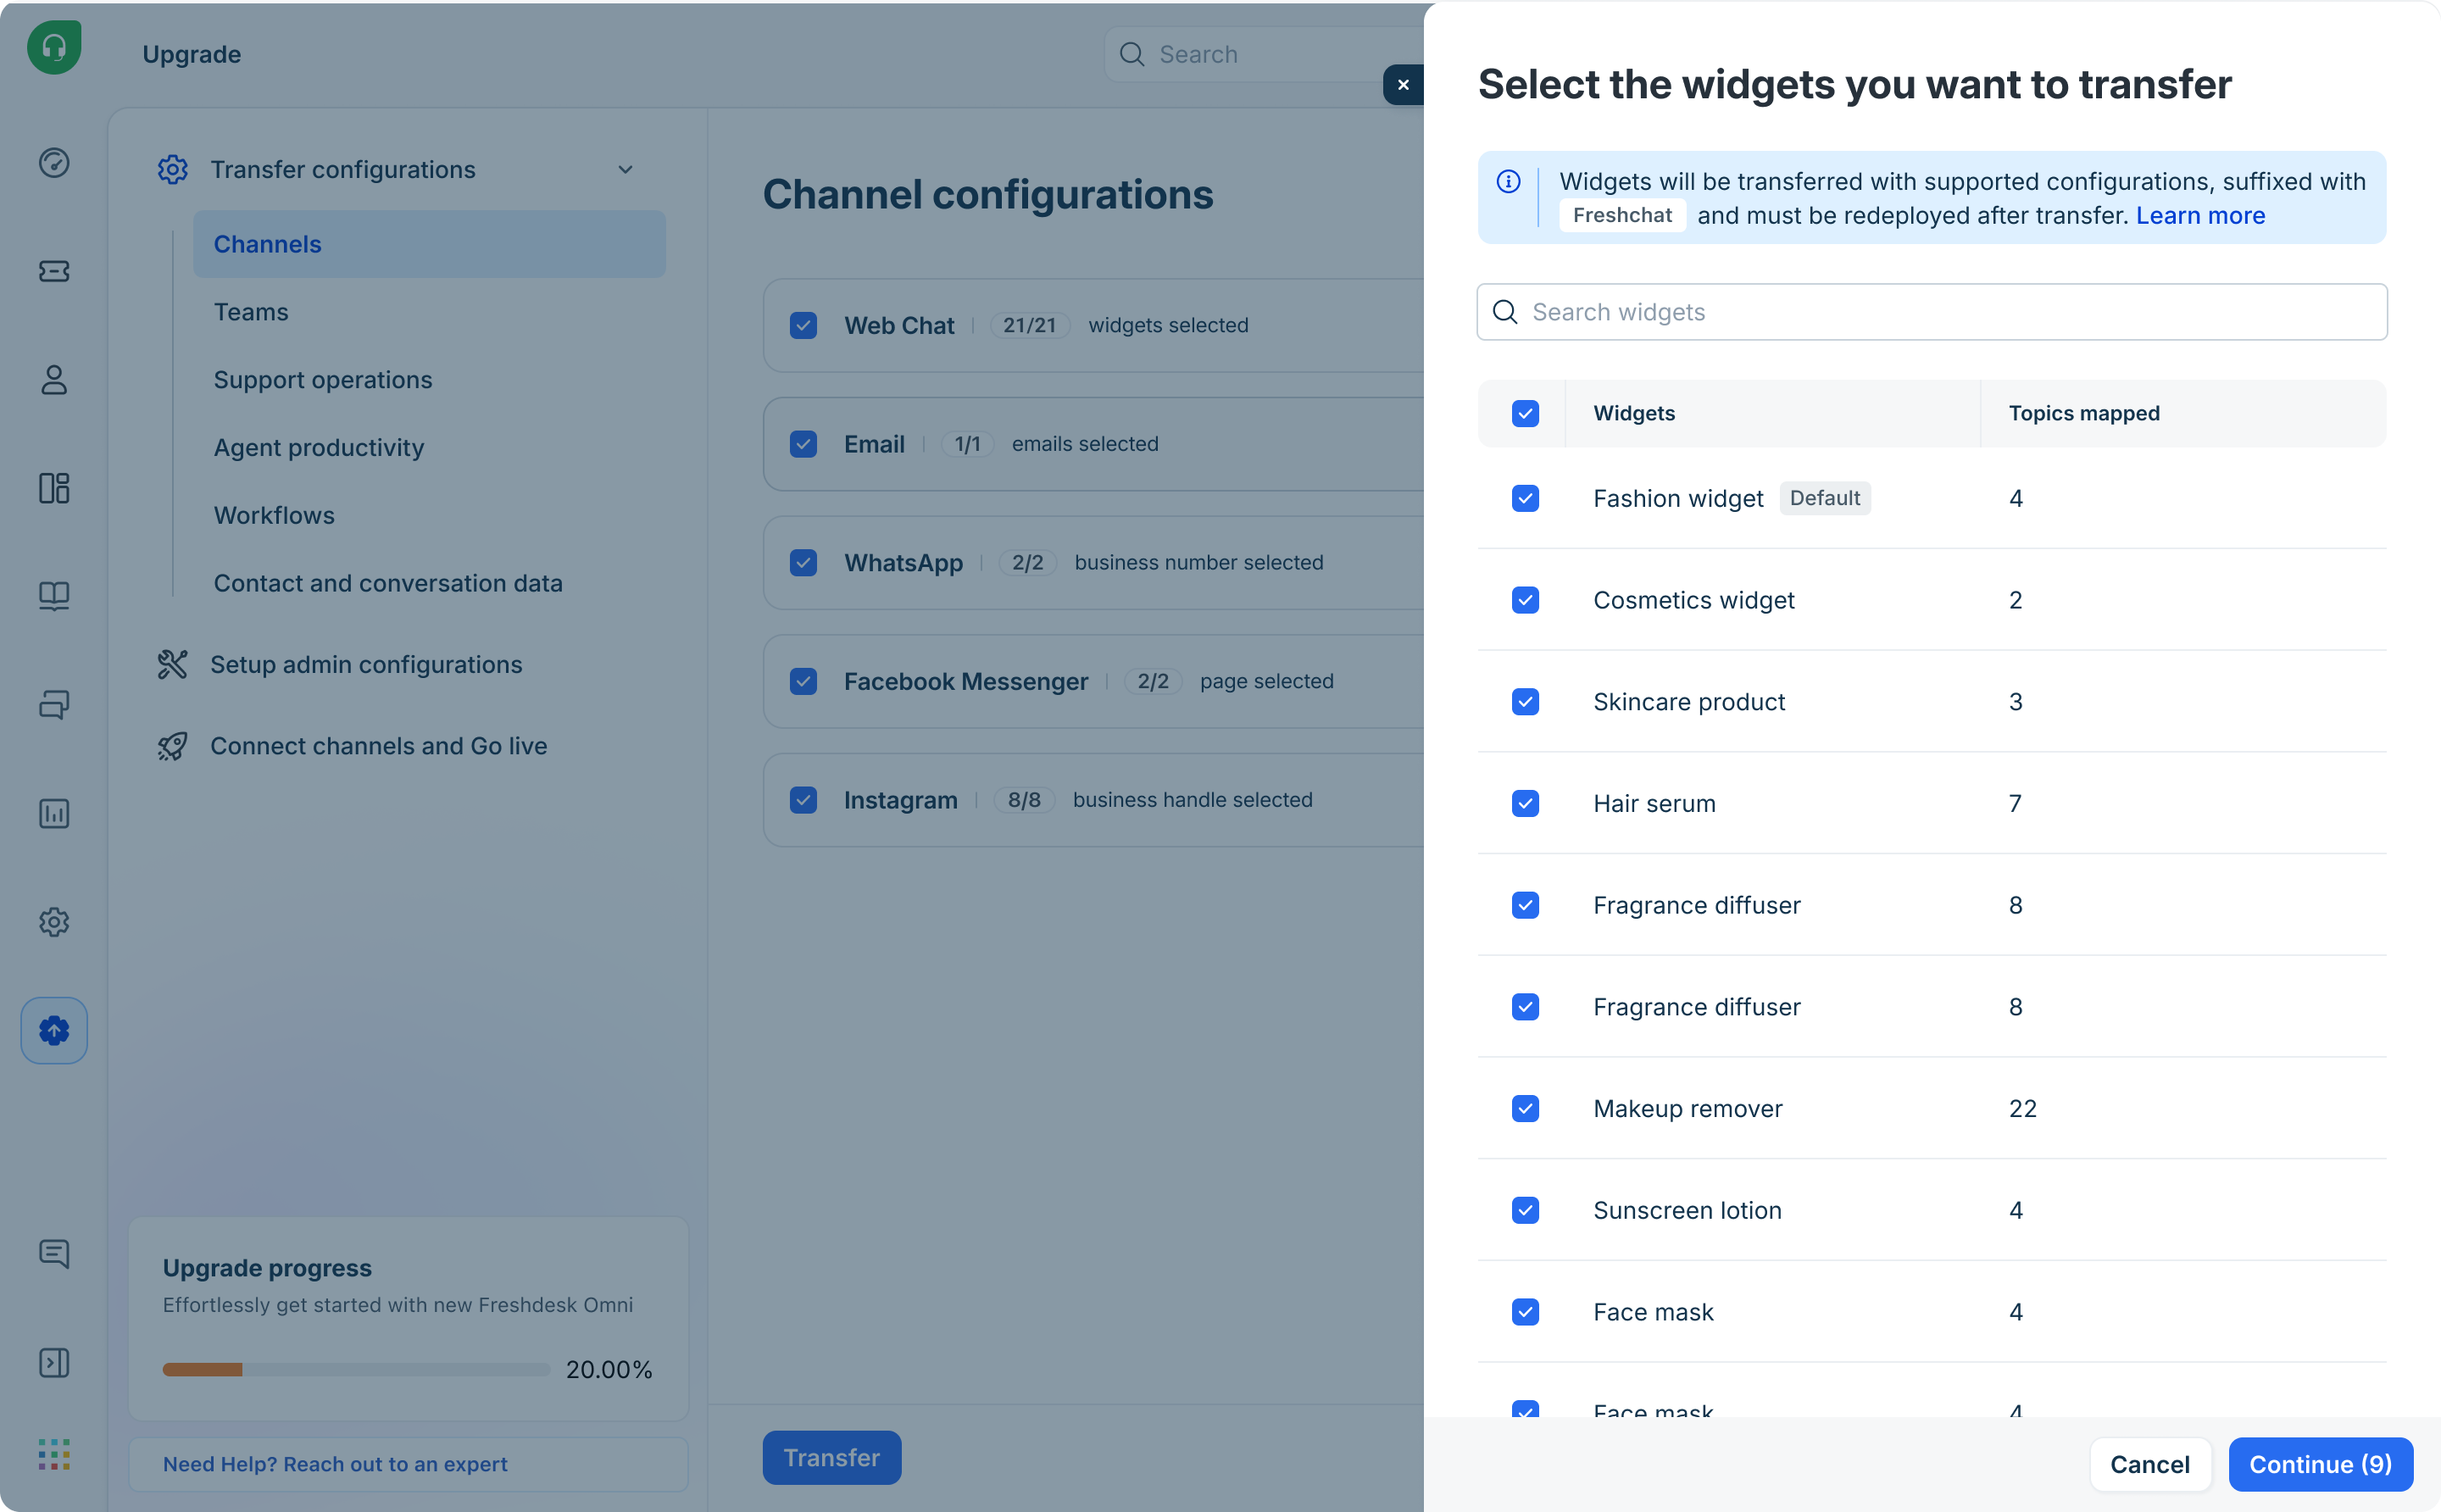
- Select the widgets you want to transfer. You can also search for a specific widget to quickly locate it.
- Click Continue.
- In the upgrade wizard, click Transfer.
After the widgets are transferred, redeploy them in your preferred channels in the upgraded Freshdesk Omni 2025. For details, see Stage 3: Connect channels and go live.
Transfer email channel
Email channel configurations include the email accounts configured in your Freshchat account. Transfer the email accounts you want to continue using in Freshdesk Omni 2025.
Note: The transferred email accounts will be suffixed with the tag "Freshchat".
To transfer email channel configurations:
- In the upgrade wizard, go to Transfer Configurations > Channels.
- Click Email.
Review the available email accounts.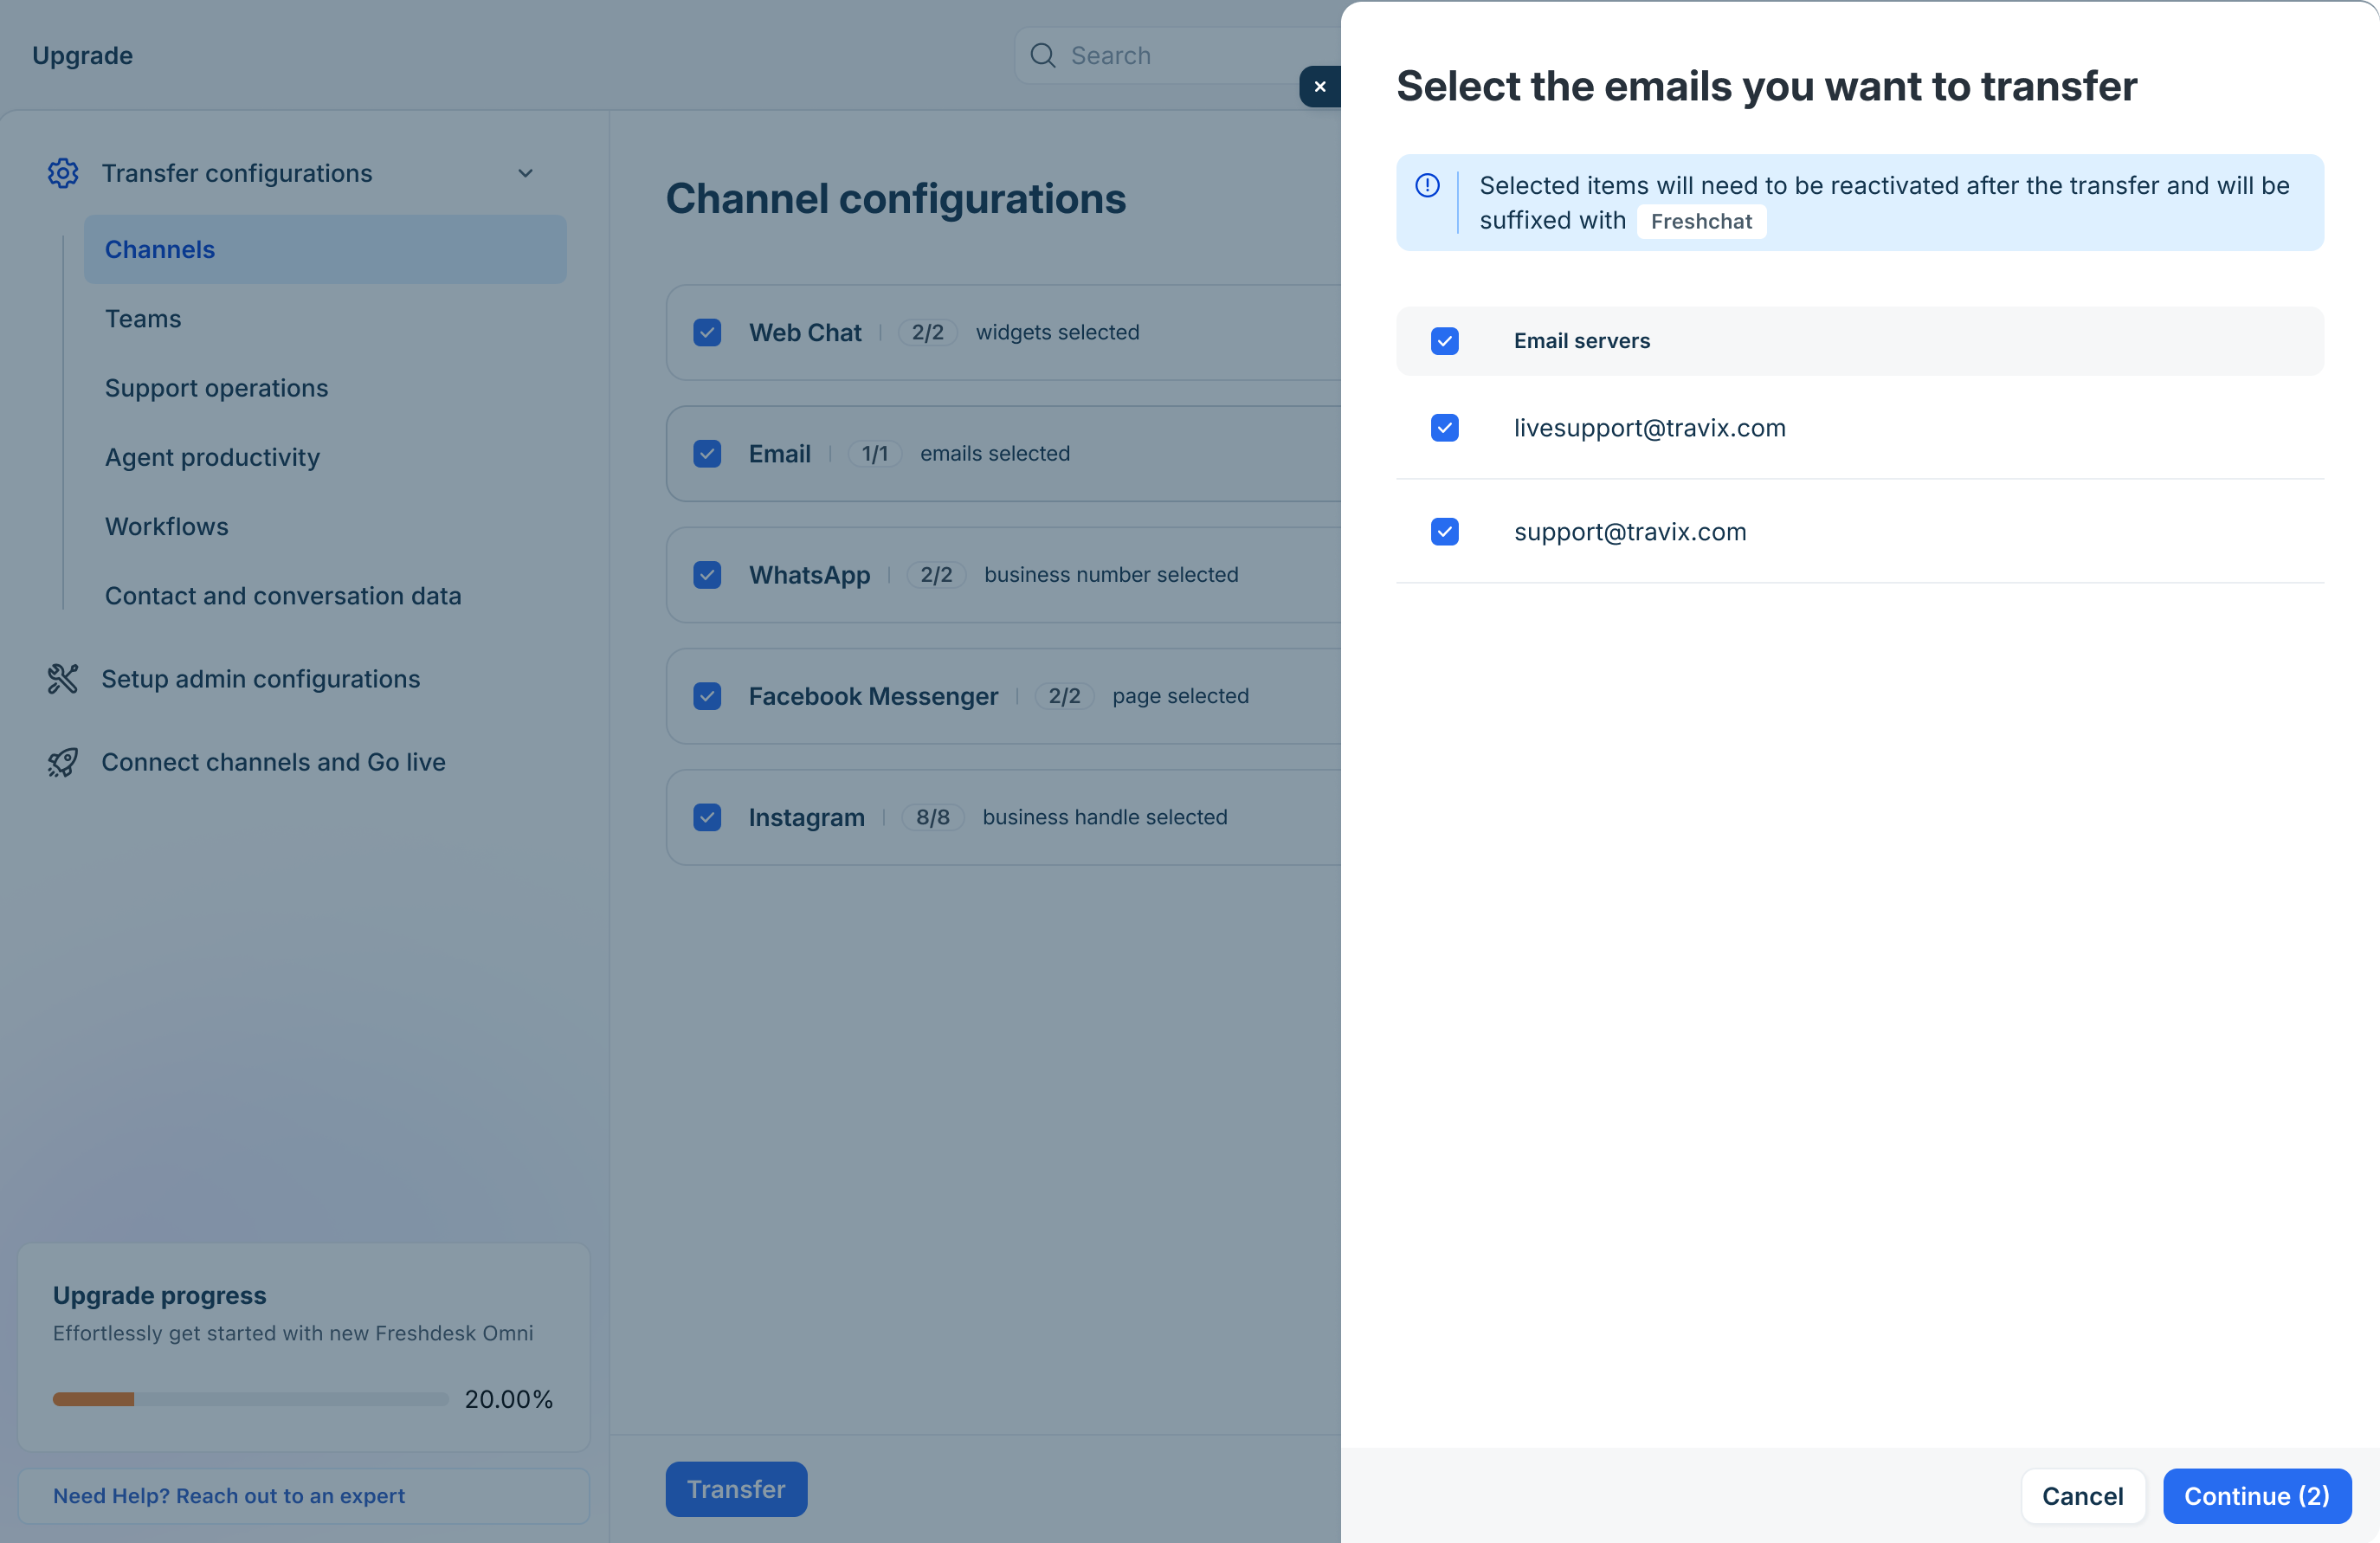
- Select the email accounts you want to transfer.
- Click Continue.
- In the upgrade wizard, click Transfer.
After the email accounts are transferred, verify the email server configuration and reconnect the email channels in Freshdesk Omni 2025. For details, see Stage 3: Connect channels and go live.
Transfer WhatsApp channel configurations
WhatsApp channel configurations include the WhatsApp Business phone numbers connected to your Freshchat account.
To transfer WhatsApp channel configurations:
- In the upgrade wizard, go to Transfer Configurations > Channels.
- Click WhatsApp.
Review the available WhatsApp Business phone numbers.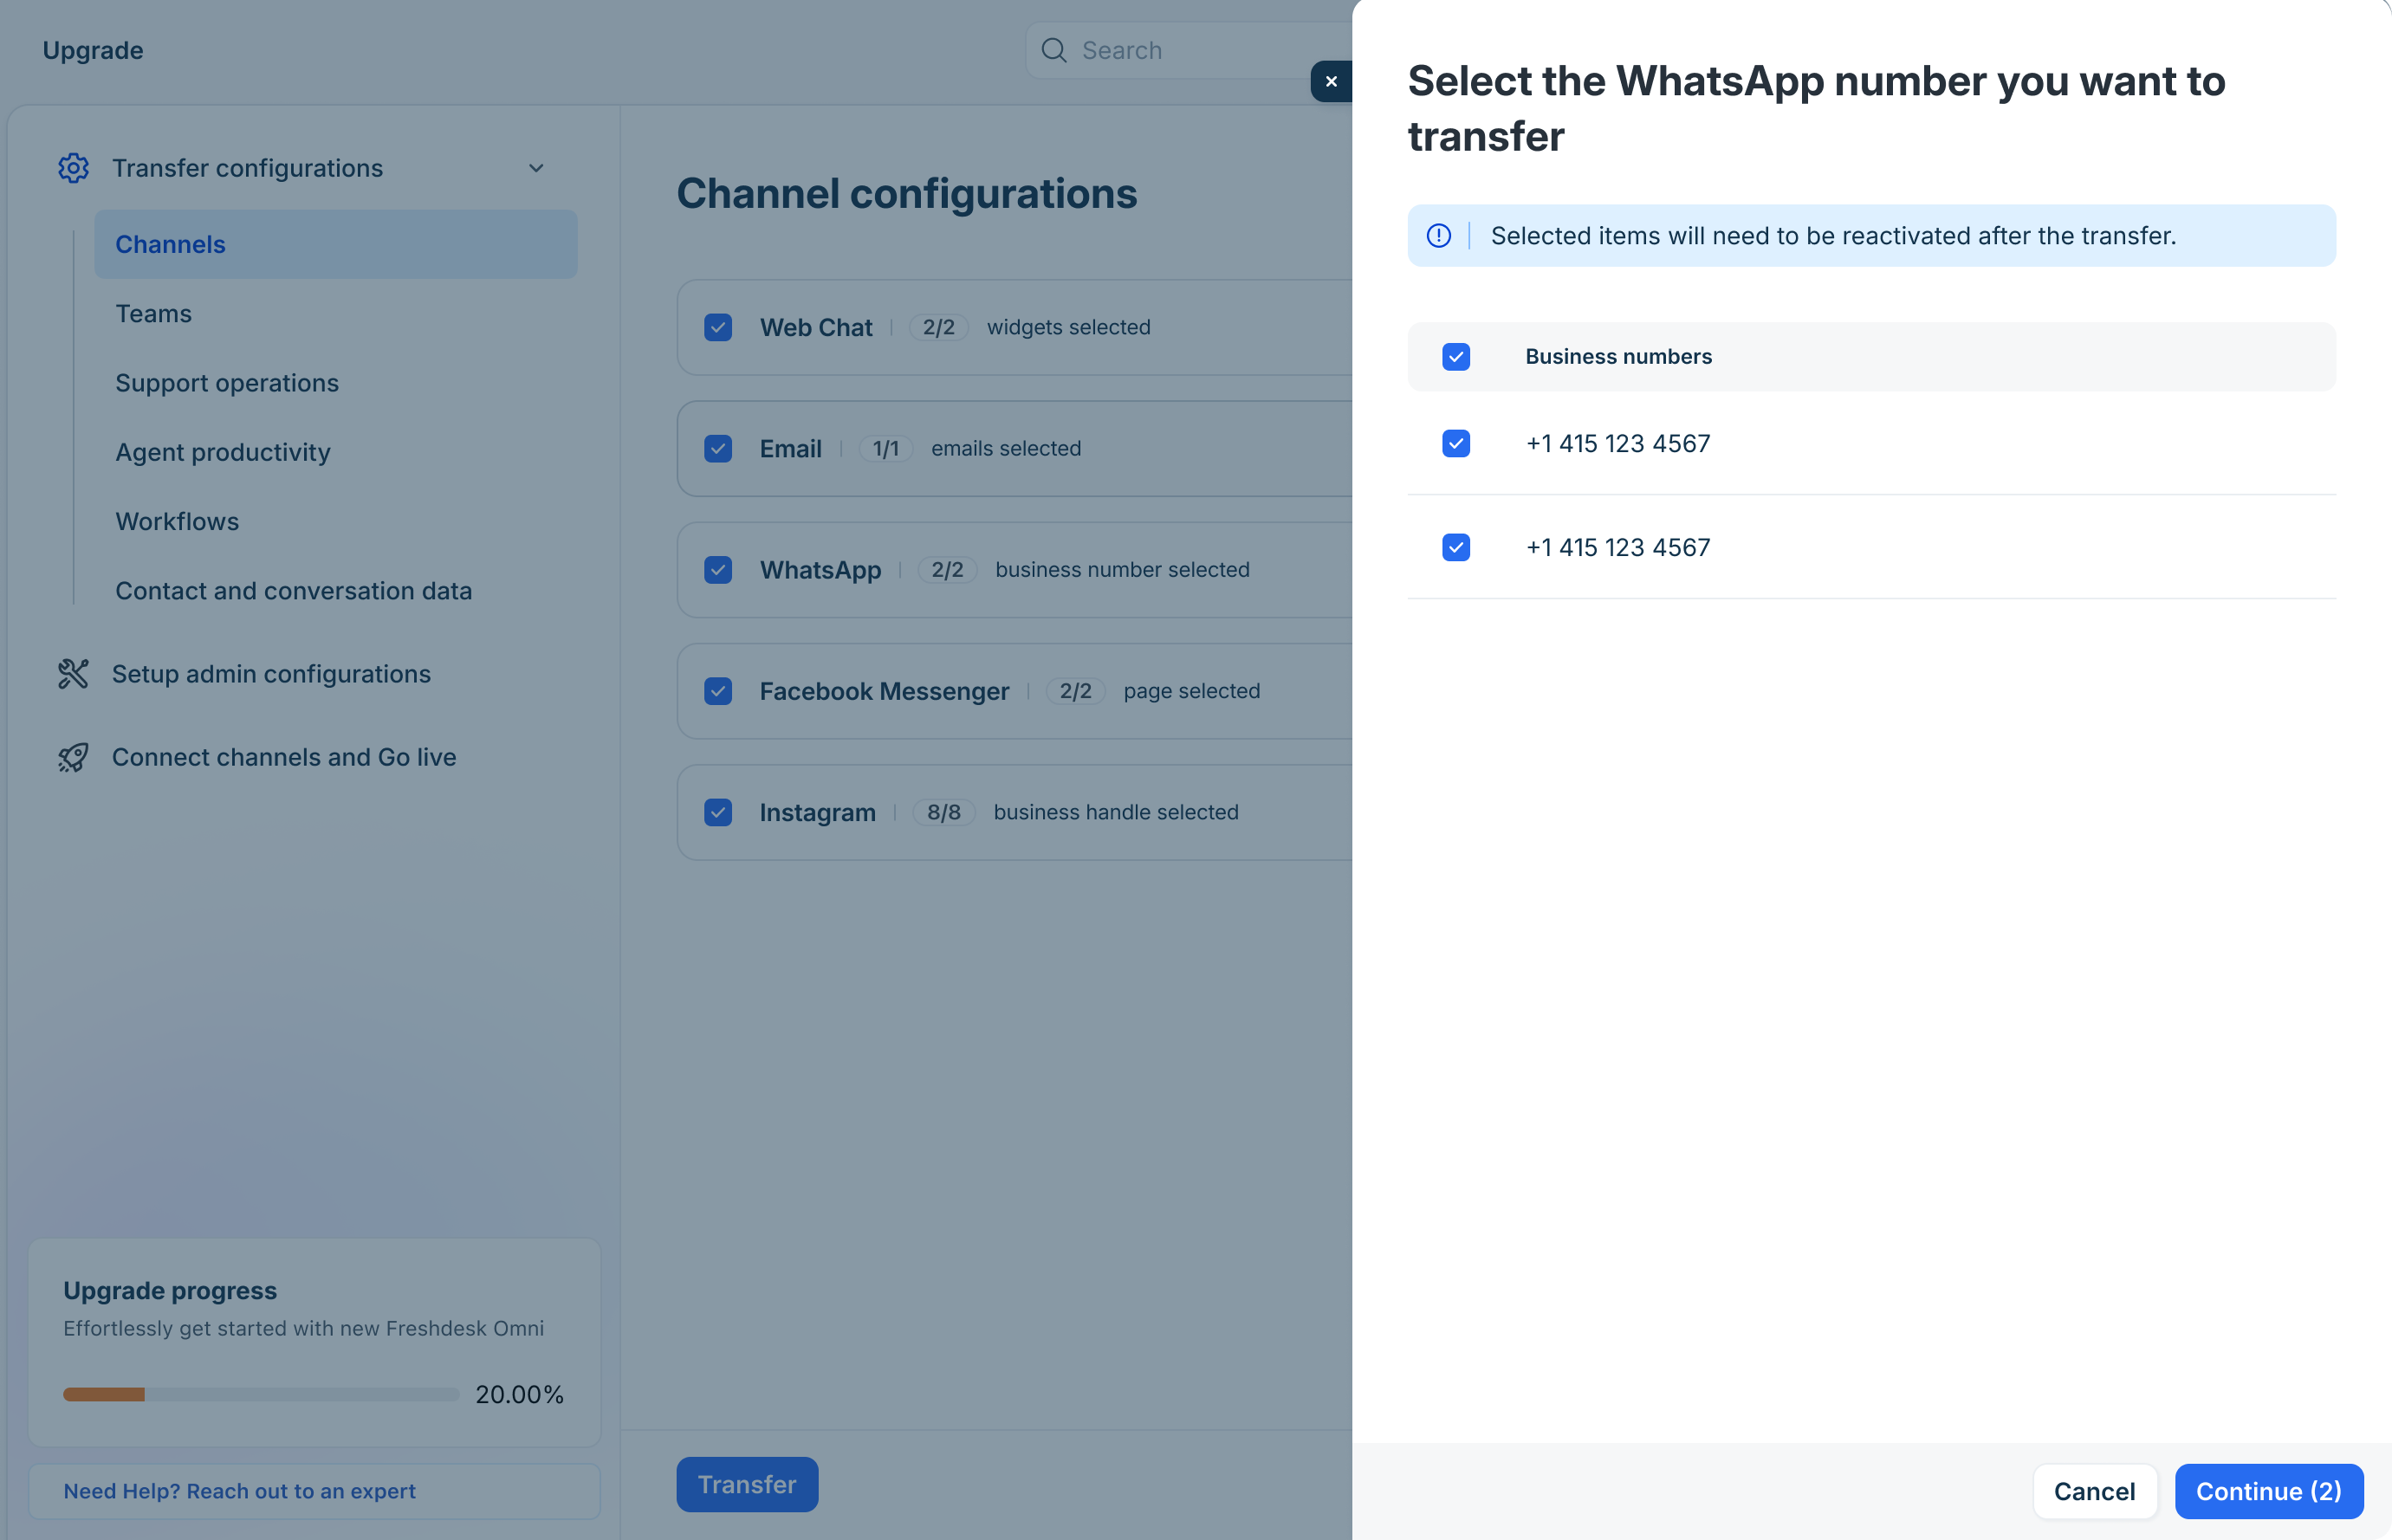
- Select the phone numbers you want to transfer.
- Click Continue.
- In the upgrade wizard, click Transfer.
After the WhatsApp numbers are transferred, reconnect the WhatsApp channels in Freshdesk Omni 2025. For details, see Stage 3: Connect channels and go live.
Transfer Facebook channel configuration
Transfer your Facebook pages to Freshdesk Omni 2025 to continue receiving and managing Facebook conversations after the upgrade.
To transfer Facebook pages:
- In the upgrade wizard, go to Transfer Configurations > Channels.
- Click Facebook Messenger.
Review the connected Facebook pages.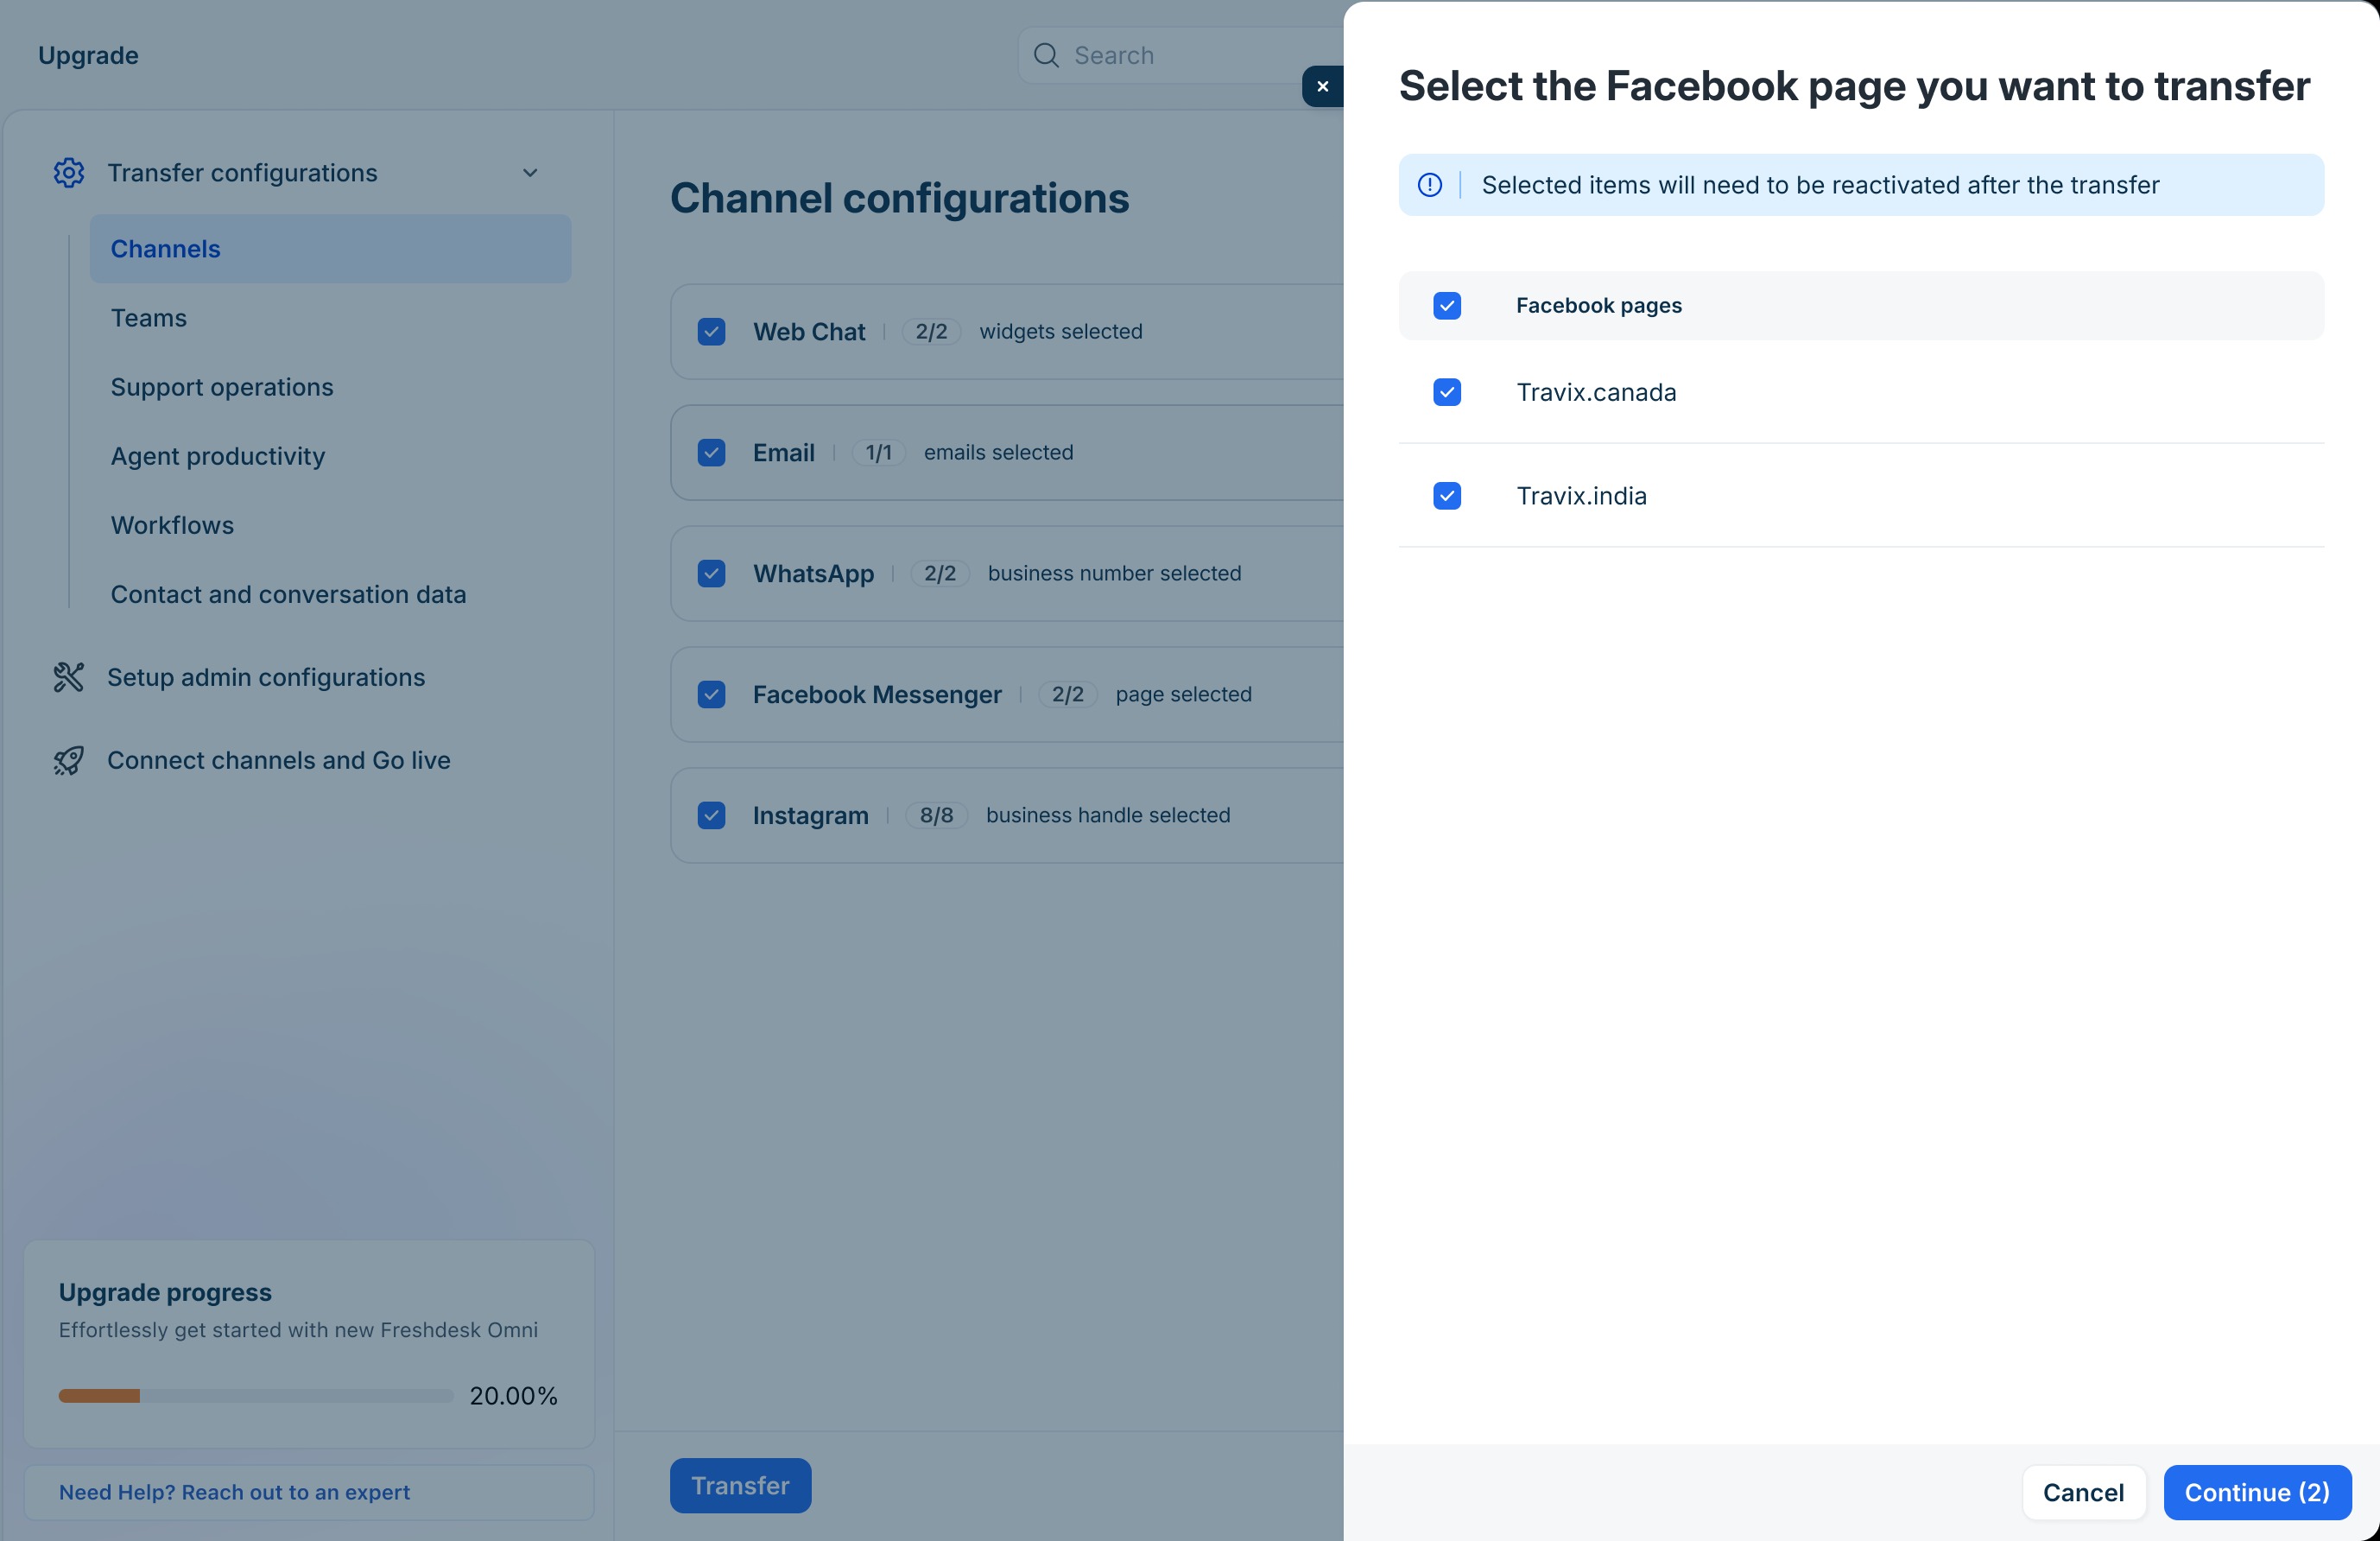
- Select the Facebook pages you want to transfer.
- Click Continue.
- In the upgrade wizard, click Transfer.
After the transfer is complete, reconnect the WhatsApp channels in Freshdesk Omni 2025. For details, see Stage 3: Connect channels and go live.
Transfer Instagram channel configurations
Instagram channel configurations include the Instagram Business accounts connected to your Freshchat account.
Note: The Instagram channel migration applies only to the Freshdesk Omni 2023 (CSS) account.
To transfer Instagram channel configurations:
- In the upgrade wizard, go to Transfer Configurations > Channels.
- Click Instagram.
Review the available Instagram Business accounts.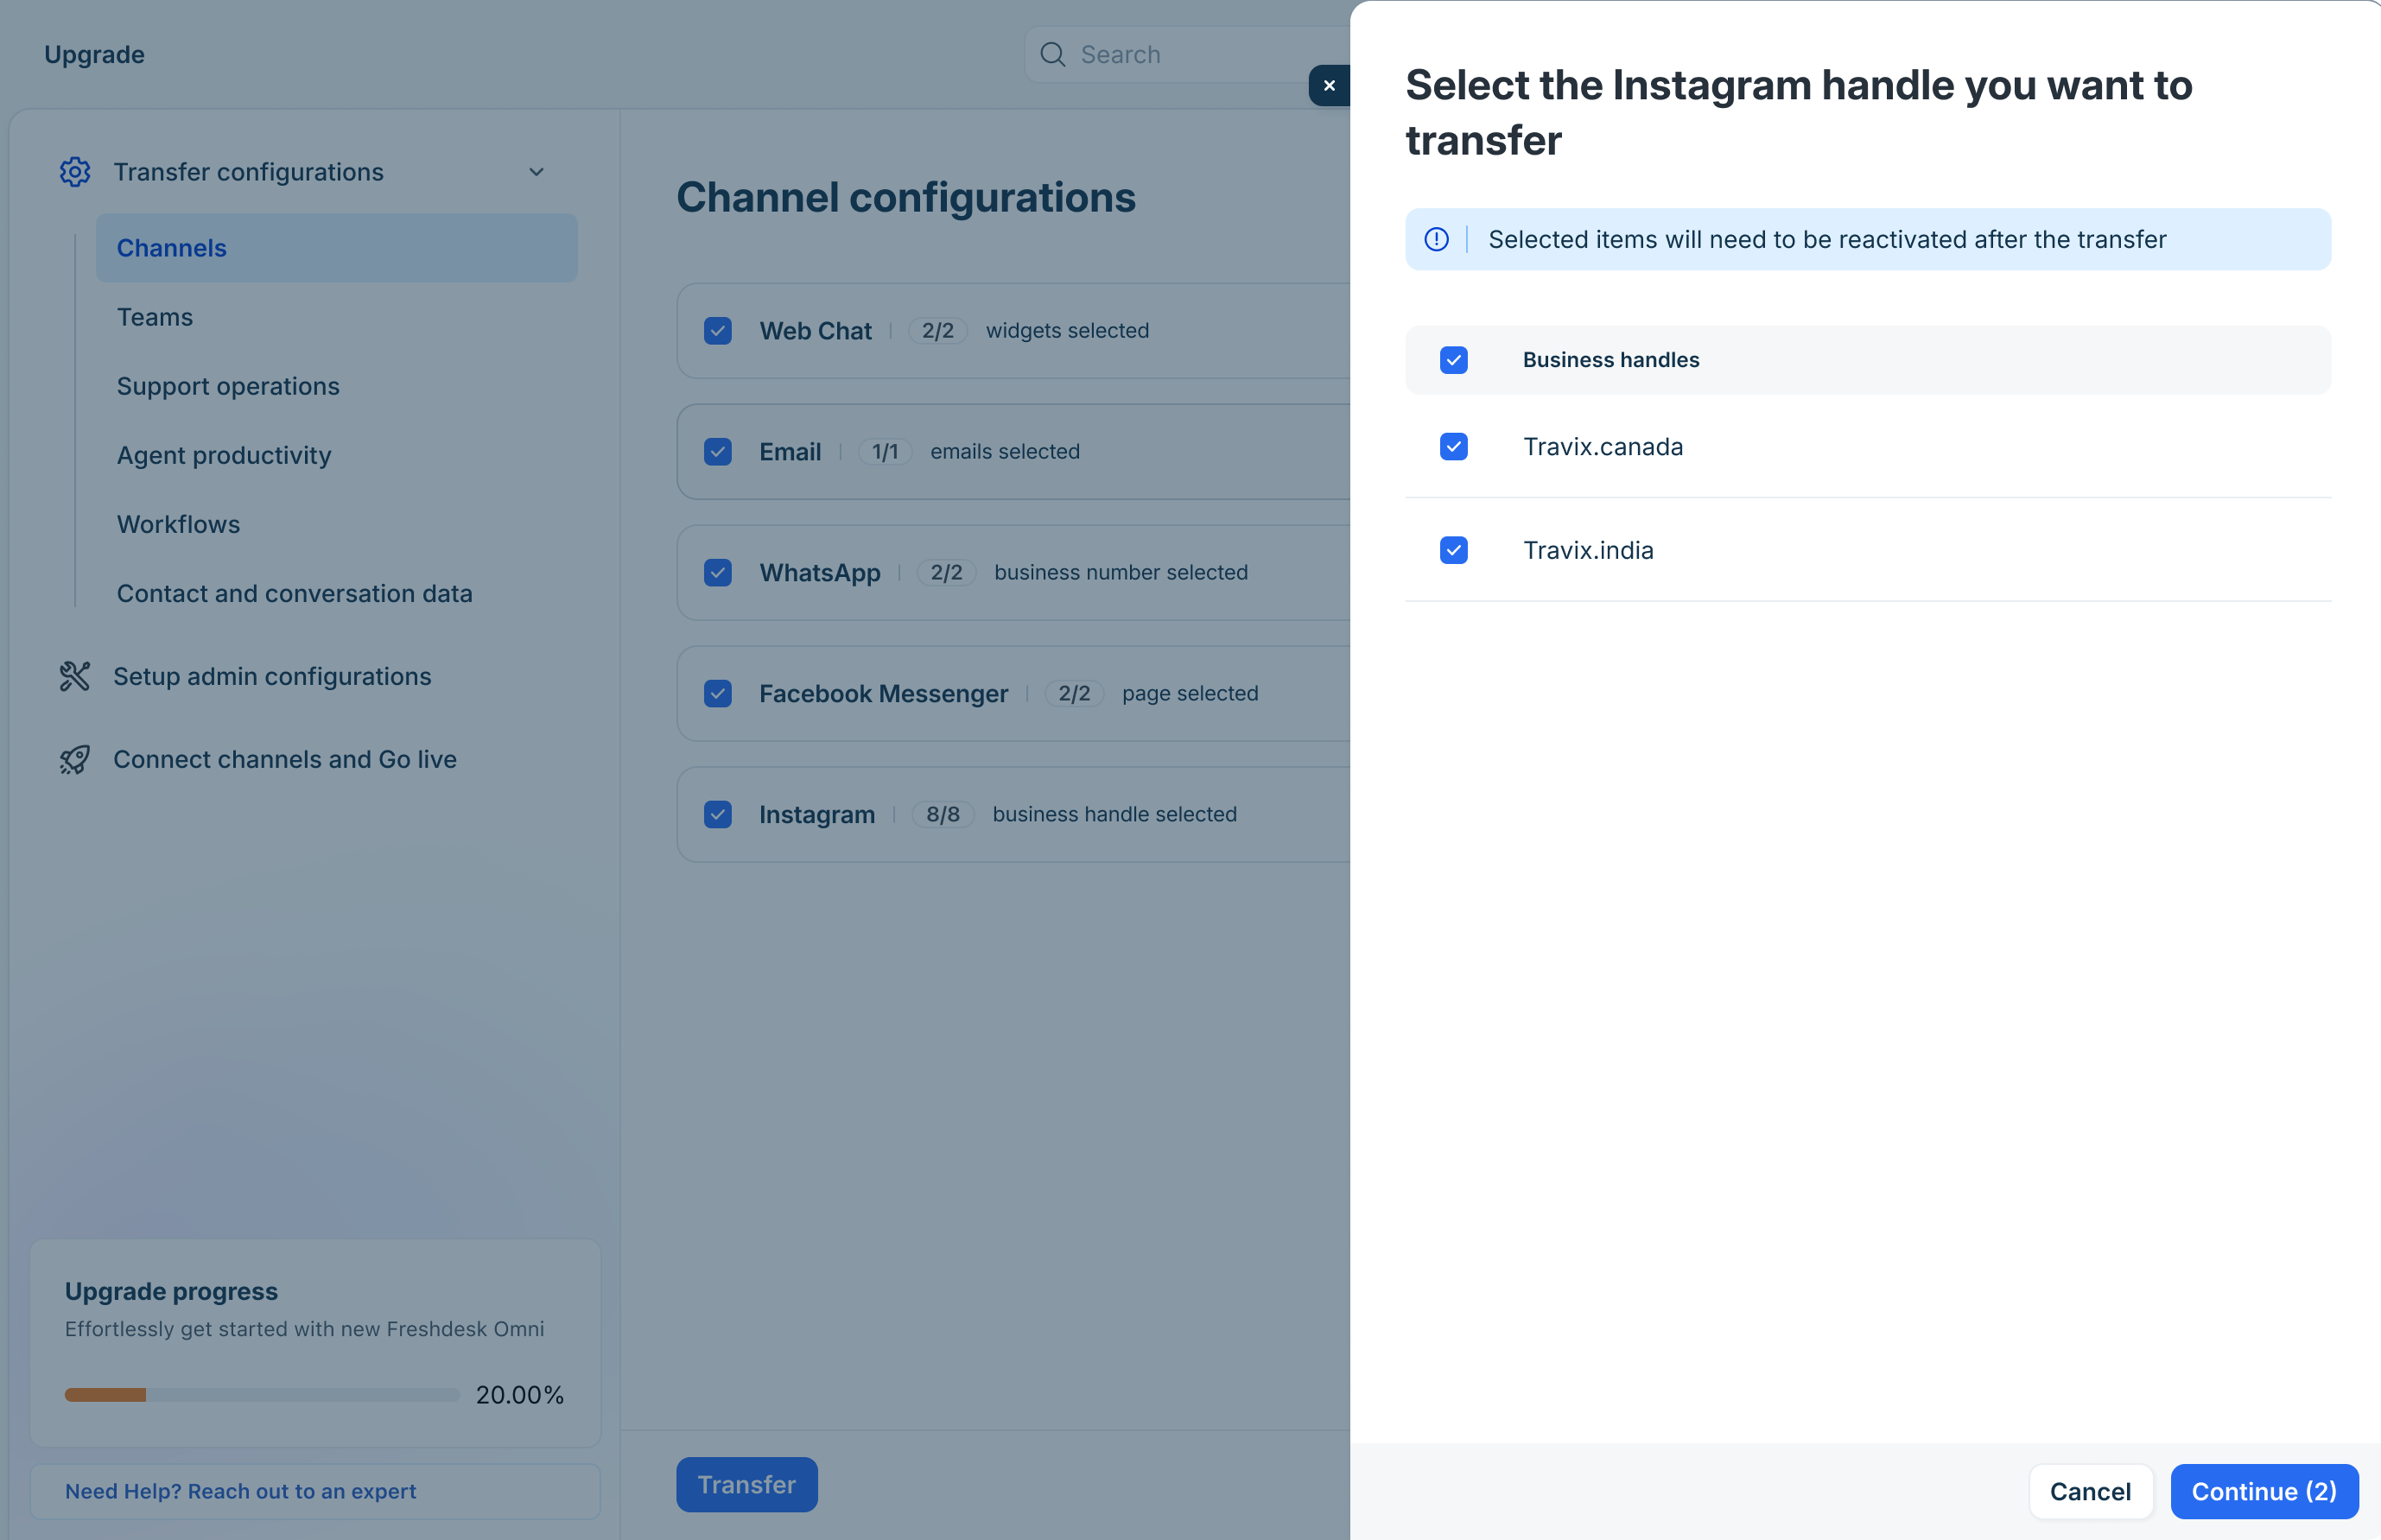
- Select the accounts you want to transfer.
- Click Continue.
- In the upgrade wizard, click Transfer.
After the transfer is complete, reconnect the Instagram channels in Freshdesk Omni 2025. For details, see Stage 3: Connect channels and go live.
Transfer SMS channel configurations
SMS channel configurations include the phone numbers configured in your Freshchat account.
To transfer SMS channel configurations:
- In the upgrade wizard, go to Transfer Configurations > Channels.
- Click SMS.
Review the available phone numbers.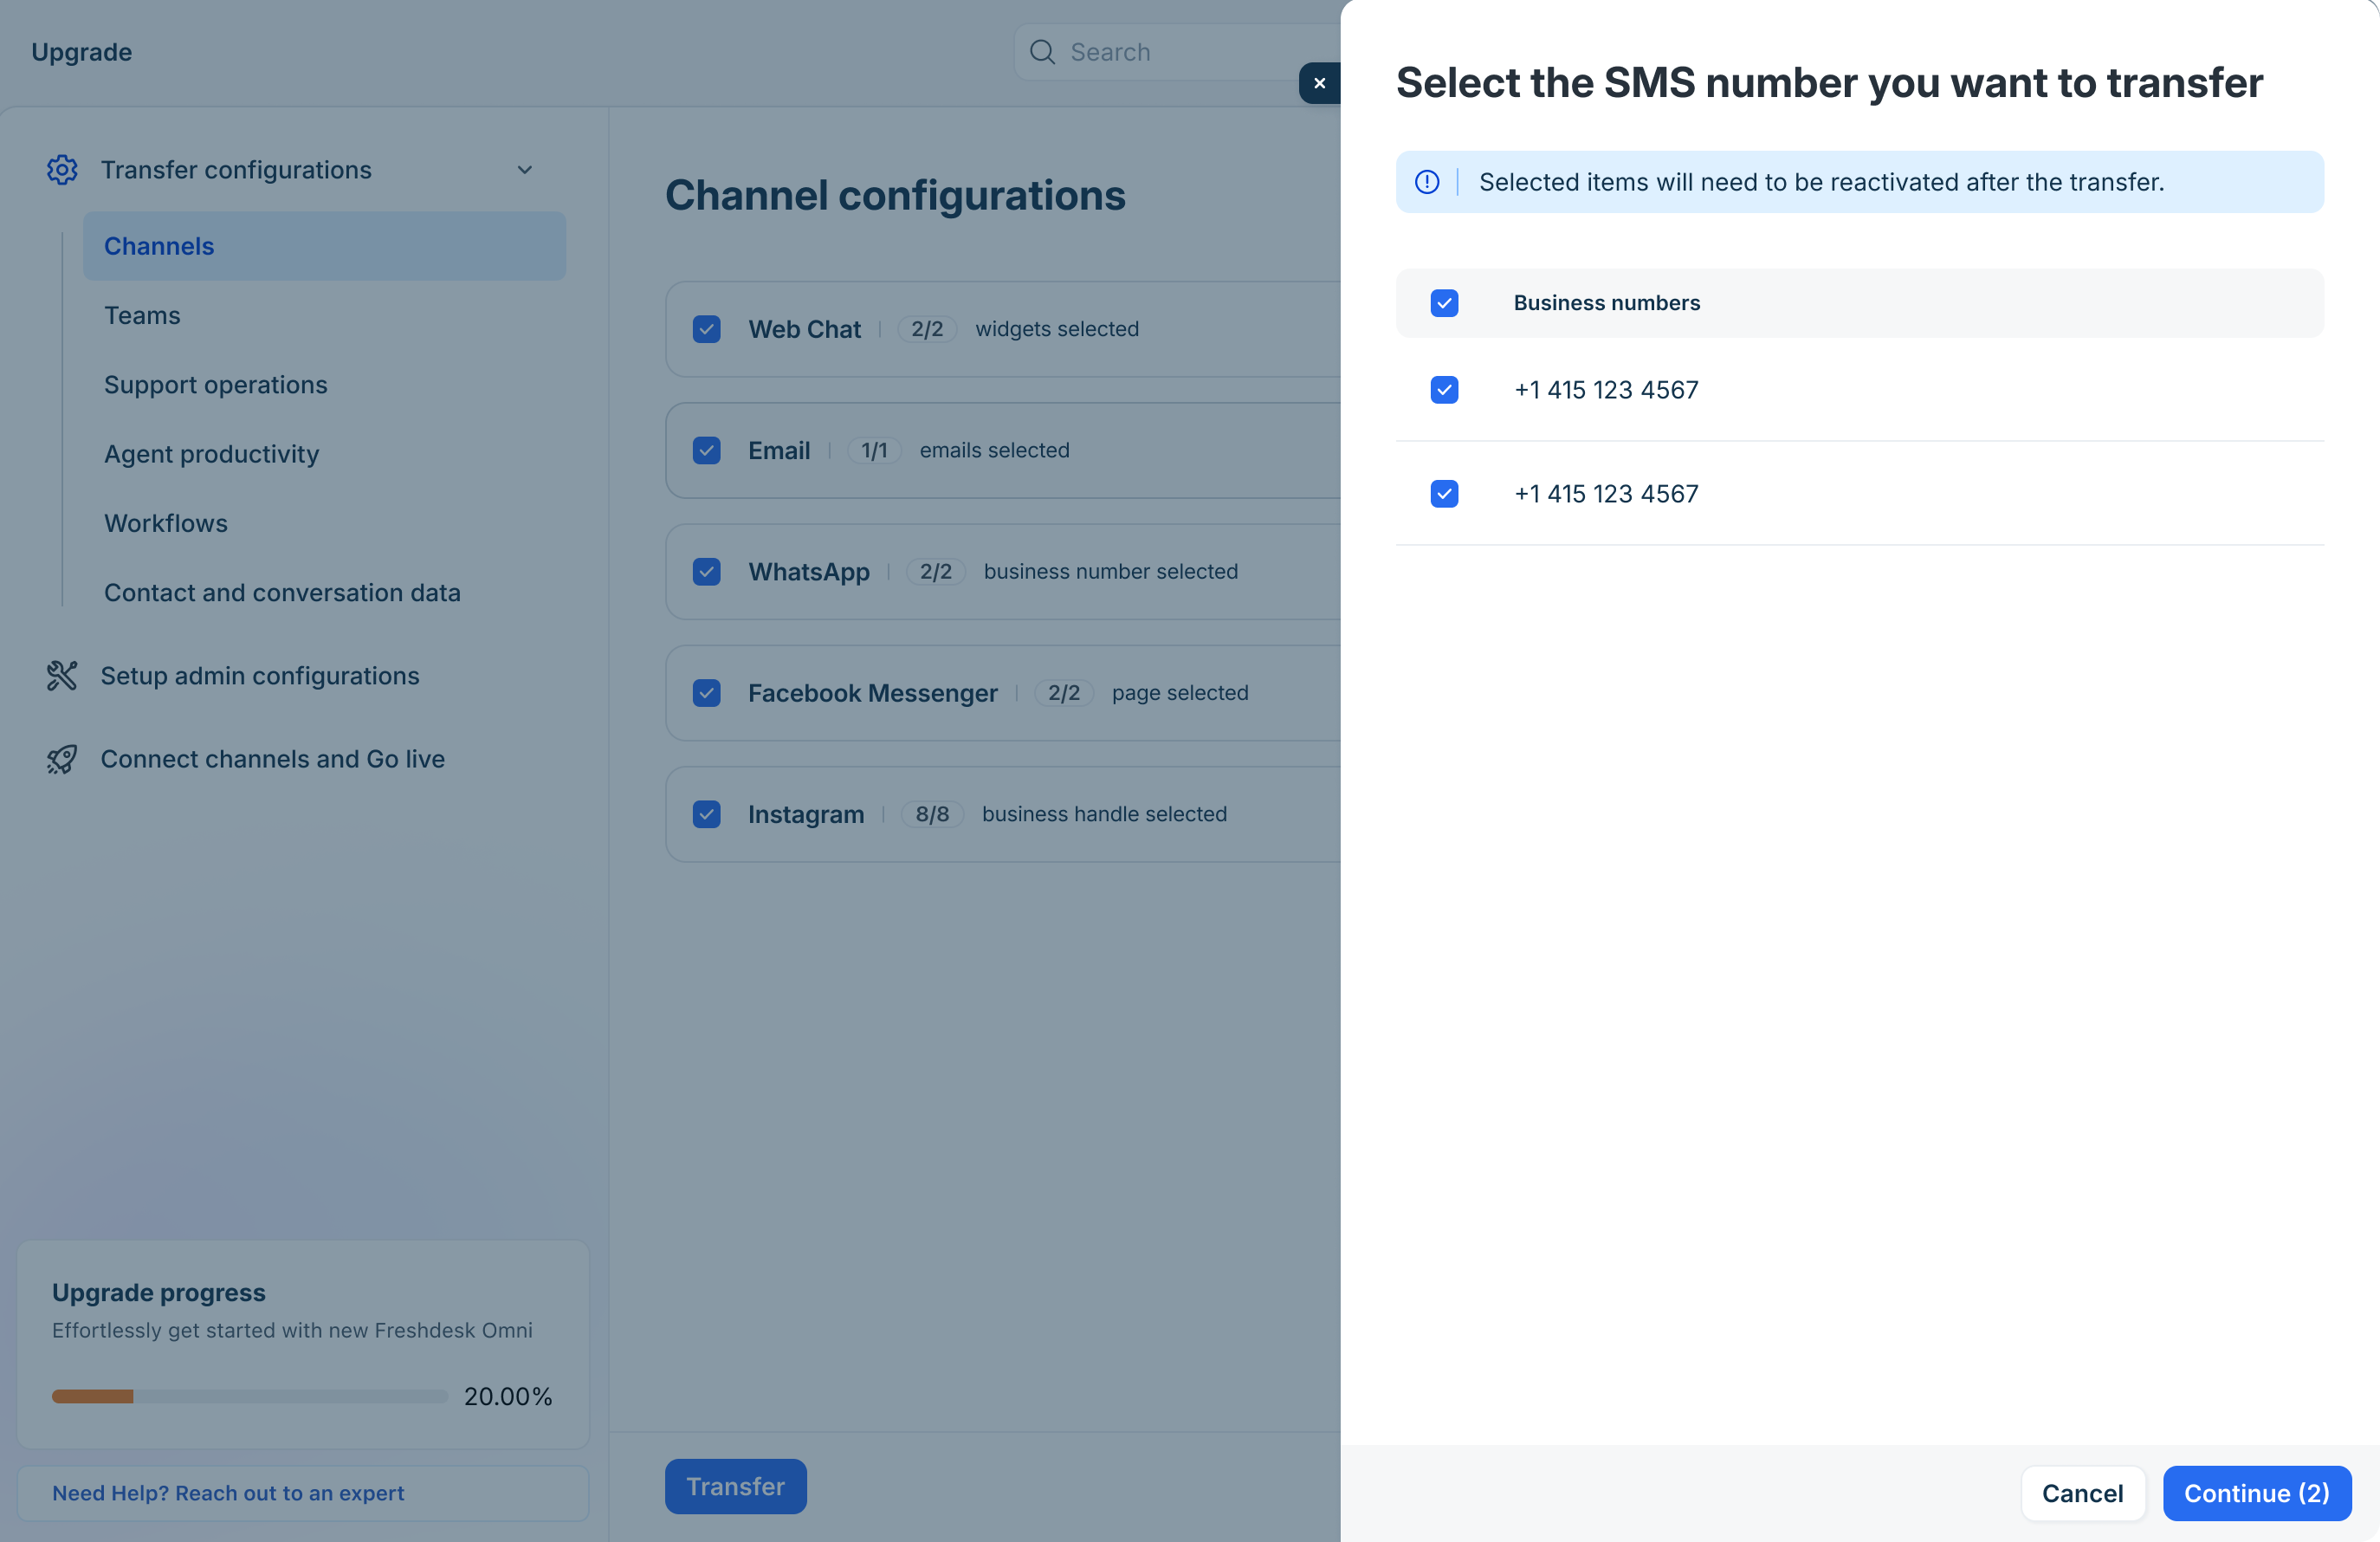
- Select the phone numbers you want to transfer.
- Click Continue.
- In the upgrade wizard, click Transfer.
After the transfer is complete, reconnect the SMS channels in Freshdesk Omni 2025. For details, see Stage 3: Connect channels and go live.
Transfer team configurations
Team configurations include the users, roles, and team structure that support your customer service operations. During this stage, you can transfer these configurations to Freshdesk Omni 2025 to retain your existing team setup.
The following sections explain how to transfer each team configuration:
- Roles
- Agents
- Groups
- Business hours
- Skills
- Agent status
Map roles
Map each Freshchat role to an equivalent role in Freshdesk Omni 2025 to ensure agents retain the appropriate permissions after the upgrade. Role mapping is required before you can transfer agent accounts to Freshdesk Omni 2025. Hence, review the role mappings carefully to ensure agents can retain the appropriate permissions and access after the upgrade.
The following table lists the default role mappings:
Freshchat role | Freshdesk role |
Account admin | Account administrator |
Administrator | Administrator |
Note: Multiple Freshchat roles can be mapped to the same Freshdesk Omni role.
To map roles:
- In the upgrade wizard, go to Transfer Configurations > Teams.
- Click Map roles next to Roles.
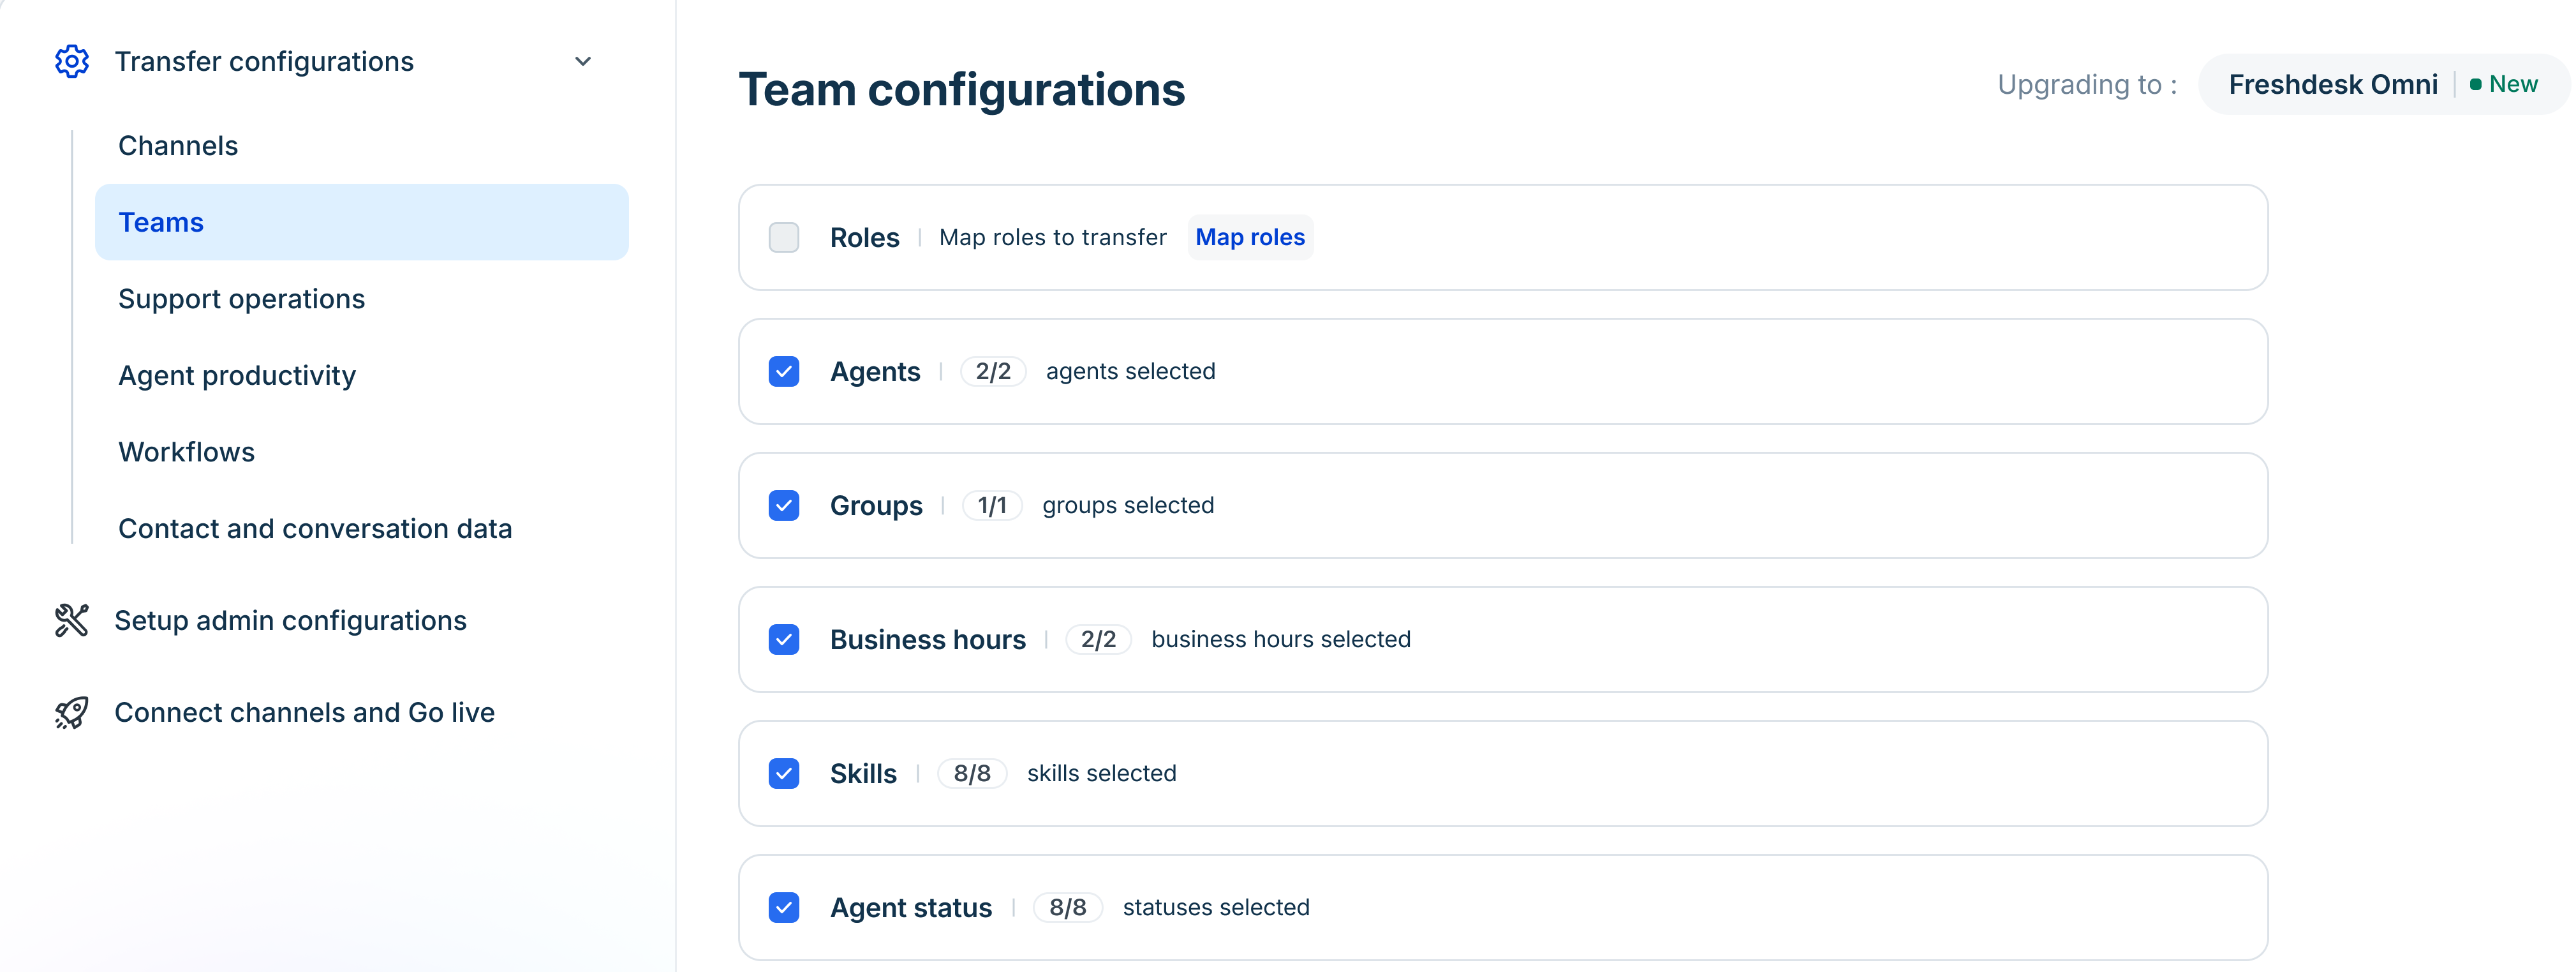
- Review the default role mappings between Freshchat and Freshdesk Omni.
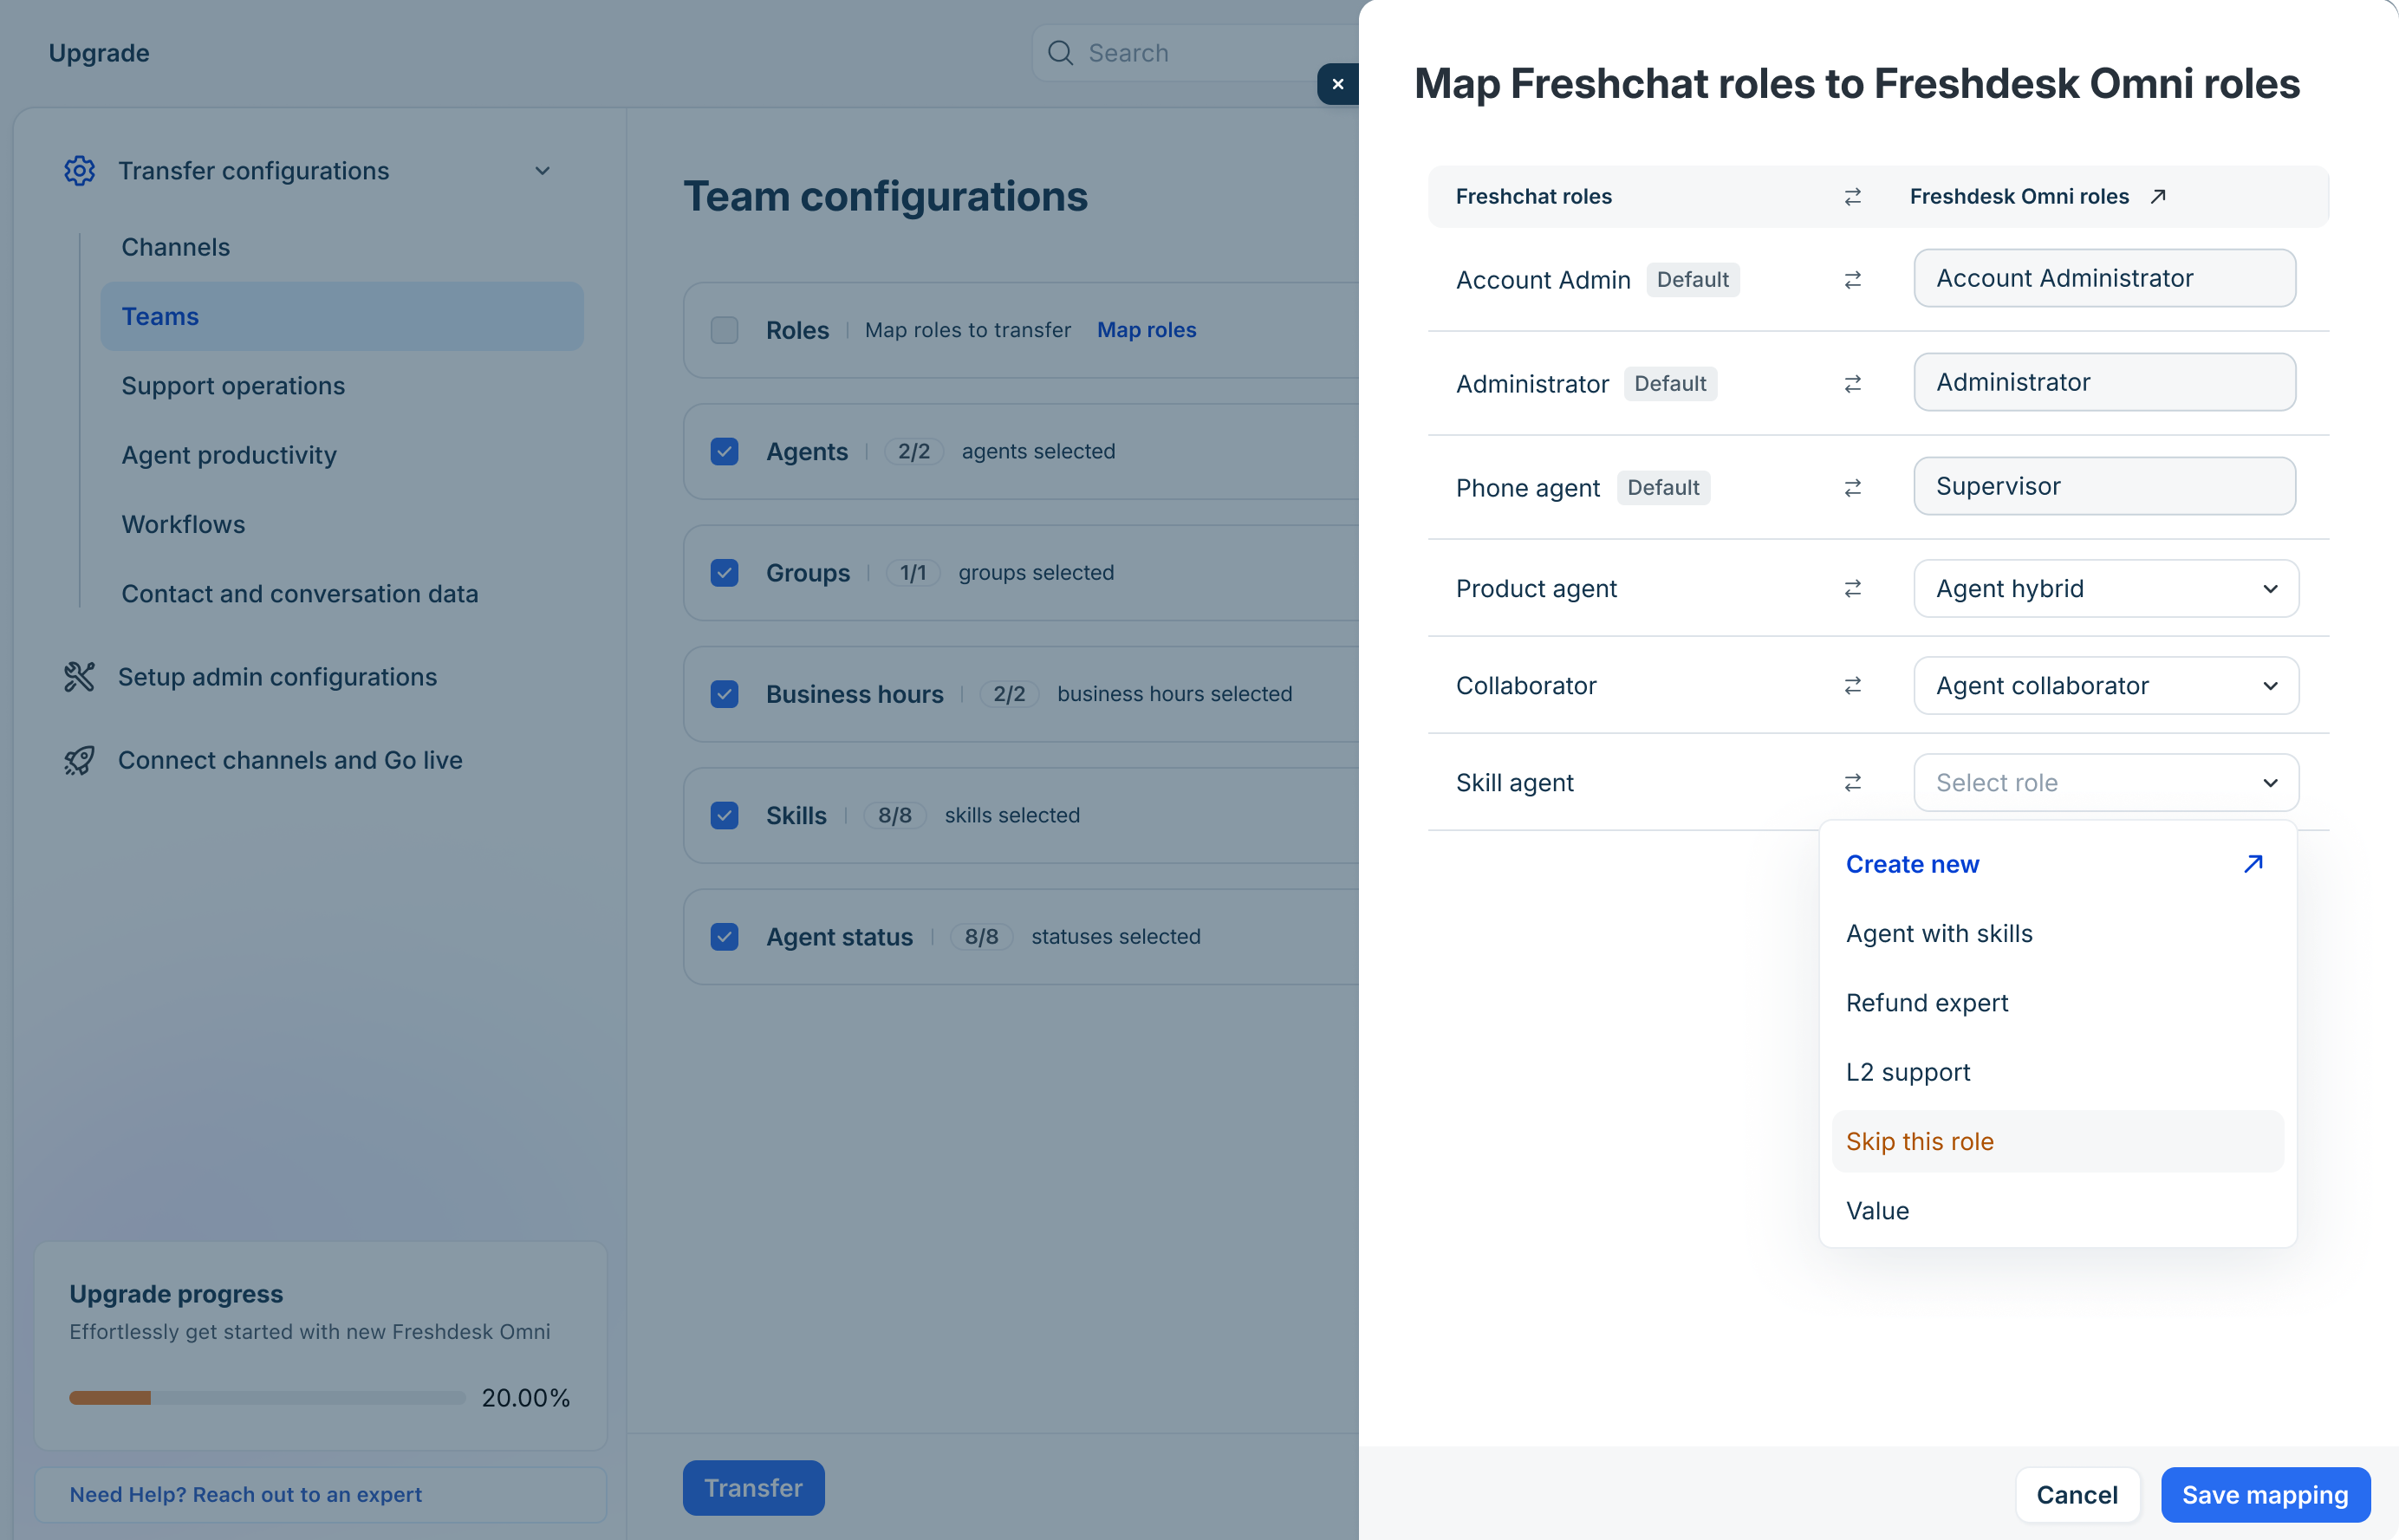
- For any unmapped role, select the appropriate Freshdesk Omni role from the list.
- If the required Freshdesk Omni role does not exist, do the following:
- Click Create new to open the Freshdesk Omni Agent Roles page in a new tab.
- Create a new role and return to the upgrade wizard.
- Click on the drop-down again to view the newly created role.
Note: To exclude a Freshchat role from the migration, select Skip this role from the role list.
- Click Save mapping.
- In the upgrade wizard, click Transfer.
Transfer agents
Transfer your existing agents to Freshdesk Omni 2025 to retain your support team. While transferring agents, you can also configure the default ticket visibility for each agent in Freshdesk Omni.
Important: Before transferring agents, ensure that all required Freshchat roles are mapped to the appropriate Freshdesk Omni roles. Agents with unmapped roles cannot be selected for transfer.
To transfer agents:
- In the upgrade wizard, go to Transfer Configurations > Teams.
- Click Agents.
Review the list of available agents.
Note: Agents already present in Freshdesk Omni are not listed here.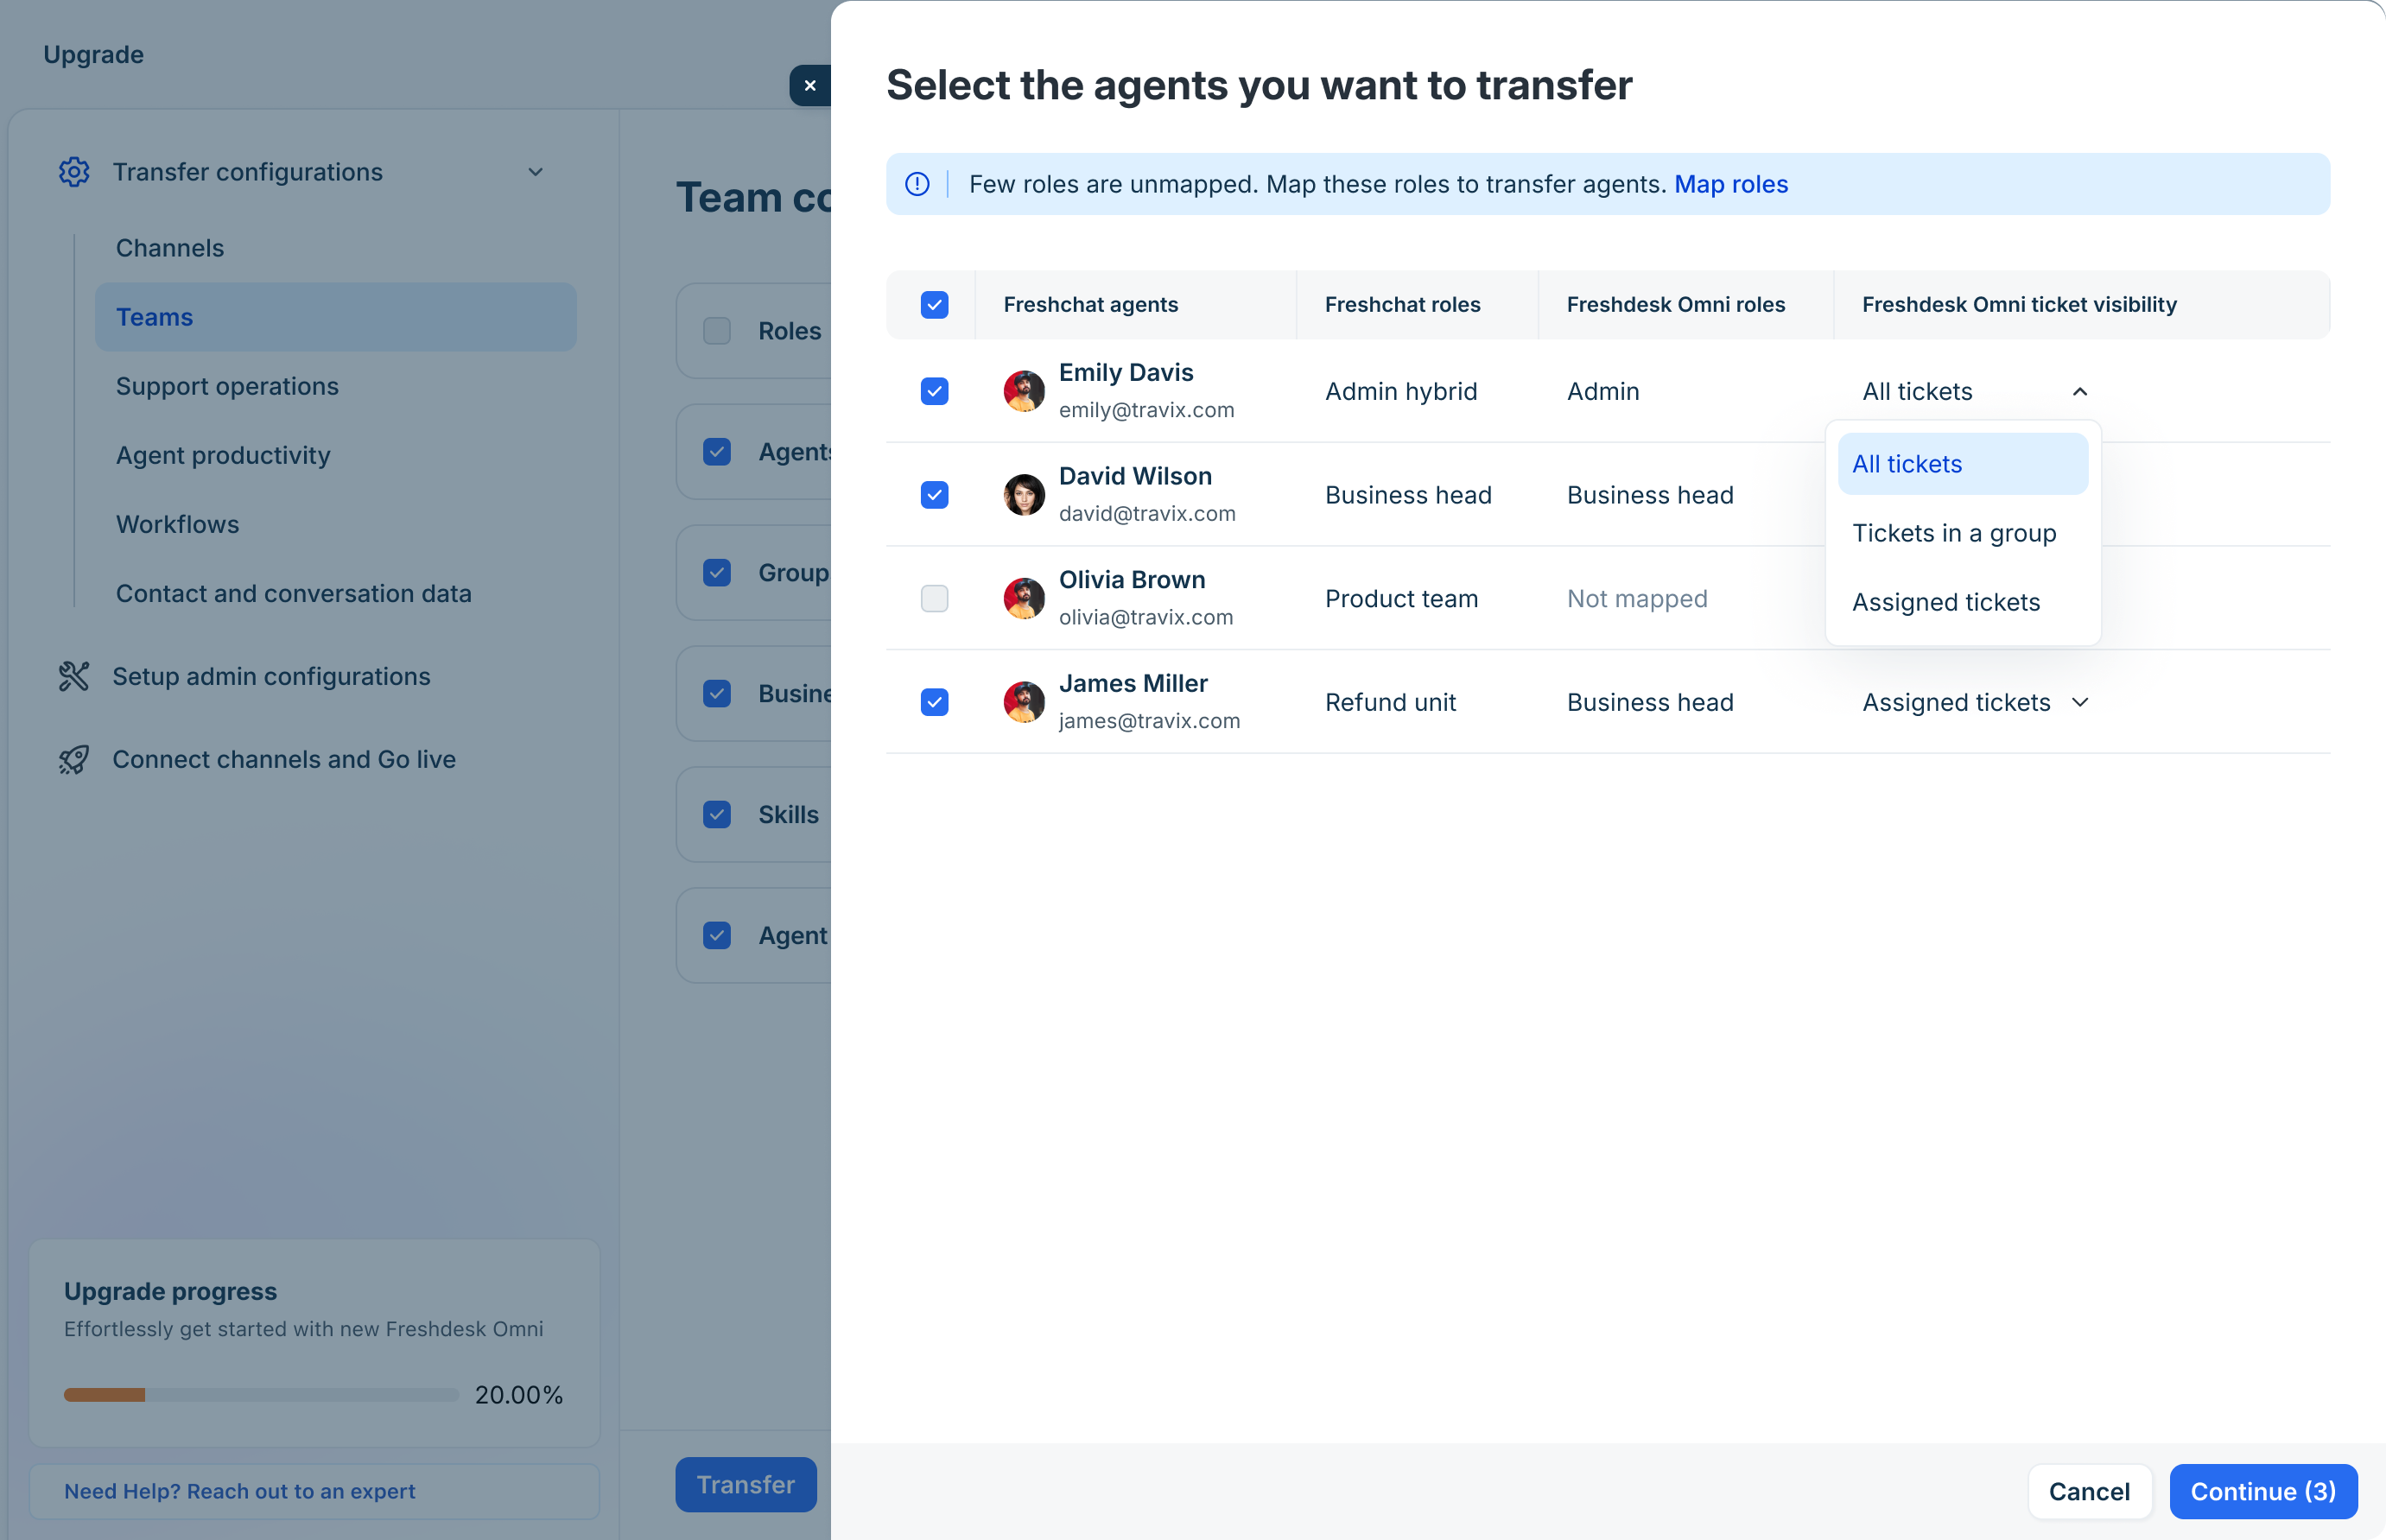
- If an agent's Freshchat role is not mapped, click Map roles and map the role to a corresponding Freshdesk Omni role.
- Select the agents you want to transfer.
- For each selected agent, choose the required ticket visibility:
- All tickets: Agents can access all tickets.
- Tickets in a group: Agents can access only the tickets in their group.
- Assigned tickets: Agents can access only tickets assigned to them.
- Click Continue.
- In the upgrade wizard, click Transfer.
The selected agents are transferred to Freshdesk Omni 2025 with the configured role mappings and ticket visibility settings.
Transfer groups
Transfer the groups configured in your Freshchat account to Freshdesk Omni 2025. The migrated groups will be suffixed with "Freshchat".
Note: If a selected group is not associated with a mapped business hours schedule, it is automatically associated with the default business hours in Freshdesk Omni 2025.
Important: This step transfers only the group definitions. Ticket routing properties associated with the selected groups, such as assignment and routing configurations, are migrated later during the Workflow migration phase.
To transfer groups:
- In the upgrade wizard, go to Transfer Configurations > Teams.
- Select Groups.
Review the available groups.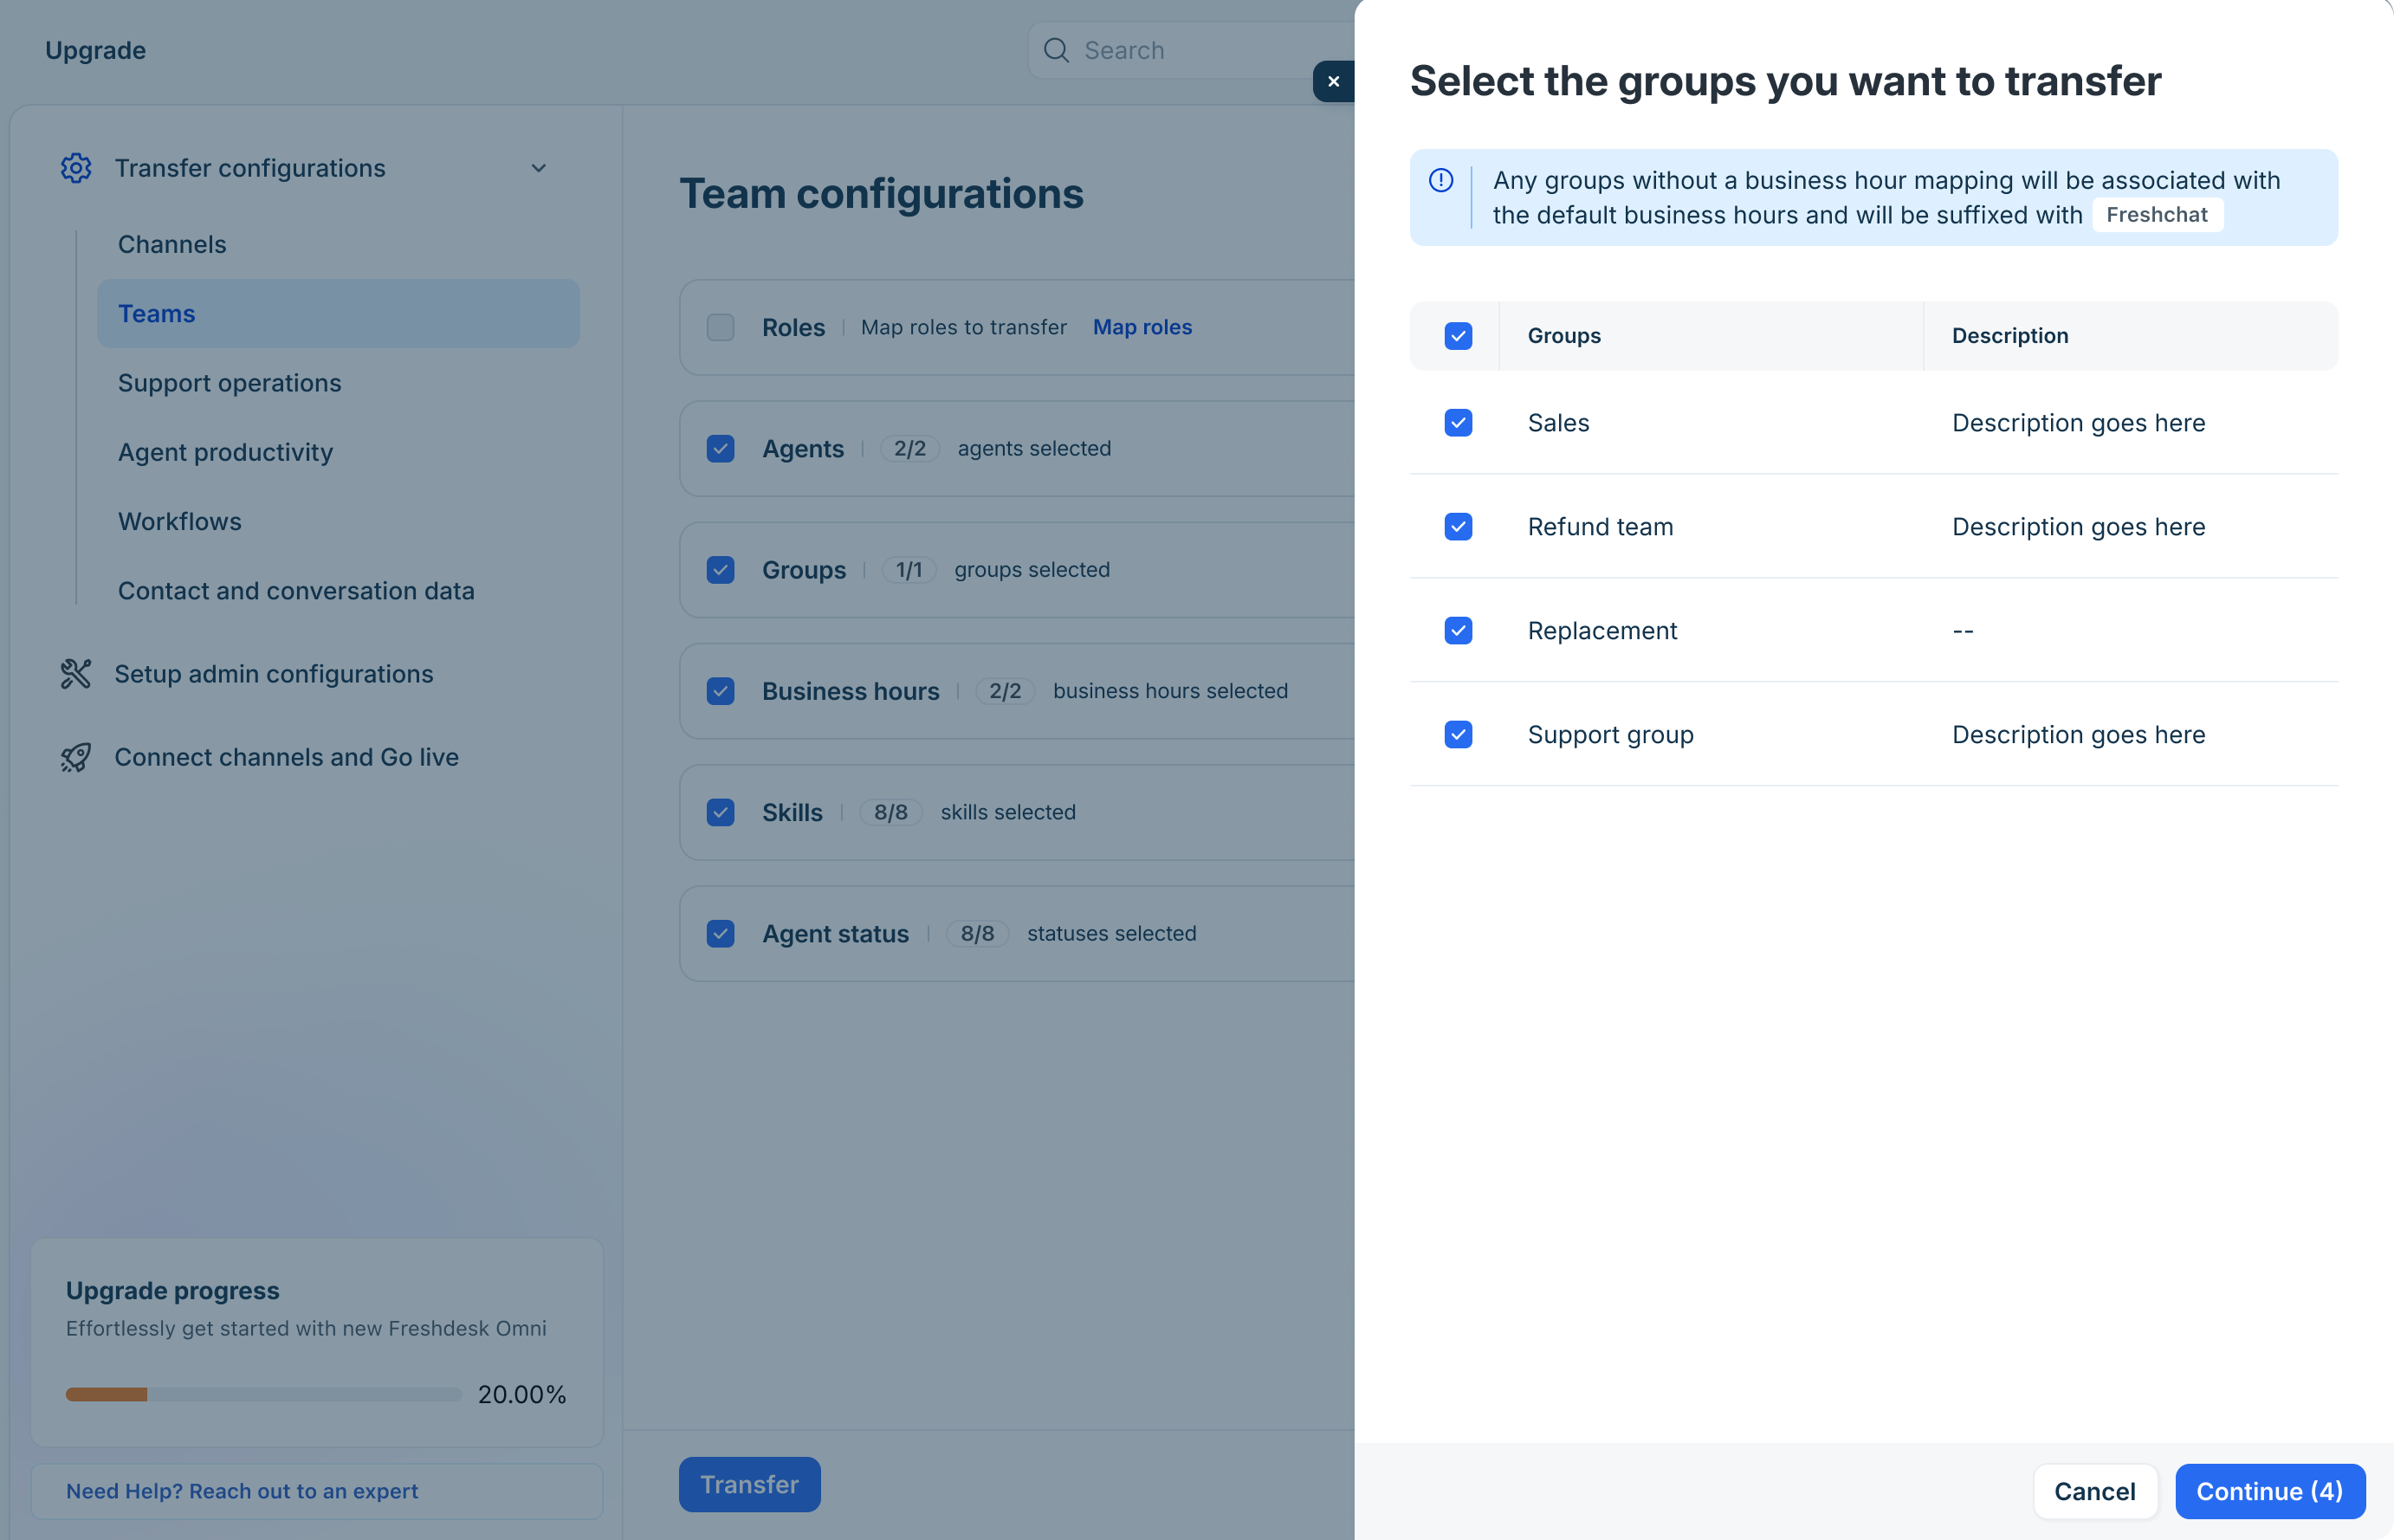
- Select the groups you want to transfer.
- Click Continue.
- In the upgrade wizard, click Transfer.
Transfer business hours
Business hours define your support team's working schedule and determine when customer requests are handled. Transfer your existing business hours to Freshdesk Omni 2025 to retain your operating schedules and associated holiday calendars after the upgrade.
Note: Only enabled business hours are transferred. After the transfer, ensure to reactivate them again in Freshdesk Omni 2025. Also, the selected business hours schedules are copied with the suffix "Freshchat".
To copy business hours:
- In the upgrade wizard, go to Transfer Configurations > Teams.
- Select Business hours.
Review the available schedules.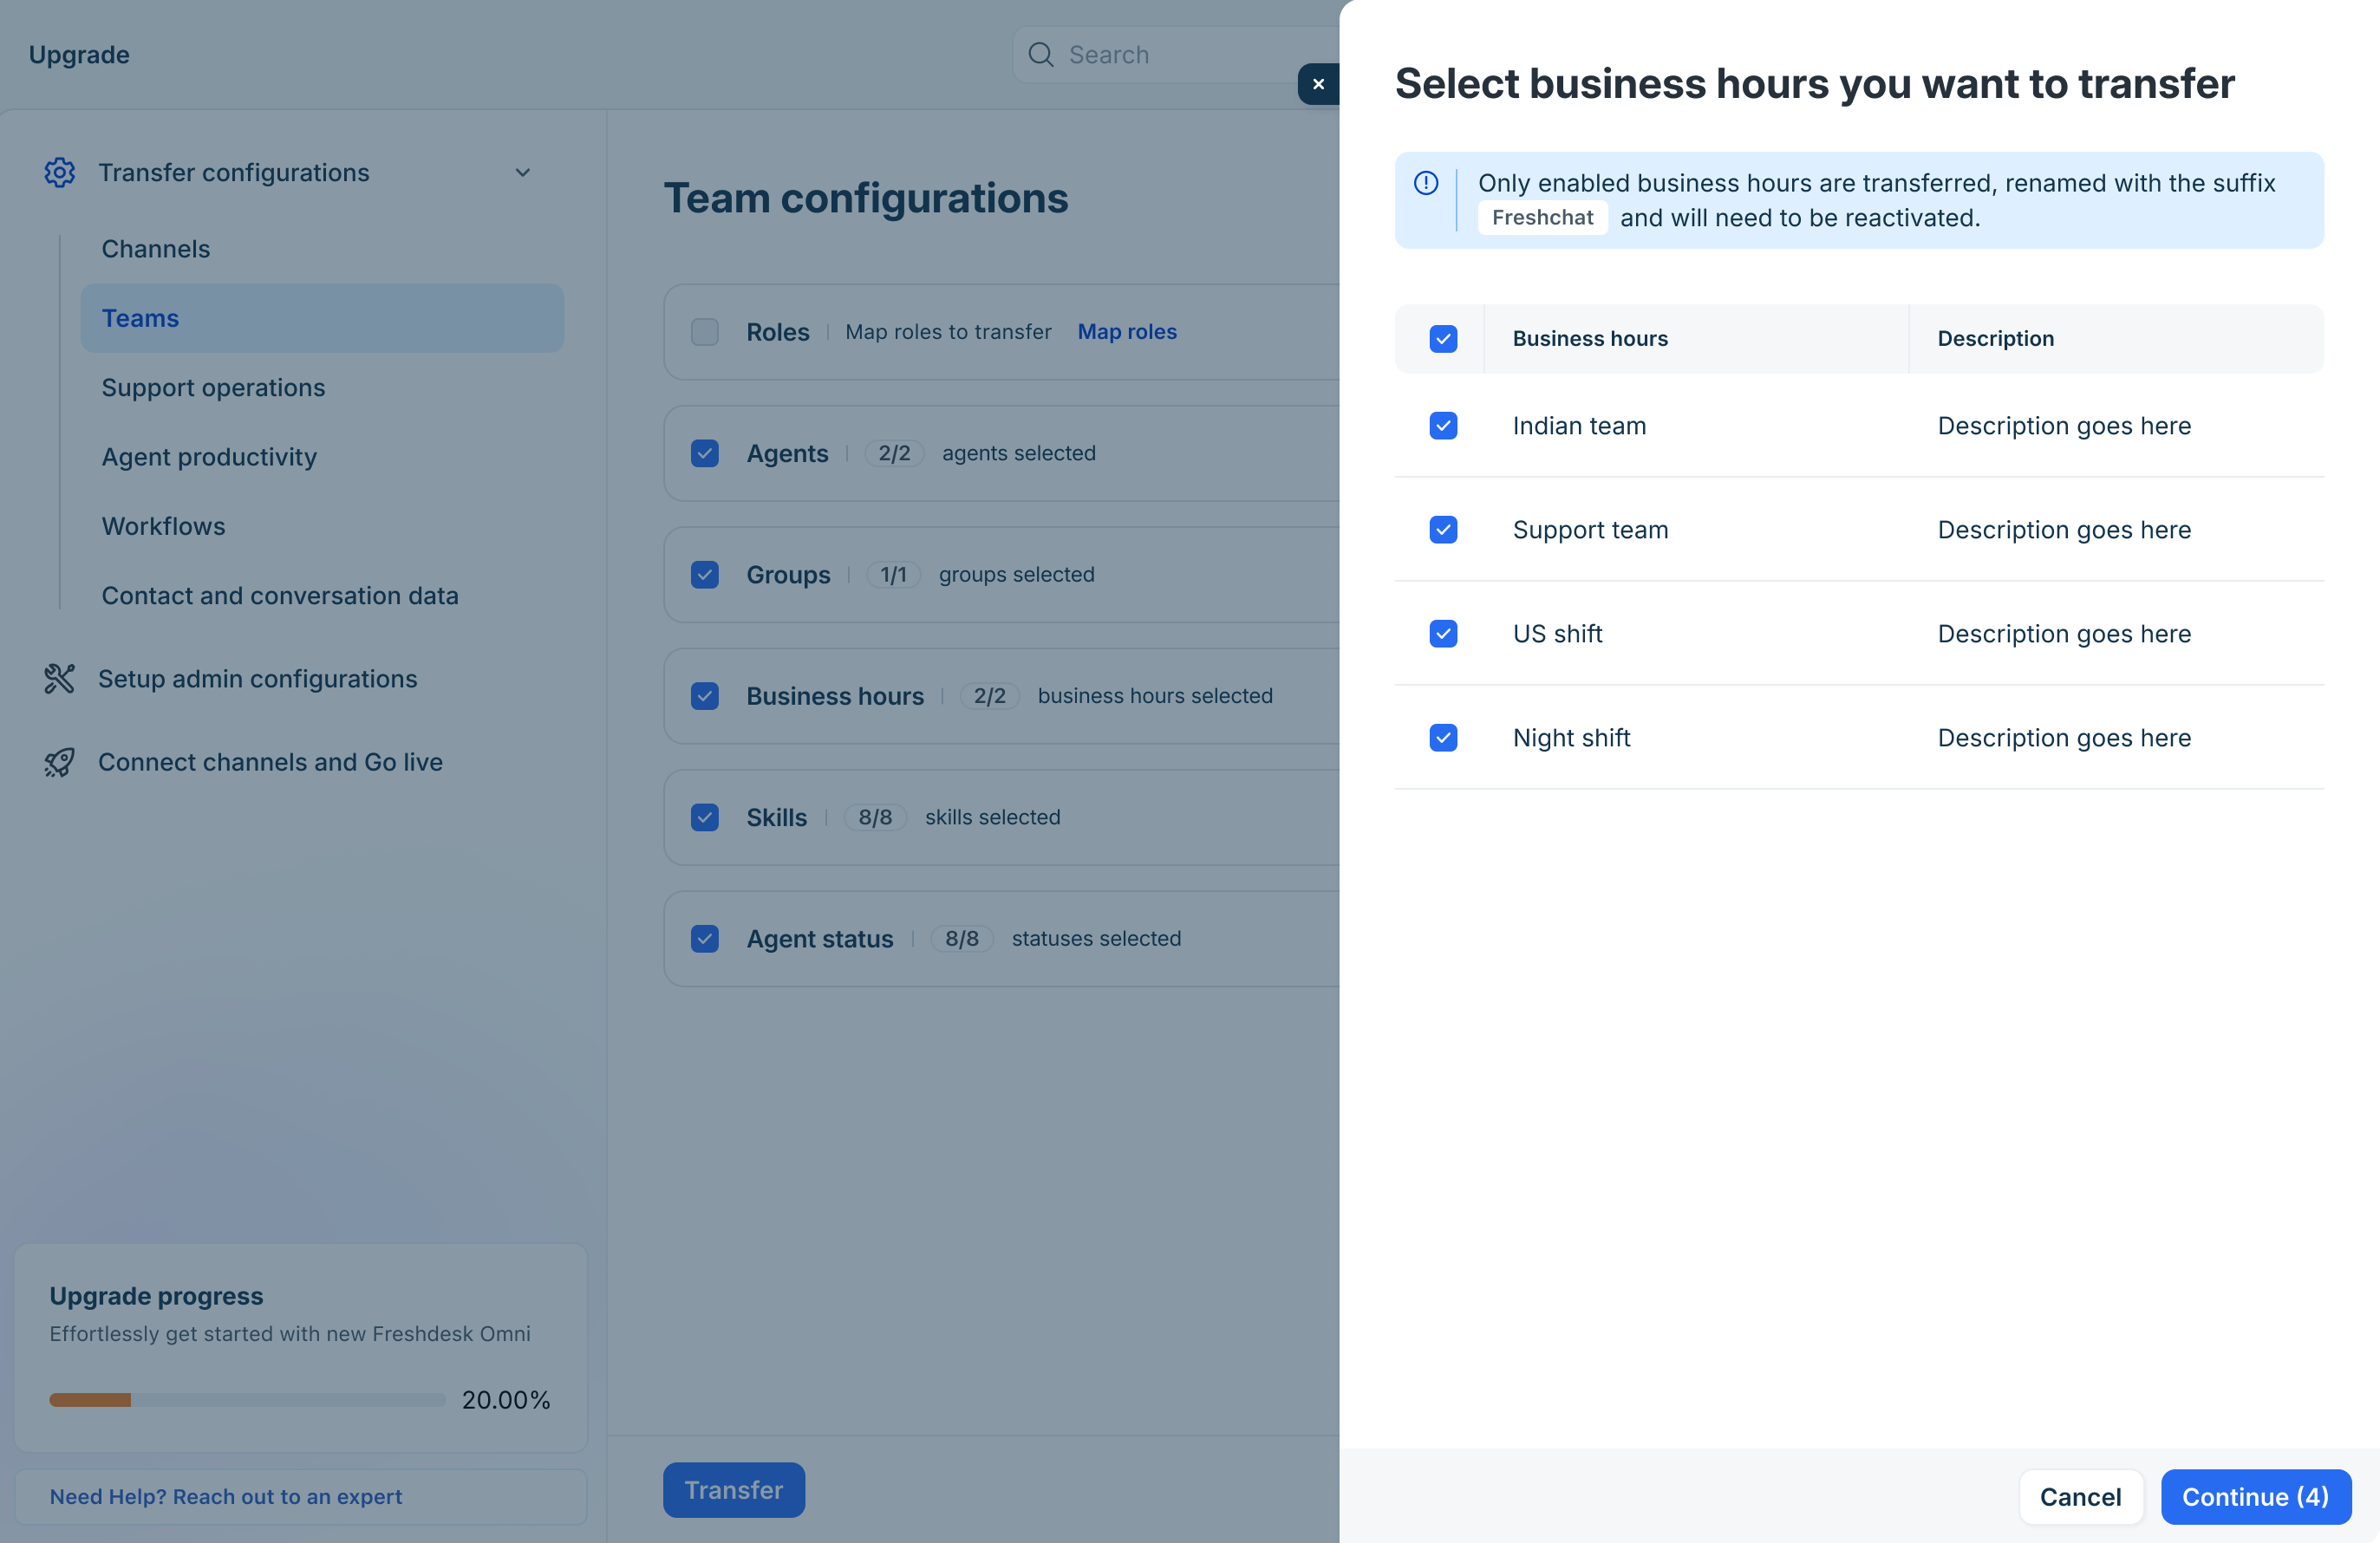
- Select the schedules you want to copy.
- Click Continue.
- In the upgrade wizard, click Transfer.
Transfer skills
Skills are used to match customer conversations with agents based on their expertise. Transfer the skills configured in your Freshchat account so they are available for routing and assignment in Freshdesk Omni 2025.
Note: Only enabled skills in Freshchat are transferred and will be suffixed with “Freshchat”.
To transfer skills:
- In the upgrade wizard, go to Transfer Configurations > Teams.
- Select Skills.
Review the available skills.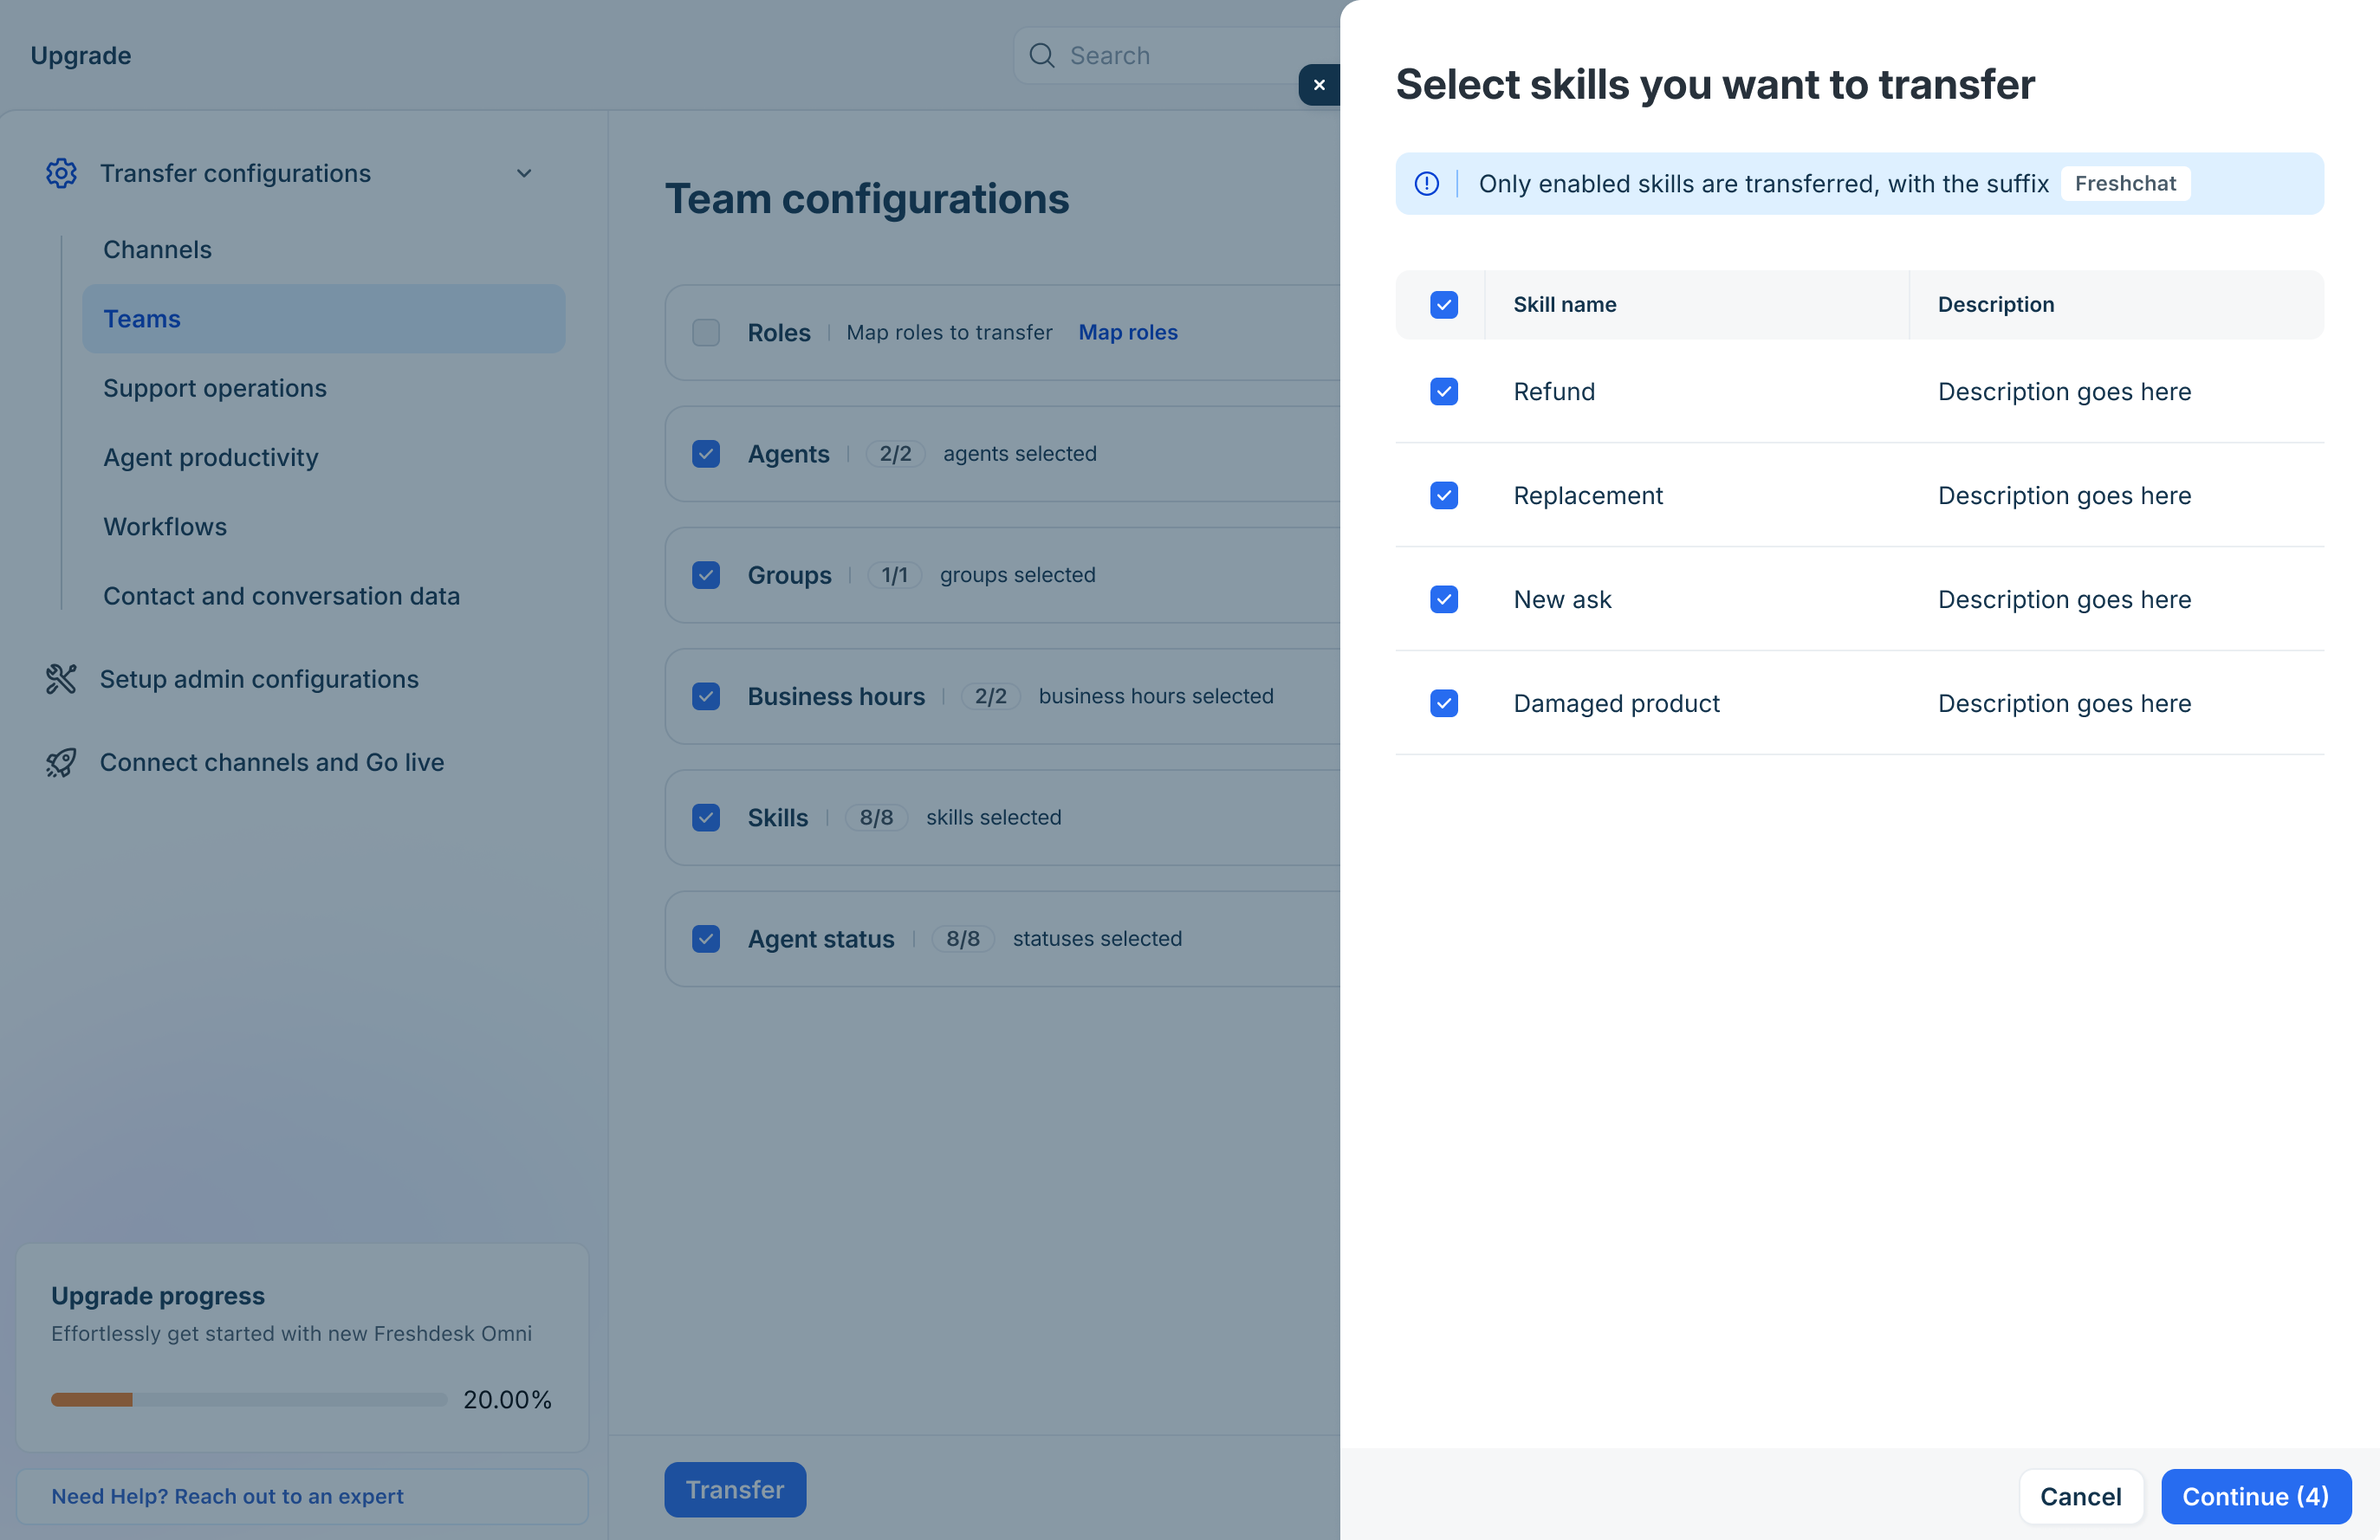 Note: You can transfer upto 35 skills.
 - Select the skills you want to transfer.
- Click Continue.
- In the upgrade wizard, click Transfer.
Transfer agent status
Agent statuses indicate agent availability and are used to determine routing and workload distribution. Transfer your existing agent statuses so they are available in Freshdesk Omni 2025.
Note: Only enabled agent statuses in Freshchat will be transferred with a suffix “Freshchat”. Also, ensure to reactivate the agent statuses in Freshdesk Omni.
To transfer agent statuses:
- In the upgrade wizard, go to Transfer Configurations > Teams.
- Click Agent statuses. Review the available statuses.
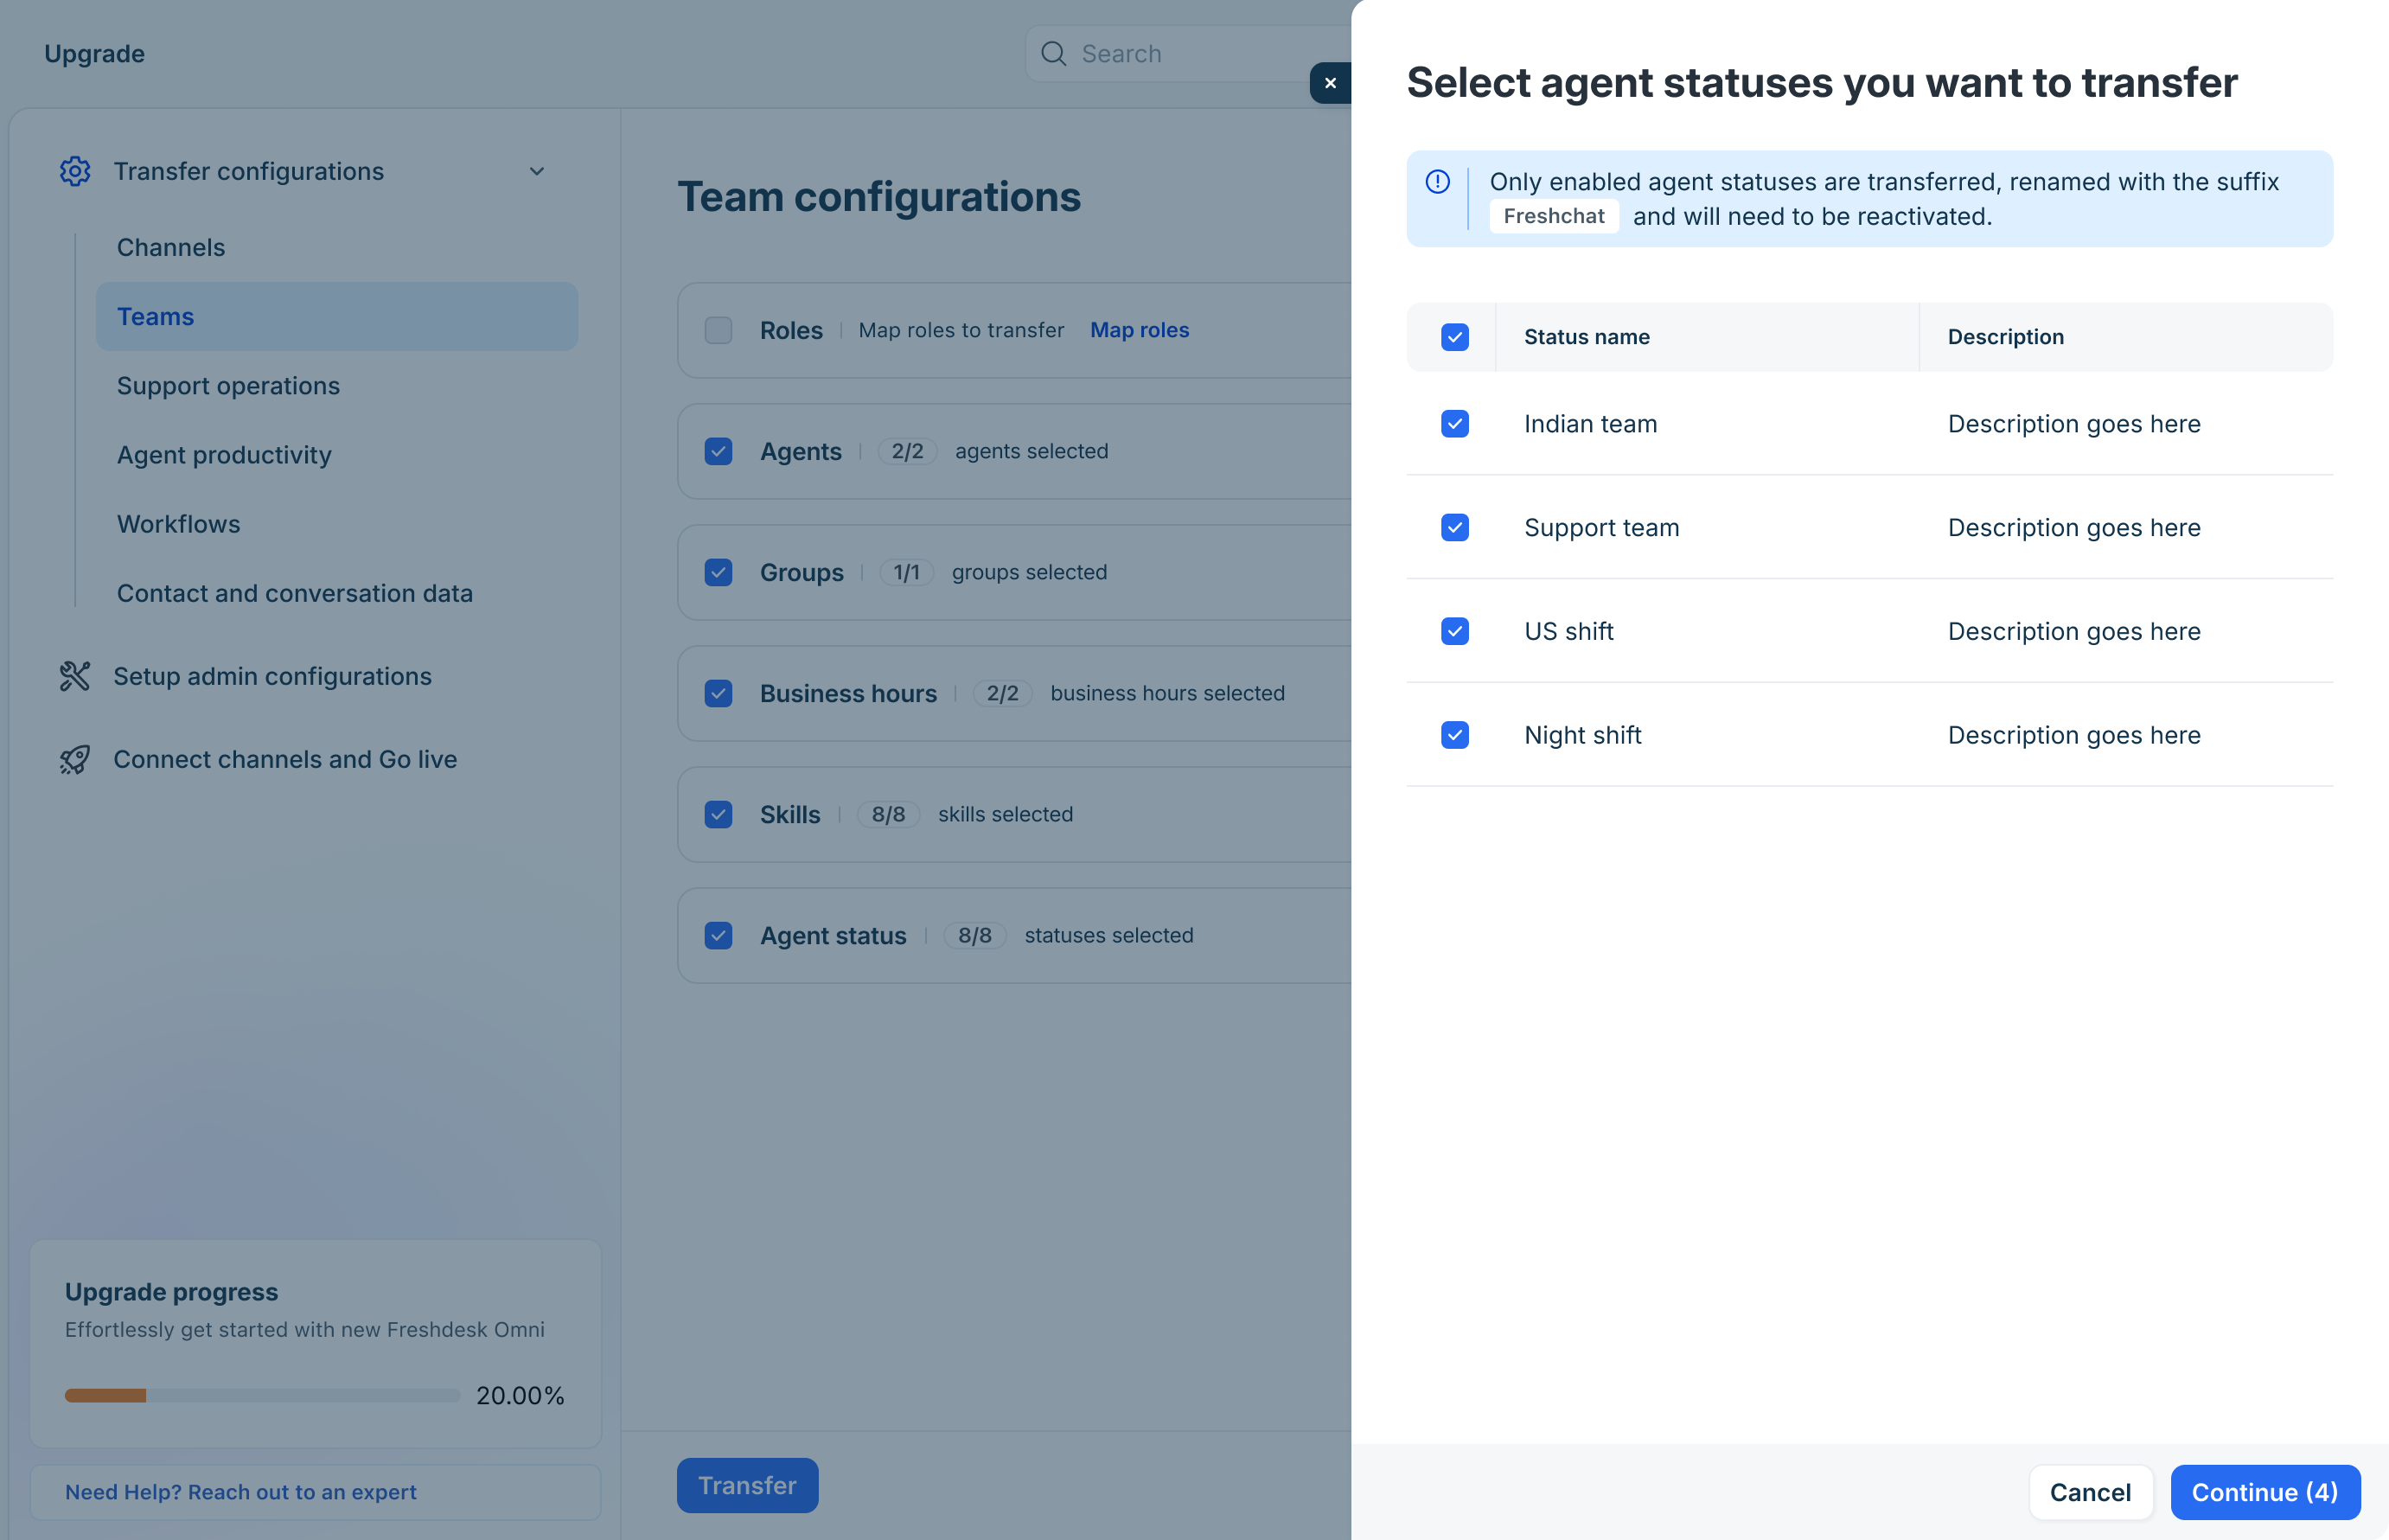
- Select the statuses you want to transfer. To select all the statuses, select the checkbox in the header row.
- Click Continue.
- In the upgrade wizard, click Transfer.
Transfer support operations
Support operation configurations include the knowledge resources and properties your support team relies on to manage customer information and conversations.
This ensures that your existing support operations continue to function after the upgrade.
The following support operation configurations can be migrated:
- FAQs
- Contact fields
- Company fields
- Conversation properties
Transfer FAQs
Freshchat FAQs are migrated as solution articles (Knowledge Base) in Freshdesk Omni 2025.
Freshchat has a two-level hierarchy (Folder > Article), while the Freshdesk Omni 2025 Knowledge Base uses a three-level hierarchy (Category > Folder > Article). To match the Freshdesk Omni structure, a default category called Imported articles (Freshchat) will be created during migration. Existing Freshchat folders will be transferred to this category and will be labeled with the suffix "Freshchat."
To migrate FAQs:
- In the upgrade wizard, go to Transfer Configurations > Support operations.
- Select FAQs.
Review the available FAQs grouped by category.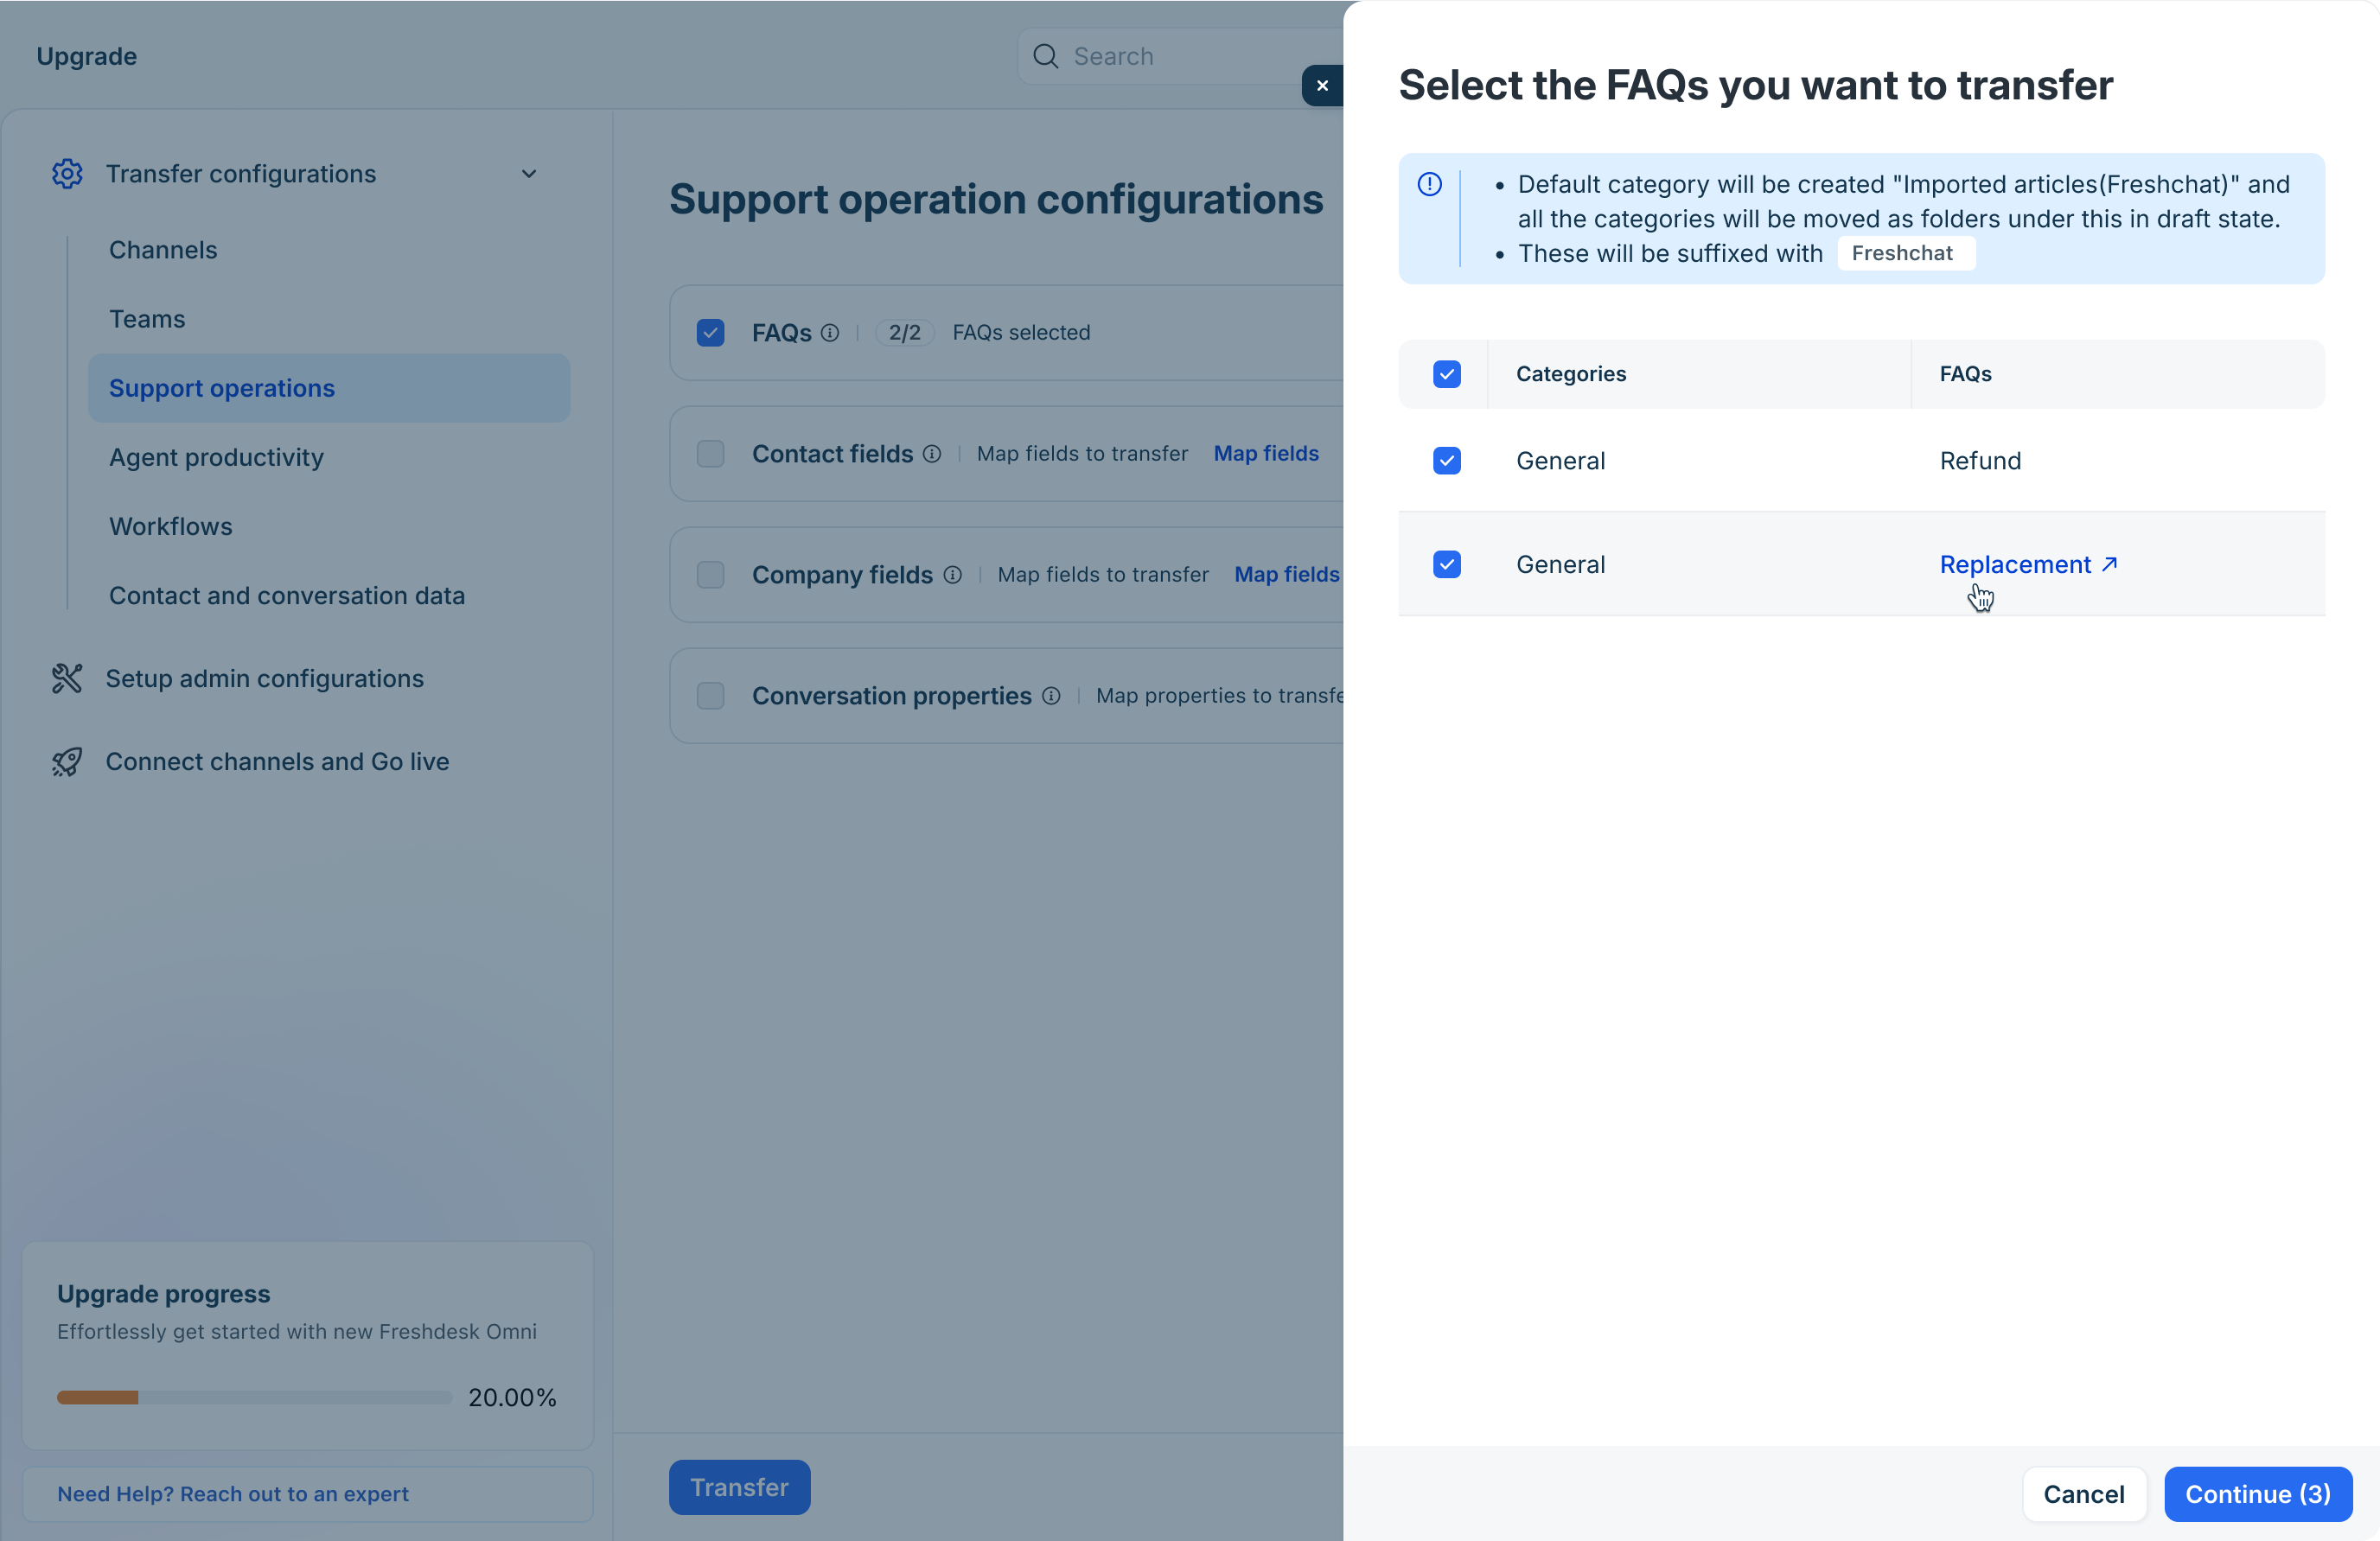
- Select the FAQs you want to migrate.
- Click Continue.
- In the upgrade wizard, click Transfer.
Map contact fields
Map the contact fields configured in your Freshchat account to the corresponding contact fields in Freshdesk Omni 2025. This ensures customer information is migrated accurately and remains available after the upgrade.
Notes:
- Existing field visibility settings remain unchanged after migration.
- Contacts that share the same unique field are merged during migration.
To map contact fields:
- In the upgrade wizard, go to Transfer Configurations > Support operations.
- Click Map fields next to the Contacts fields row.
Review the default field mappings.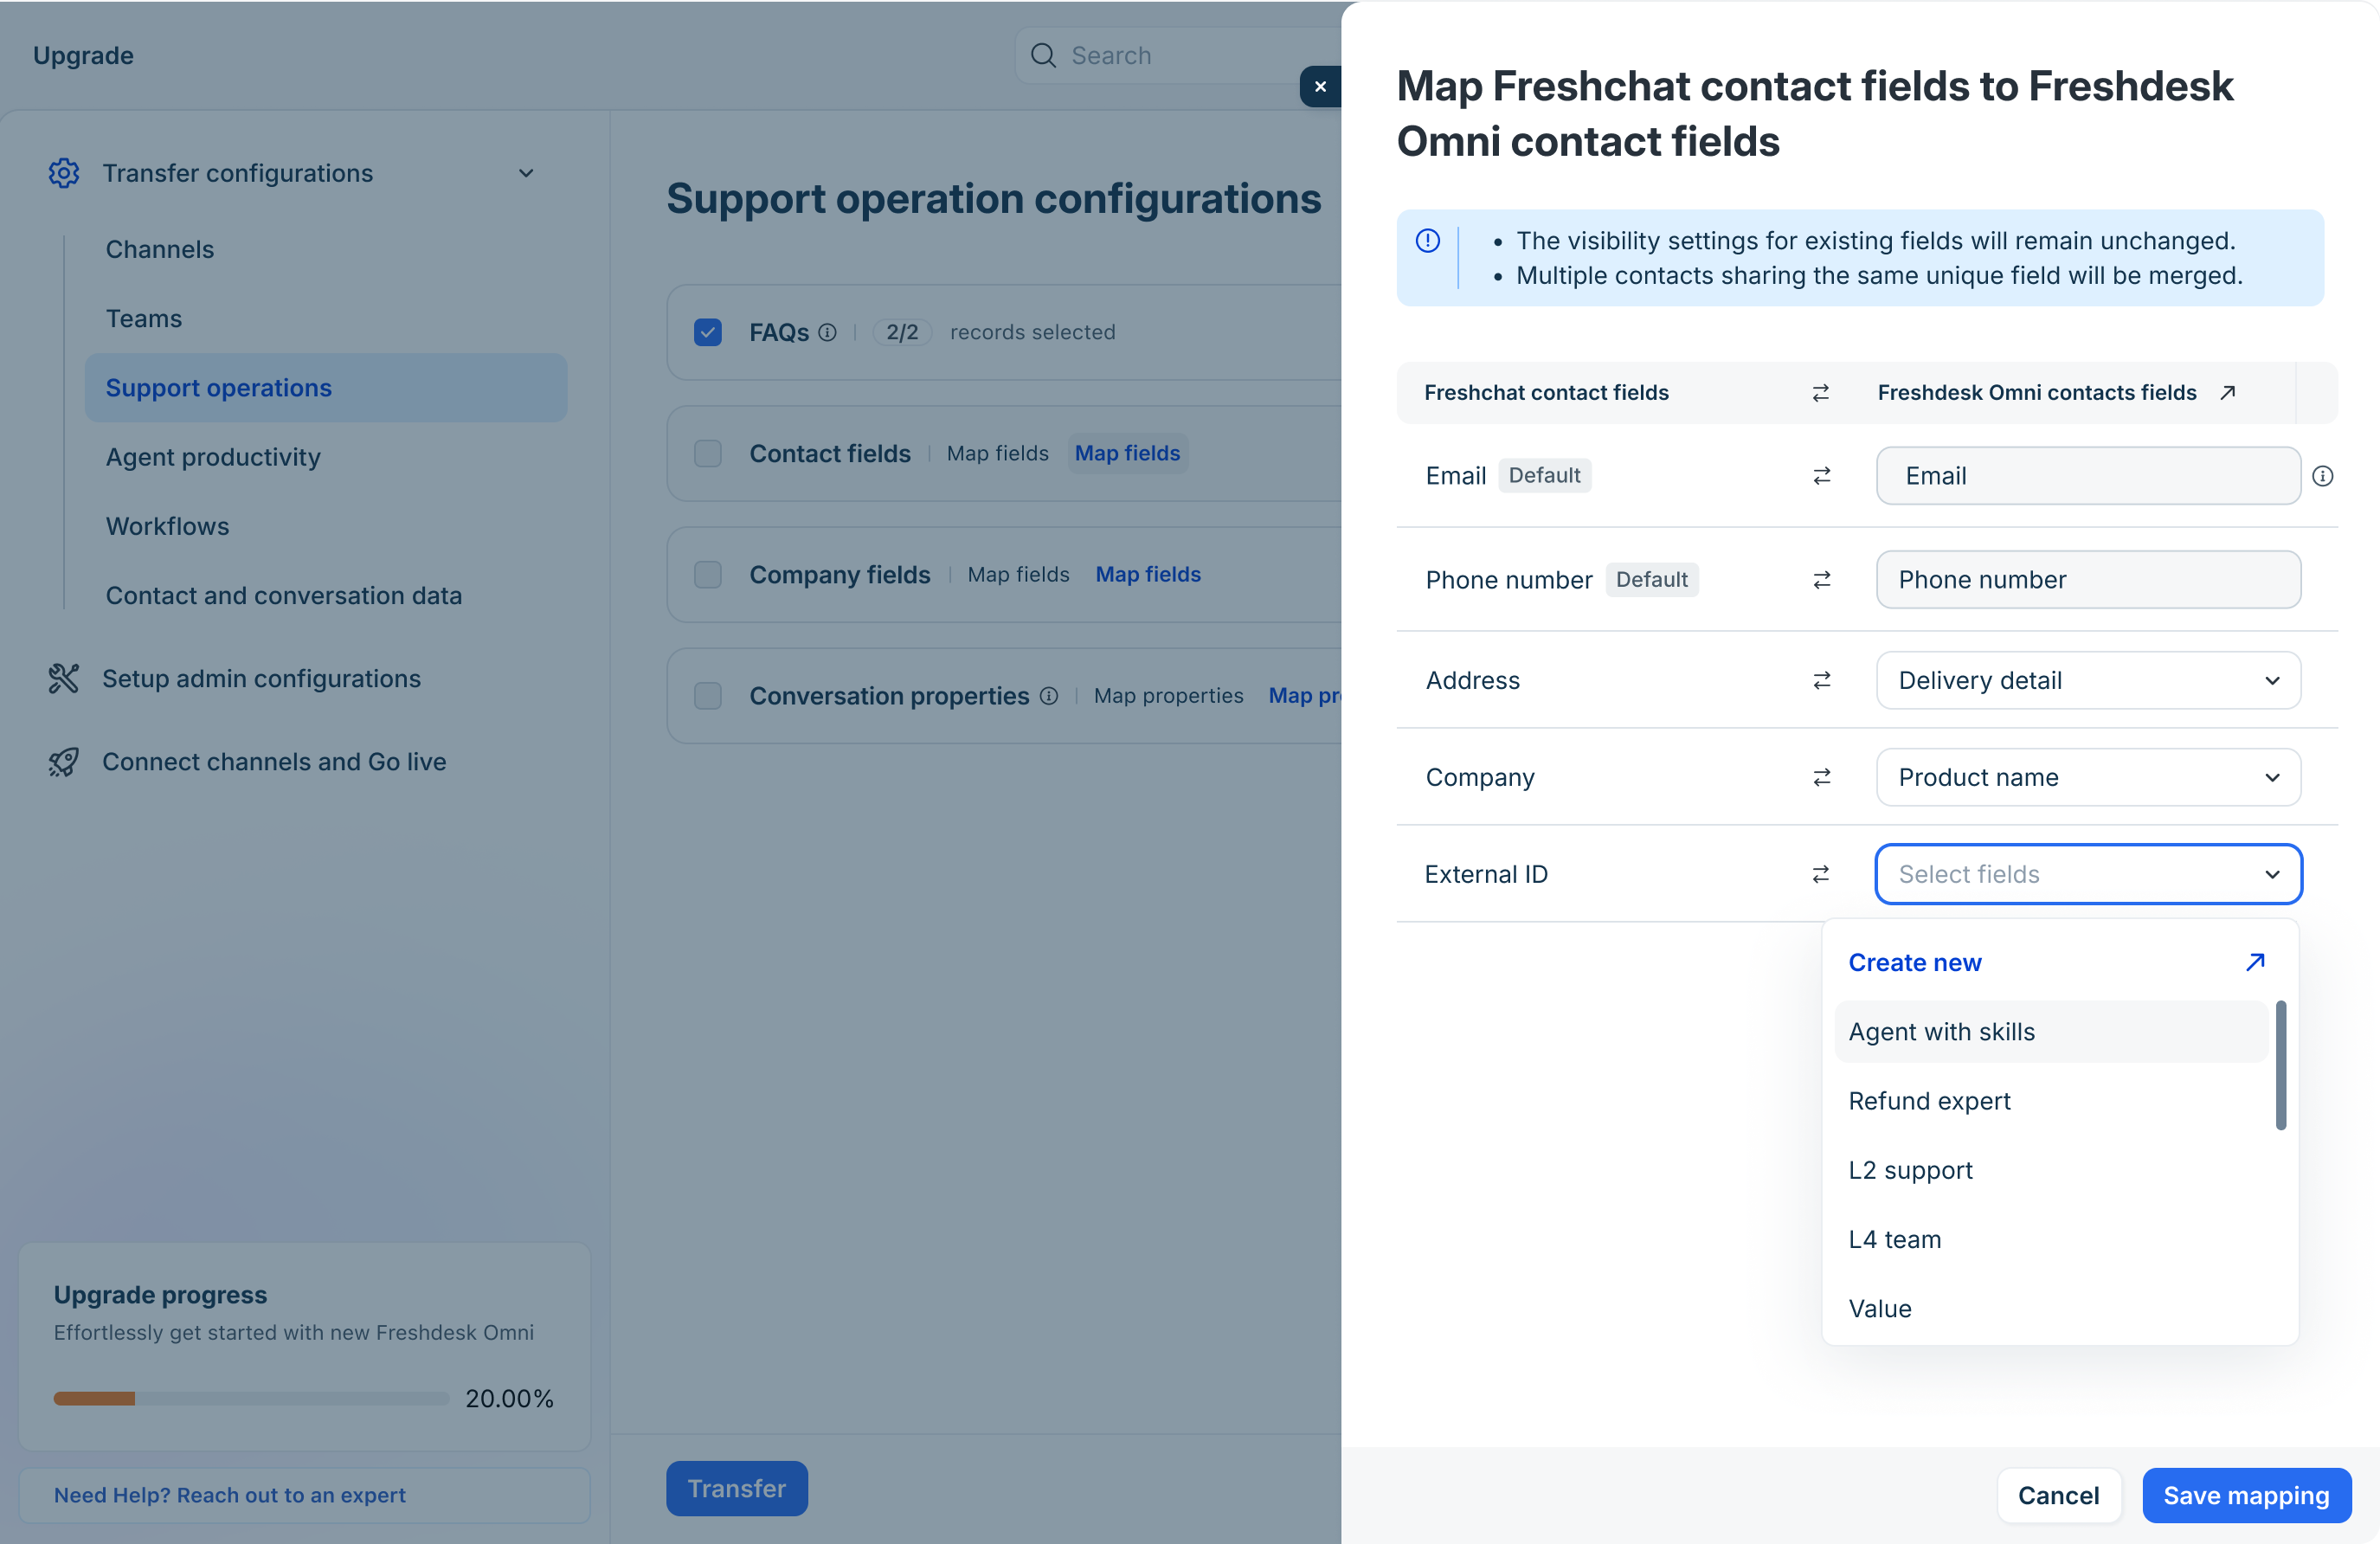
- For other fields, map each Freshchat contact field to an existing Freshdesk Omni contact field.
- If a corresponding field does not exist, do the following:
- Click Create new to open the Freshdesk Omni Contact Fields page in a new tab.
- Create the new contact field and return to the upgrade wizard.
- Click on the contact field drop-down again to view the newly created contact field.
- Click Save mapping.
- In the upgrade wizard, click Transfer.
Map company fields
Map the company fields configured in your Freshchat account to the corresponding company fields in Freshdesk Omni 2025. This ensures company information remains associated with the correct customer records and is available after the upgrade.
Note: Existing field visibility settings remain unchanged after migration.
To map company fields:
- In the upgrade wizard, go to Transfer Configurations > Support operations.
- Click Map fields next to the Company fields row.
Review the default field mappings.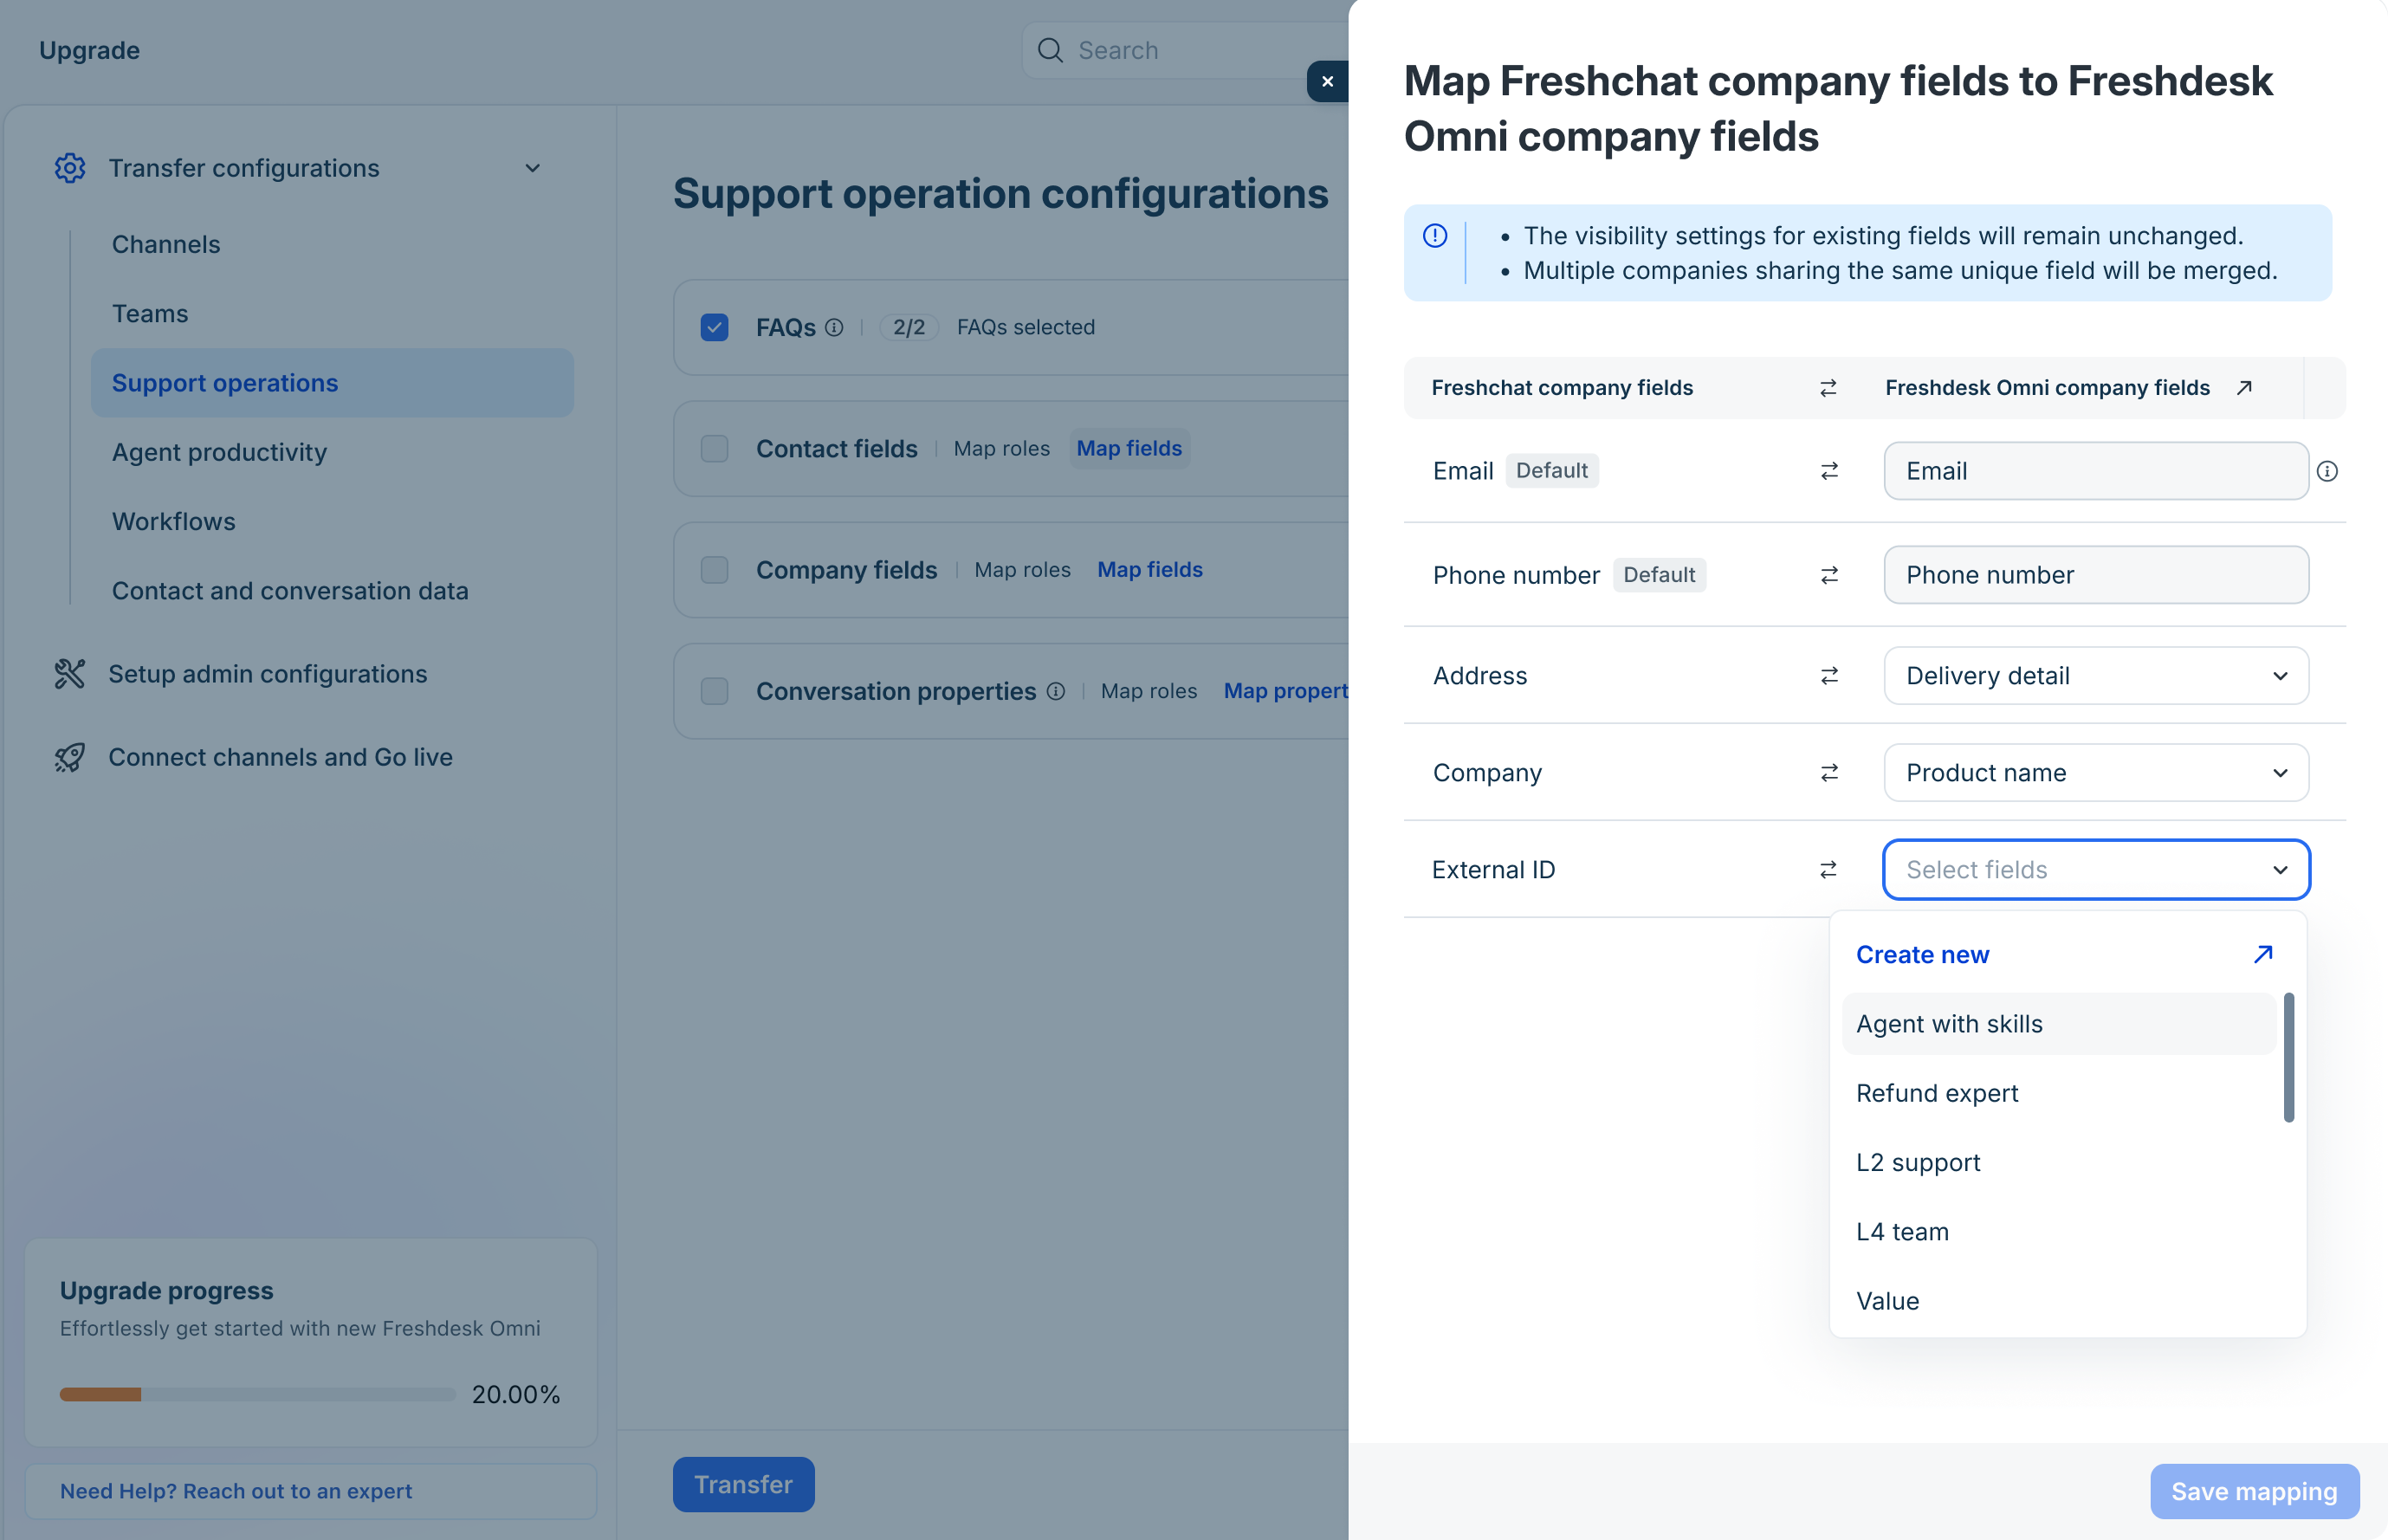
- For other fields, map each Freshchat company field to an existing Freshdesk Omni company field.
- If a corresponding field does not exist, do the following:
- Click Create new to open the Freshdesk Omni Company Fields page in a new tab.
- Create the new company field and return to the upgrade wizard.
- Click on the company field drop-down again to view the newly created company field.
- Click Save mapping.
- In the upgrade wizard, click Transfer.
Map conversation properties
Map the conversation properties in your Freshchat account to the corresponding ticket fields in Freshdesk Omni before migrating them. This ensures conversation metadata is retained and available on the migrated tickets.
Note: Existing field visibility settings remain unchanged after migration.
To map conversation properties:
- In the upgrade wizard, go to Transfer Configurations > Support operations.
- Click Conversation properties. Review the default property mappings.
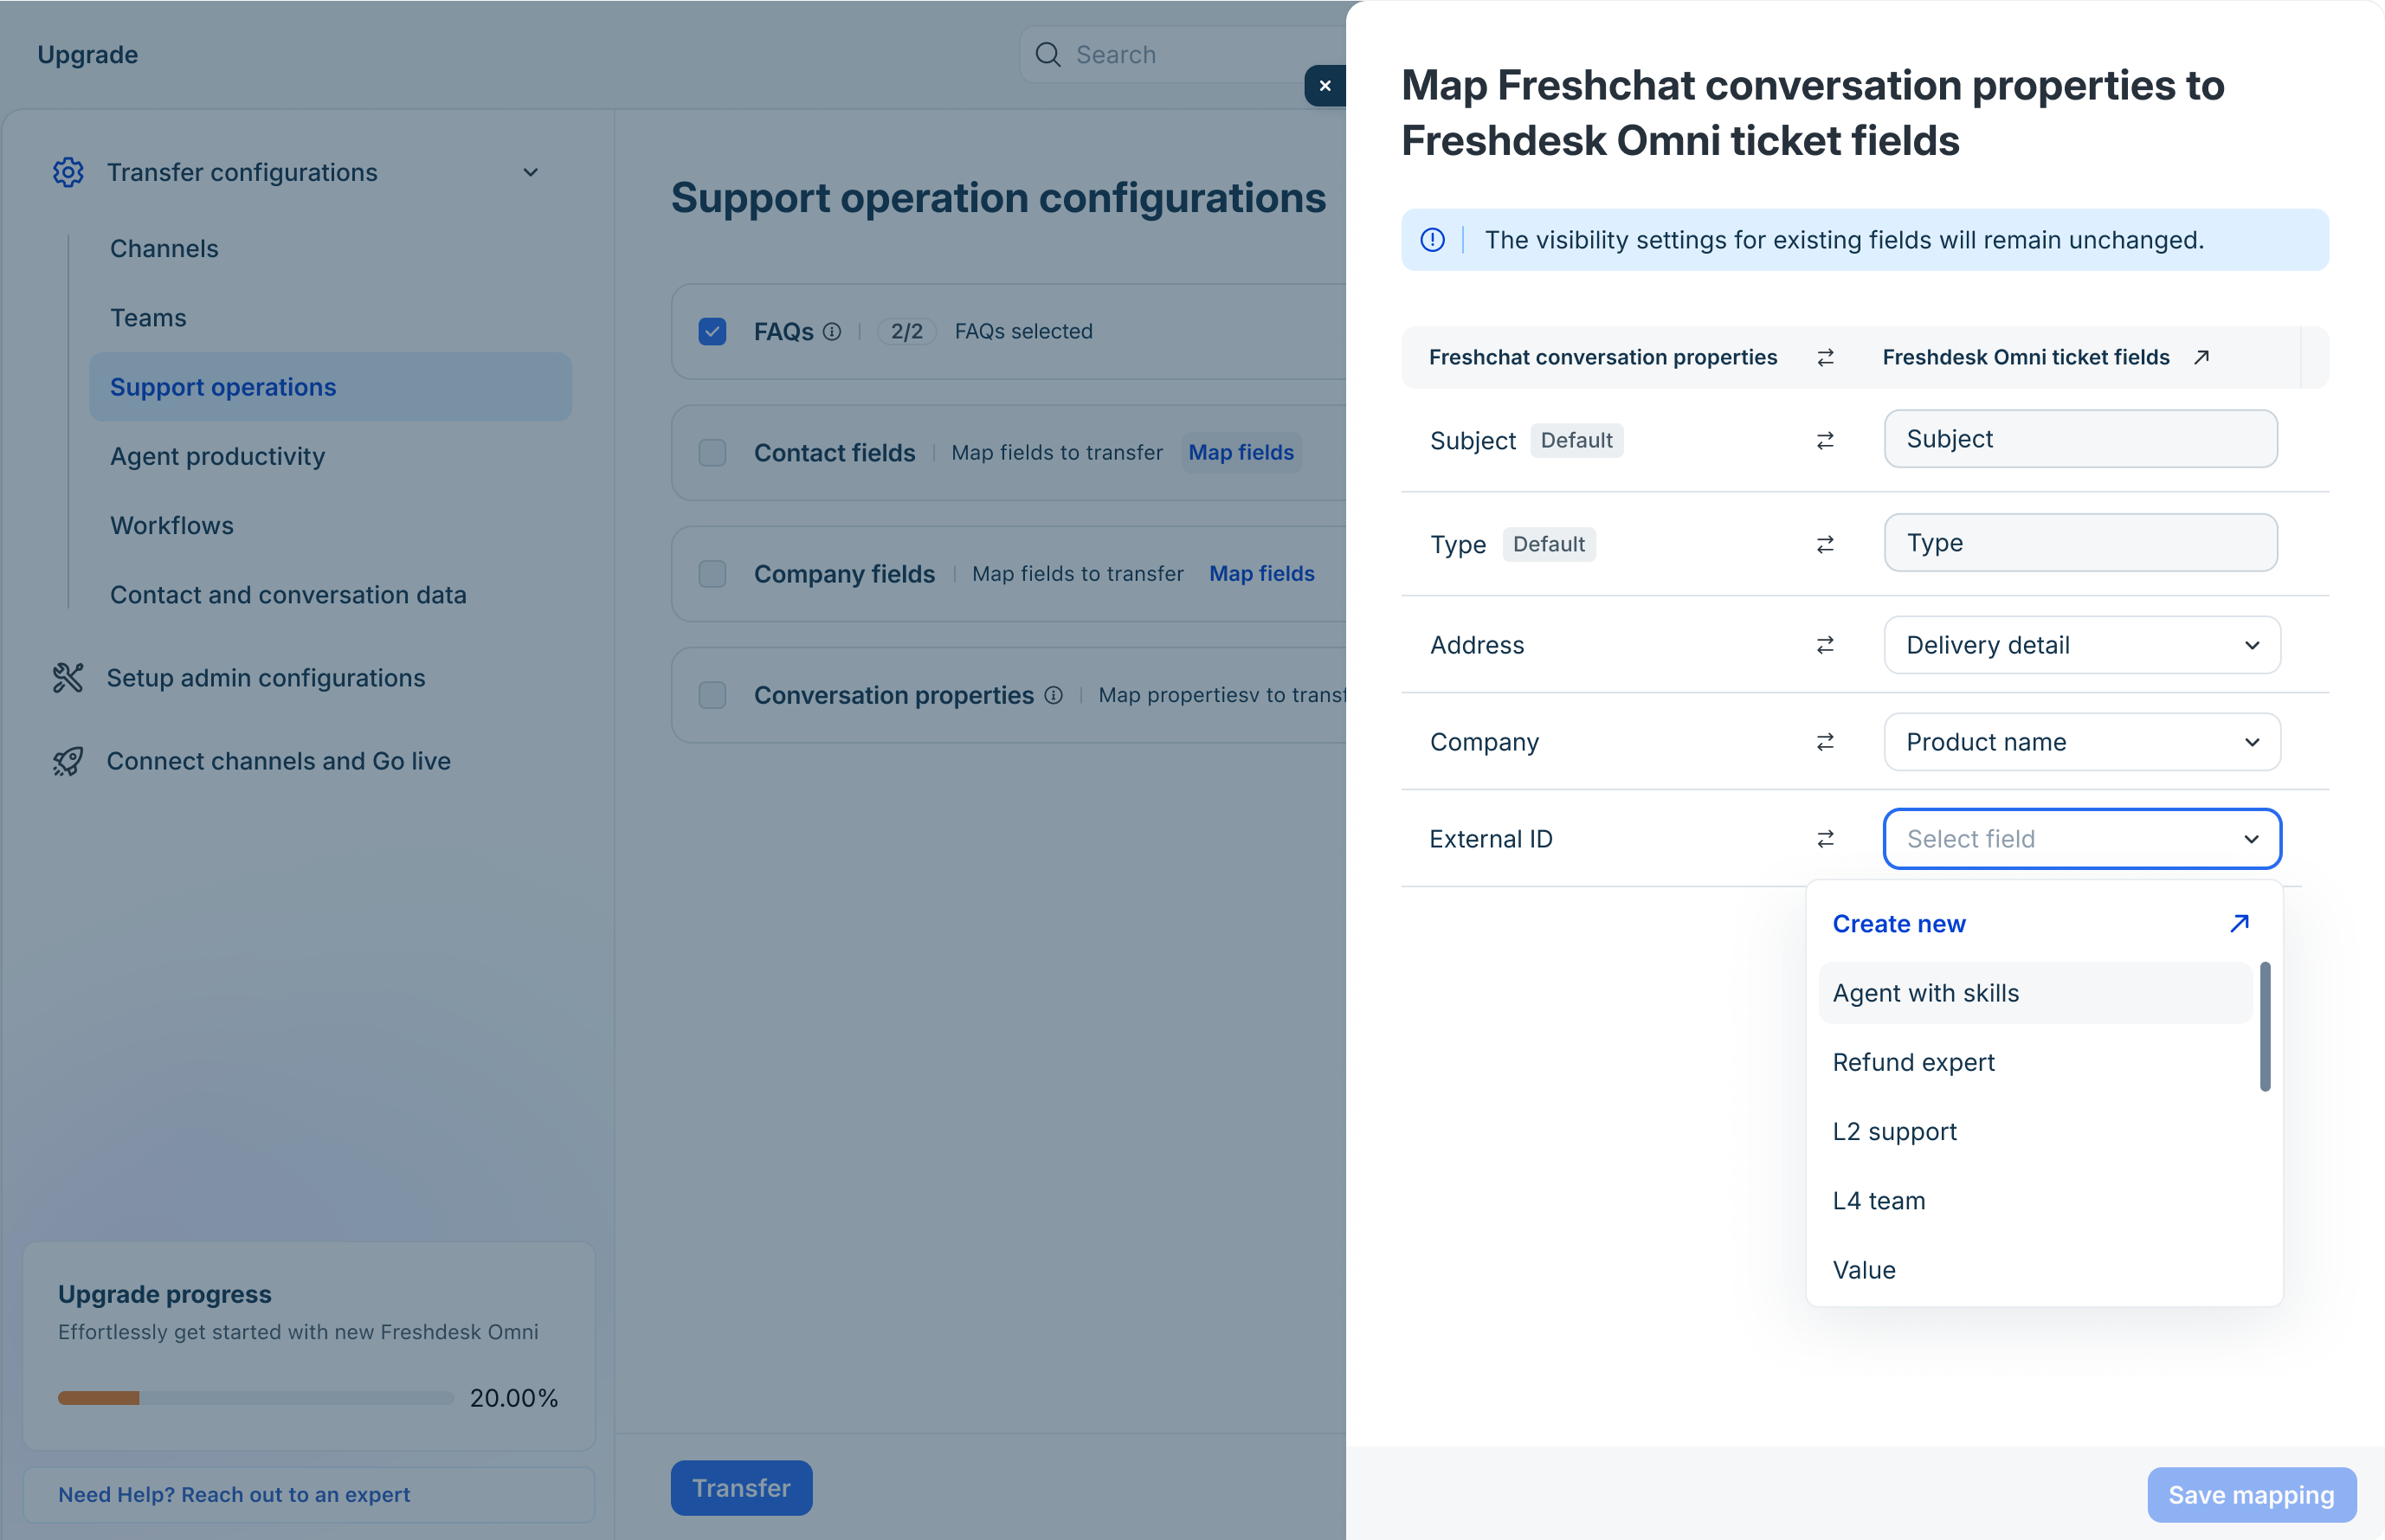
- Map each Freshchat conversation property to an existing Freshdesk Omni ticket field.
- If a corresponding field does not exist, do the following:
- Click Create new to open the Freshdesk Omni Ticket Fields page in a new tab.
- Create the new ticket field and return to the upgrade wizard.
- Click on the ticket field drop-down again to view the newly created ticket field.
- Click Save mapping.
- In the upgrade wizard, click Transfer.
Transfer agent productivity
Agent productivity configurations include the canned responses and CRM tags that help agents respond to customer conversations quickly and consistently. During this stage, you can transfer these configurations to Freshdesk Omni 2025 to retain your agents' existing productivity tools.
The following sections explain how to transfer each agent productivity configuration:
- Canned responses
- CRM tags
Transfer canned responses
Transfer your current canned responses to Freshdesk Omni 2025 to ensure your agents can use these templates seamlessly without the need to recreate them from scratch once you go live.
To transfer canned responses:
- In the upgrade wizard, go to Transfer Configurations > Agent productivity.
- Select Canned responses. You can view the canned responses, grouped by category and their associated shortcodes.
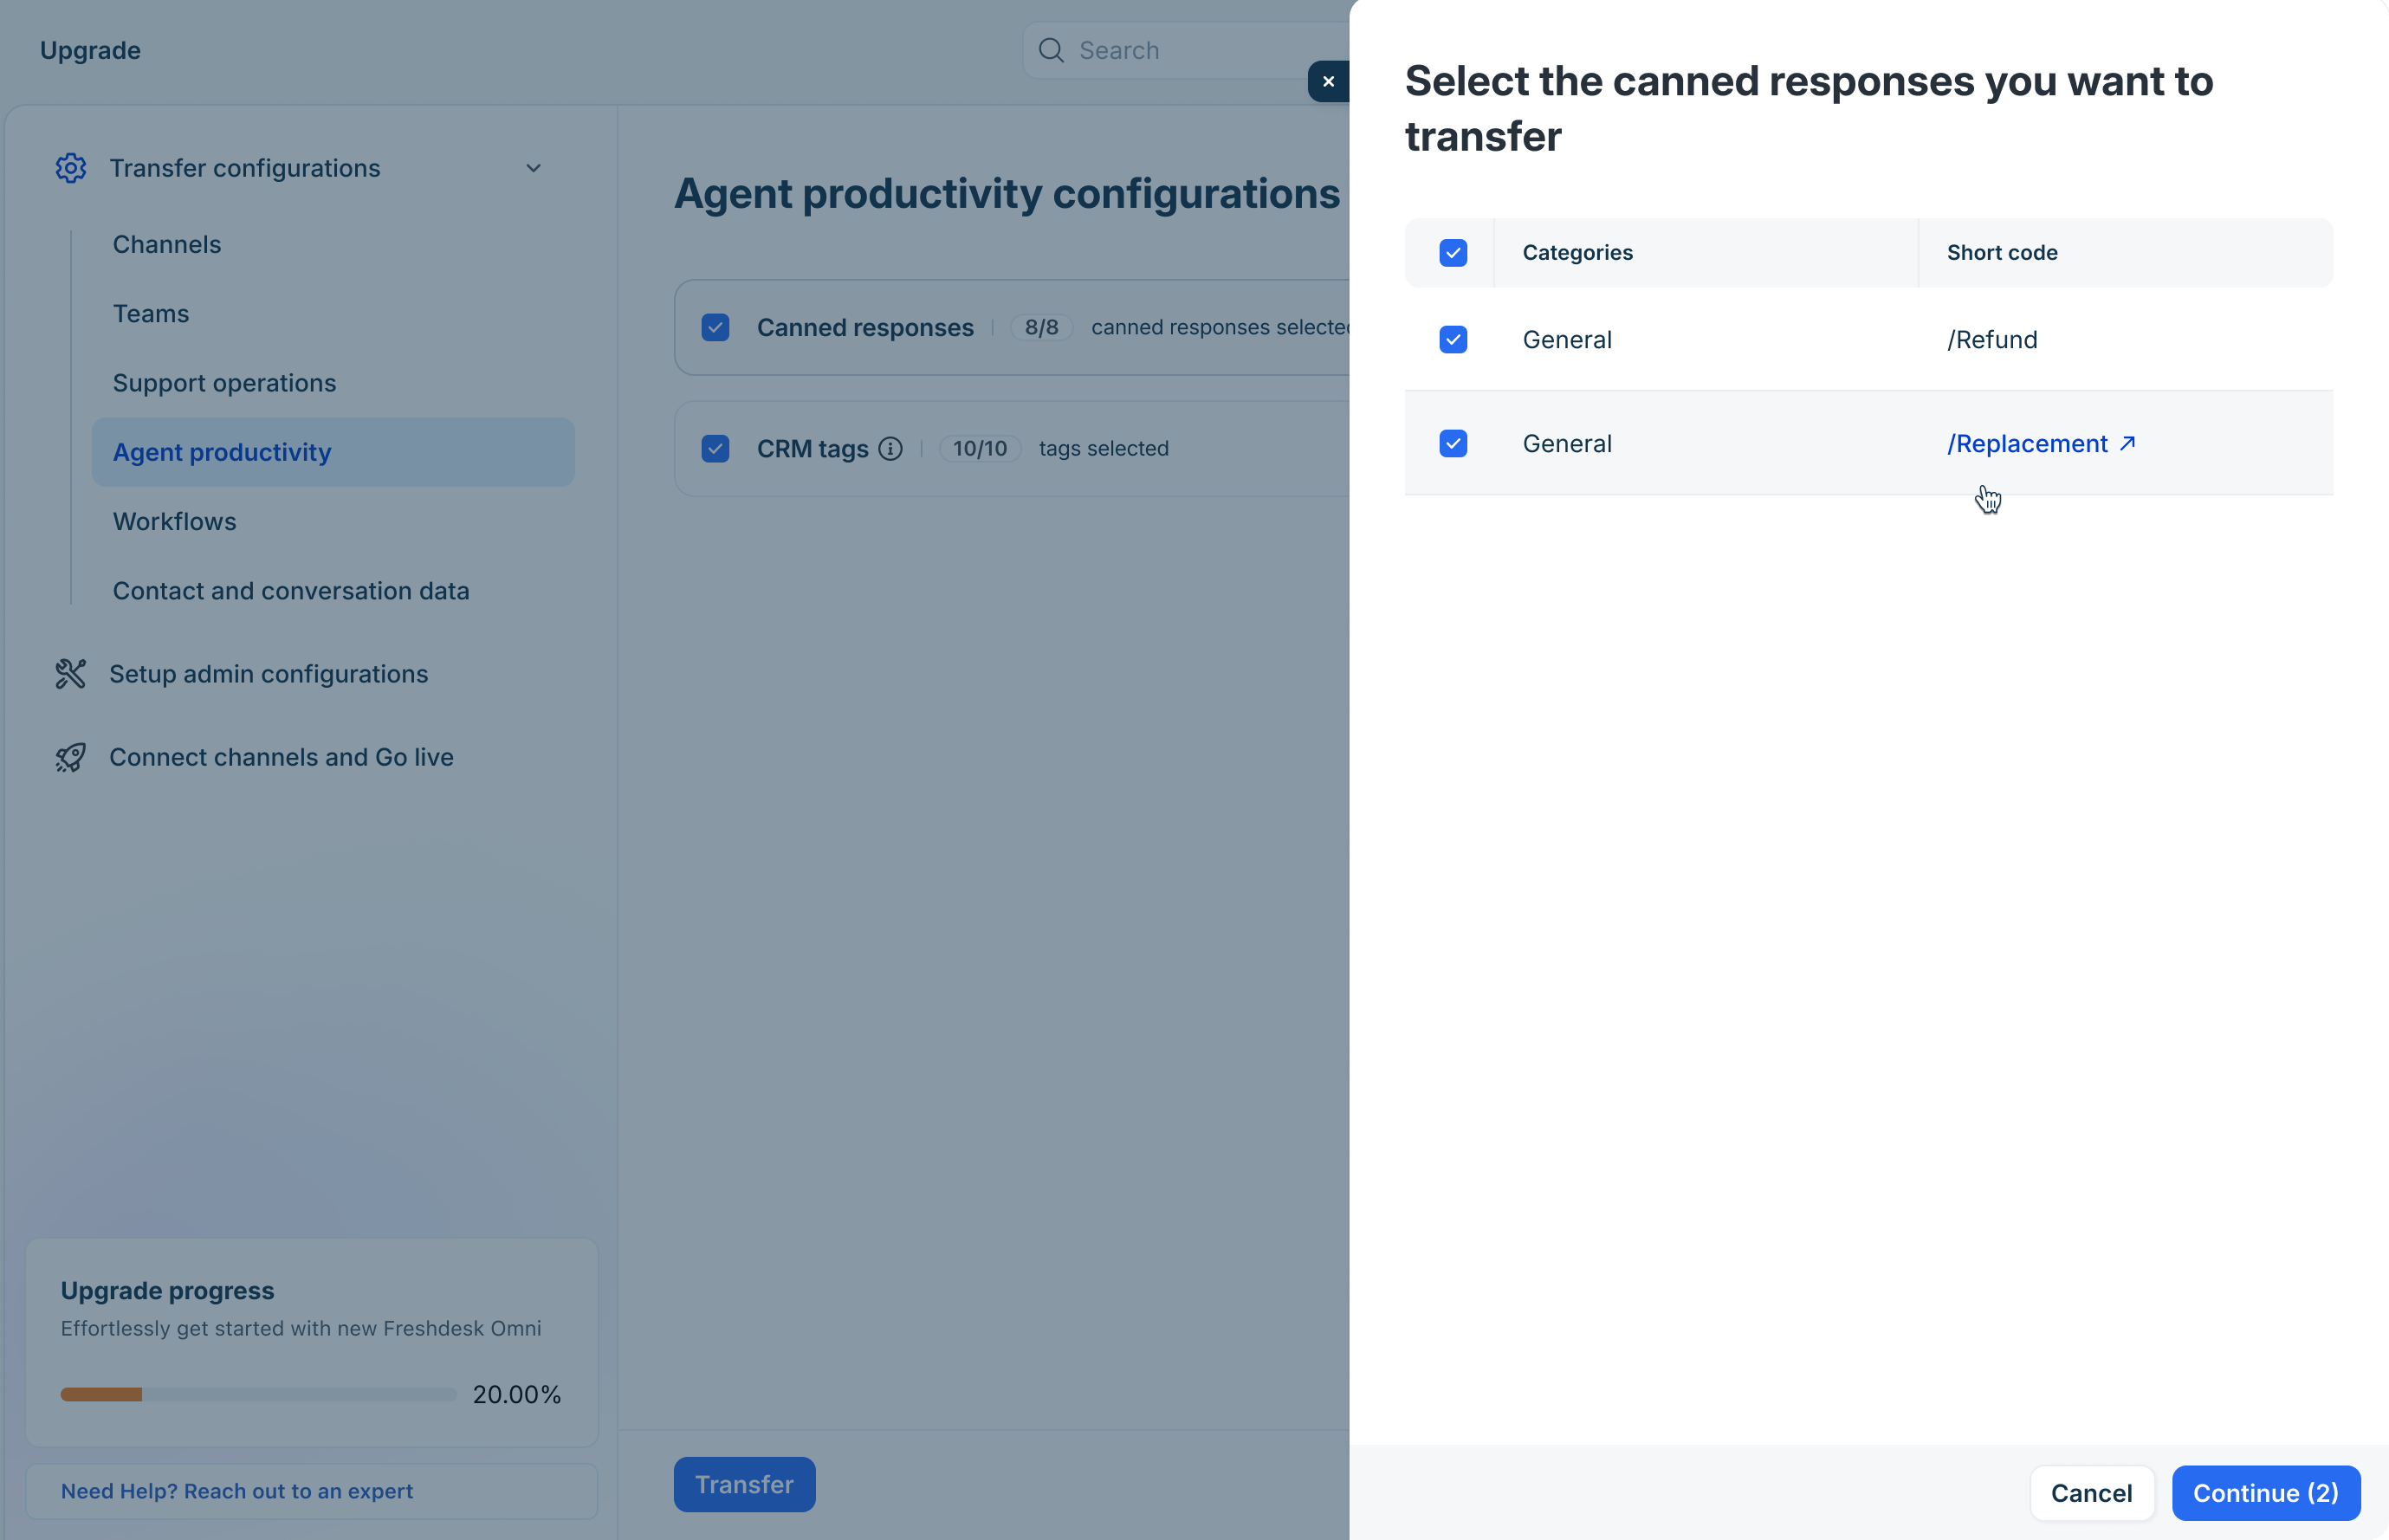
- Select the canned responses you want to transfer.
- Click Continue.
- In the upgrade wizard, click Transfer.
Transfer CRM tags
Transfer your existing CRM tags to Freshdesk Omni 2025 so you can continue segmenting and prioritizing customer conversations without rebuilding your tagging system from scratch.
Note: CRM tags are copied as Tags in Freshdesk Omni.
To transfer CRM tags:
- In the upgrade wizard, go to Transfer Configurations > Agent productivity.
- Select CRM tags. You will see the available tags.
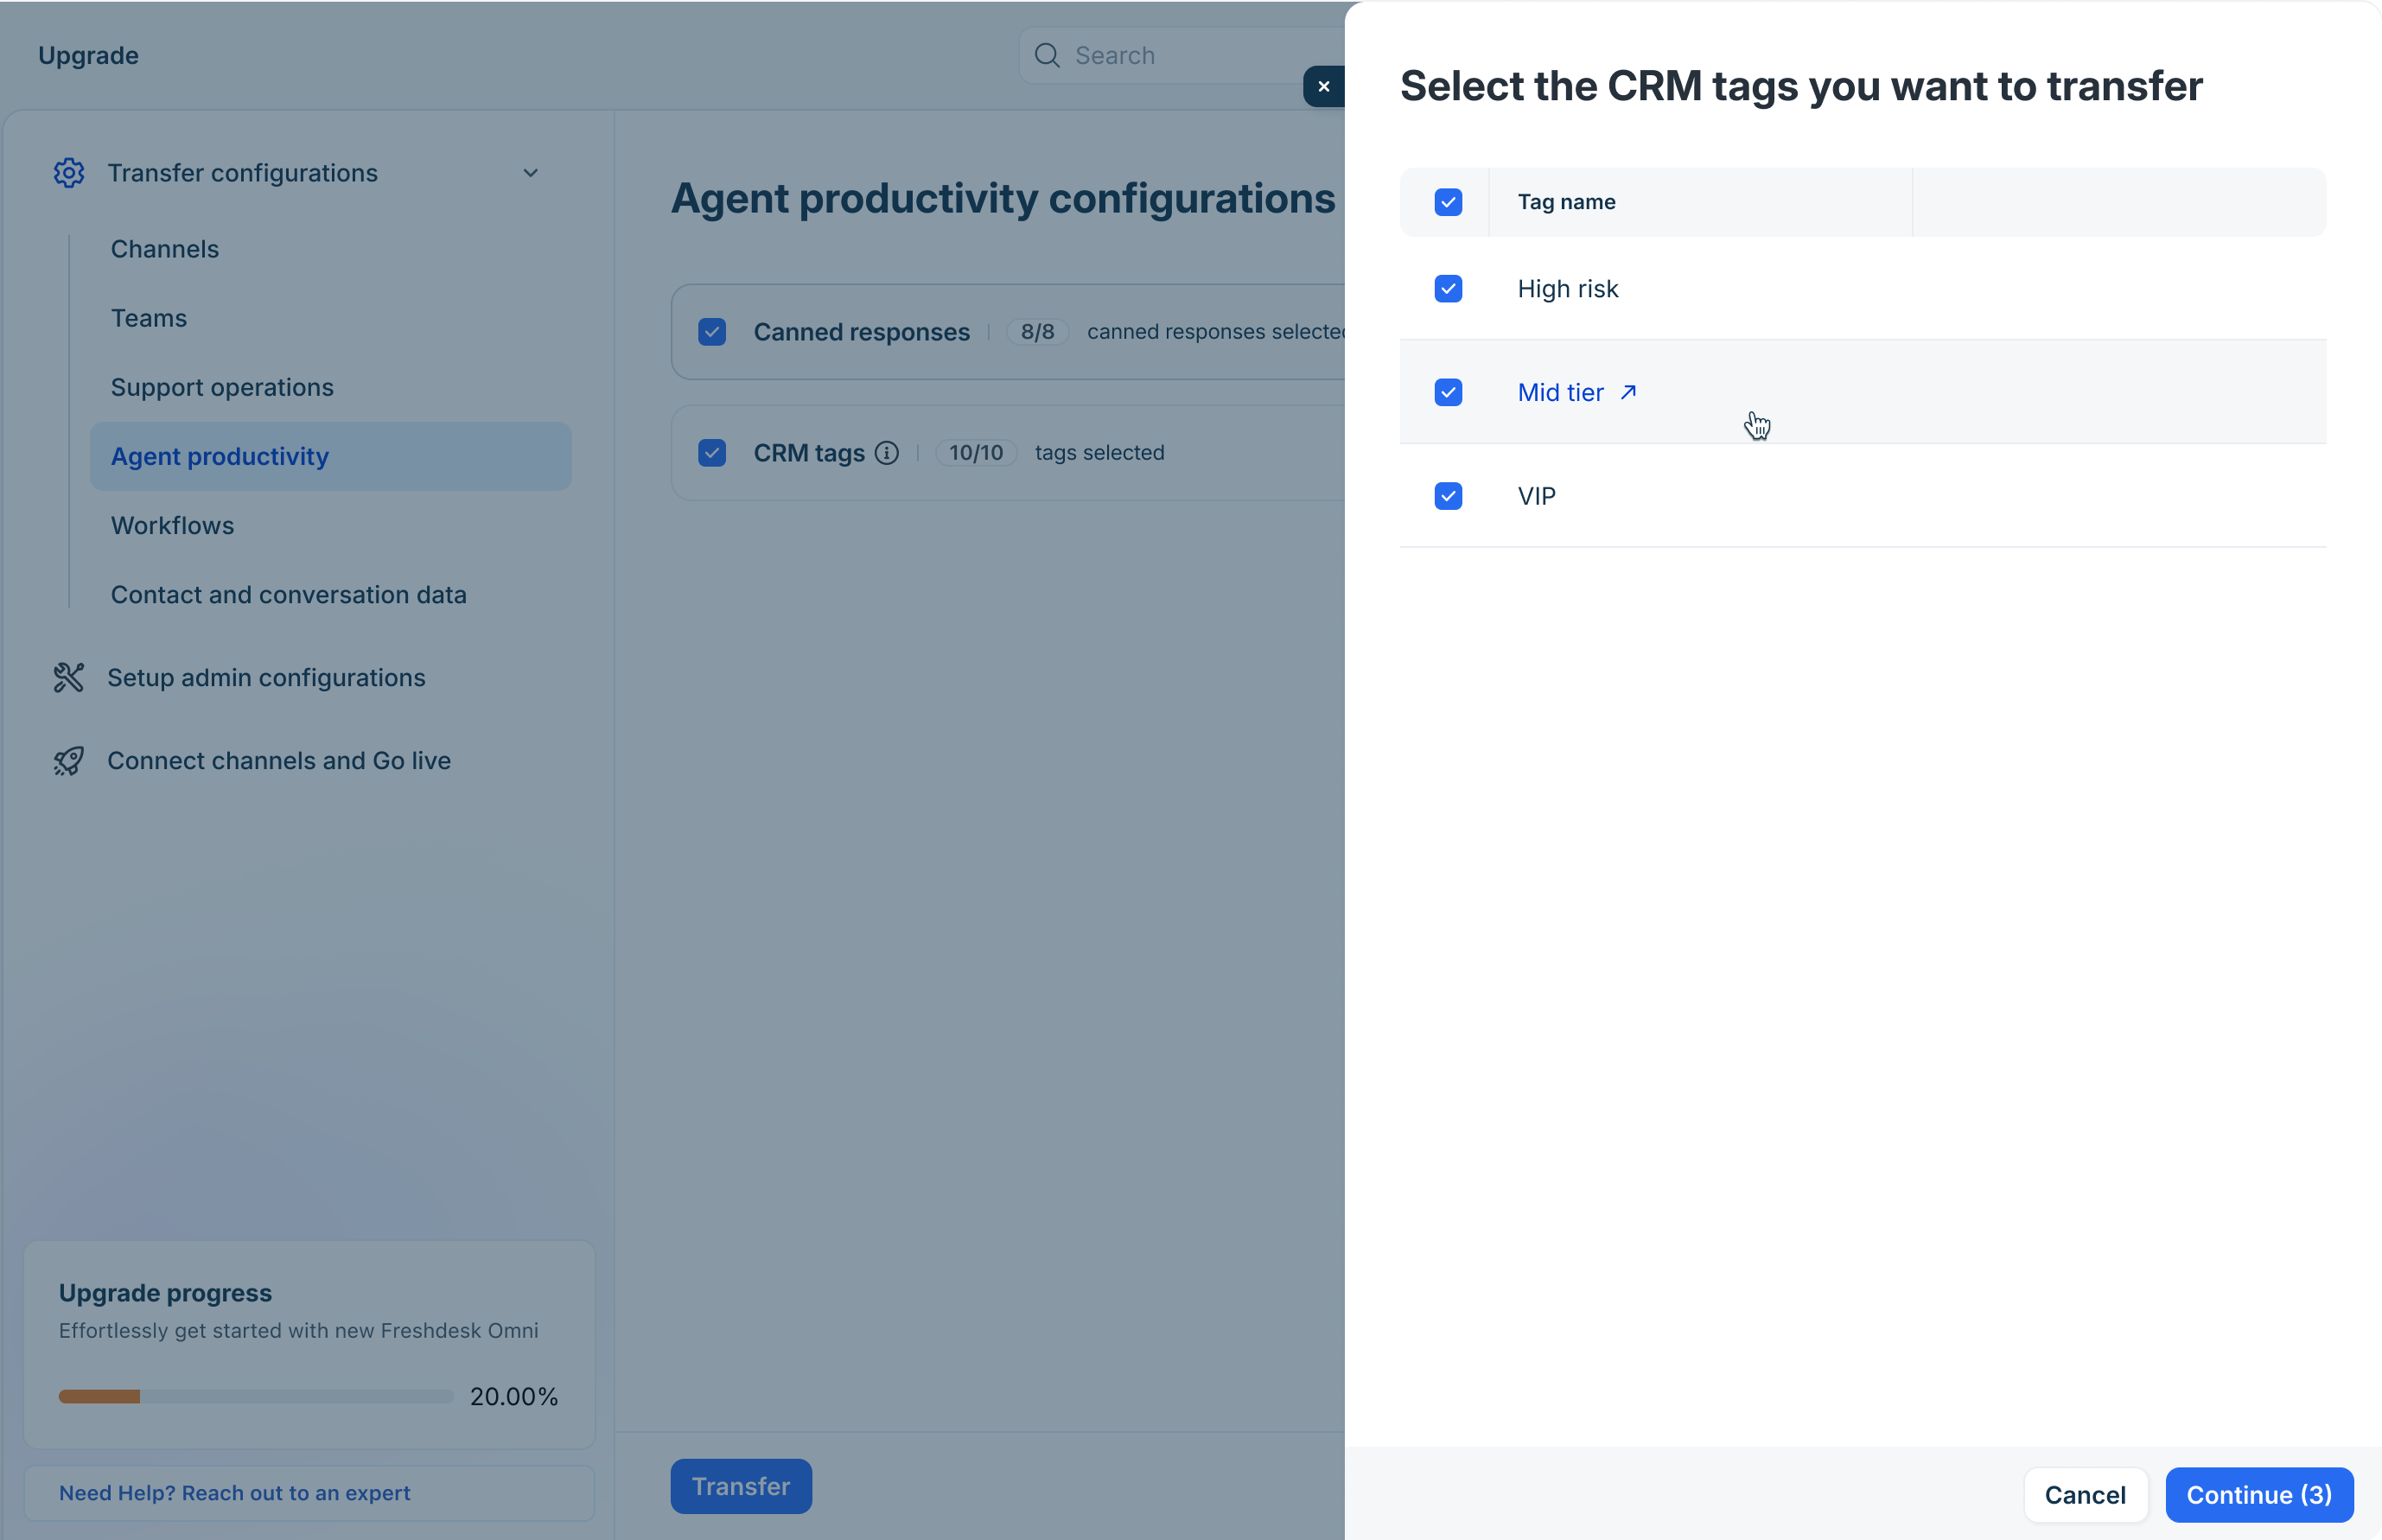
- Select the CRM tags you want to transfer.
- Click Continue.
- In the upgrade wizard, click Transfer.
Transfer workflow configurations
Workflow configurations control how conversations move through your support process - from automatic actions and ticket assignment to service-level tracking and customer feedback. Transferring these configurations to Freshdesk Omni 2025 ensures your existing routing and escalation logic continues to work after the upgrade.
The following sections explain how to transfer each workflow configuration:
- Advanced automations
- Assignment rules
- SLA policies
- Customer satisfaction (CSAT)
- Intelliassign
Transfer advanced automations
Freshchat advanced automations manage routine ticket tasks, like escalating issues or updating properties, automatically. You can migrate these rules to Freshdesk Omni 2025 as Automations to maintain seamless automated handling following your upgrade.
Note: Advanced automations are copied as Automations in Freshdesk Omni.
Important:
- Only non-scheduled, enabled rules are transferred. After the transfer, you must enable these rules again in Freshdesk Omni.
- Scheduled rules will not be transferred. You can recreate these using Quick Automations in Freshdesk Omni.
To transfer automations:
- In the upgrade wizard, go to Transfer Configurations > Workflows.
- Select Advanced automations. You will see the available automation rules.
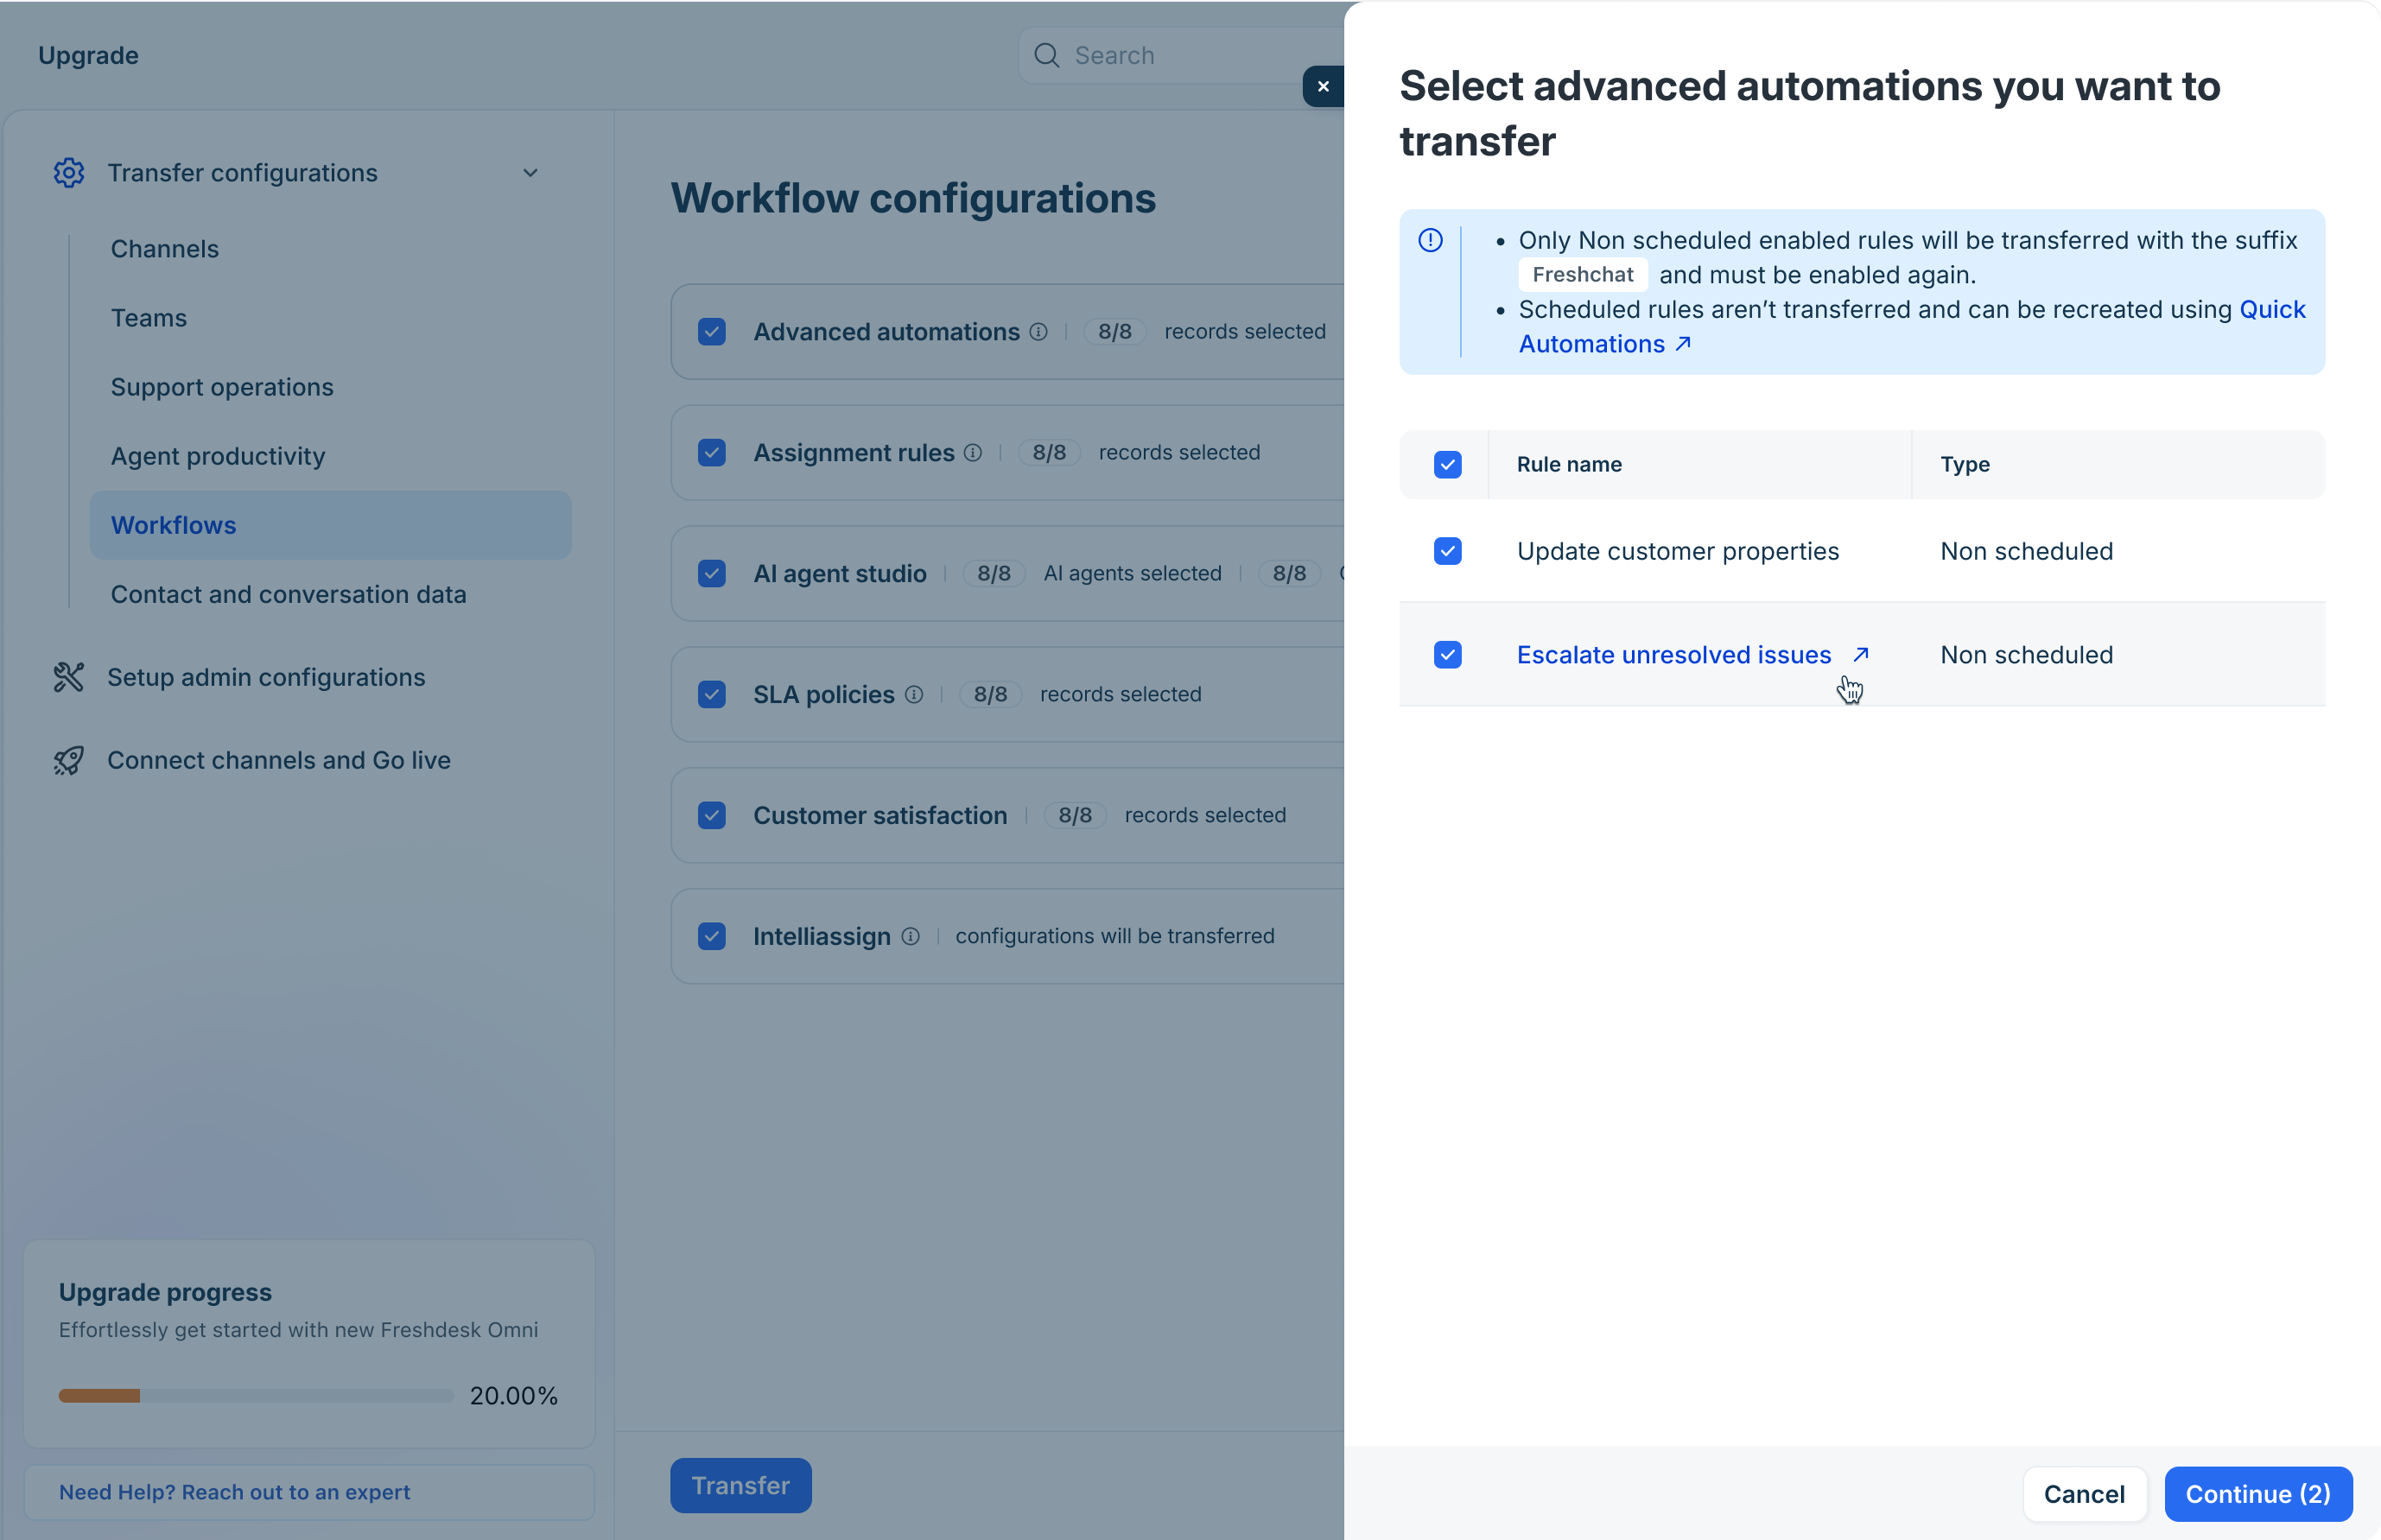
- Select the automation rules you want to transfer.
- Click Continue.
- In the upgrade wizard, click Transfer.
Transfer assignment rules
Assignment rules route incoming tickets to the right agent or group based on defined criteria, such as ticket type or priority. Transferring these rules to Freshdesk Omni 2025 ensures tickets continue to be routed correctly after the upgrade.
Note: Assignment rules are moved under the Automations module in Freshdesk Omni.
Important: Only enabled rules are transferred. After the transfer, you must enable these rules again in Freshdesk Omni 2025. Also, the selected assignment rules are copied with the suffix "Freshchat".
To transfer assignment rules:
- In the upgrade wizard, go to Transfer Configurations > Workflows.
- Select Assignment rules. You will see the available assignment rules.
- Select the assignment rules you want to transfer. To select all listed rules, select the checkbox in the header row.
- Click Continue.
- In the upgrade wizard, click Transfer.
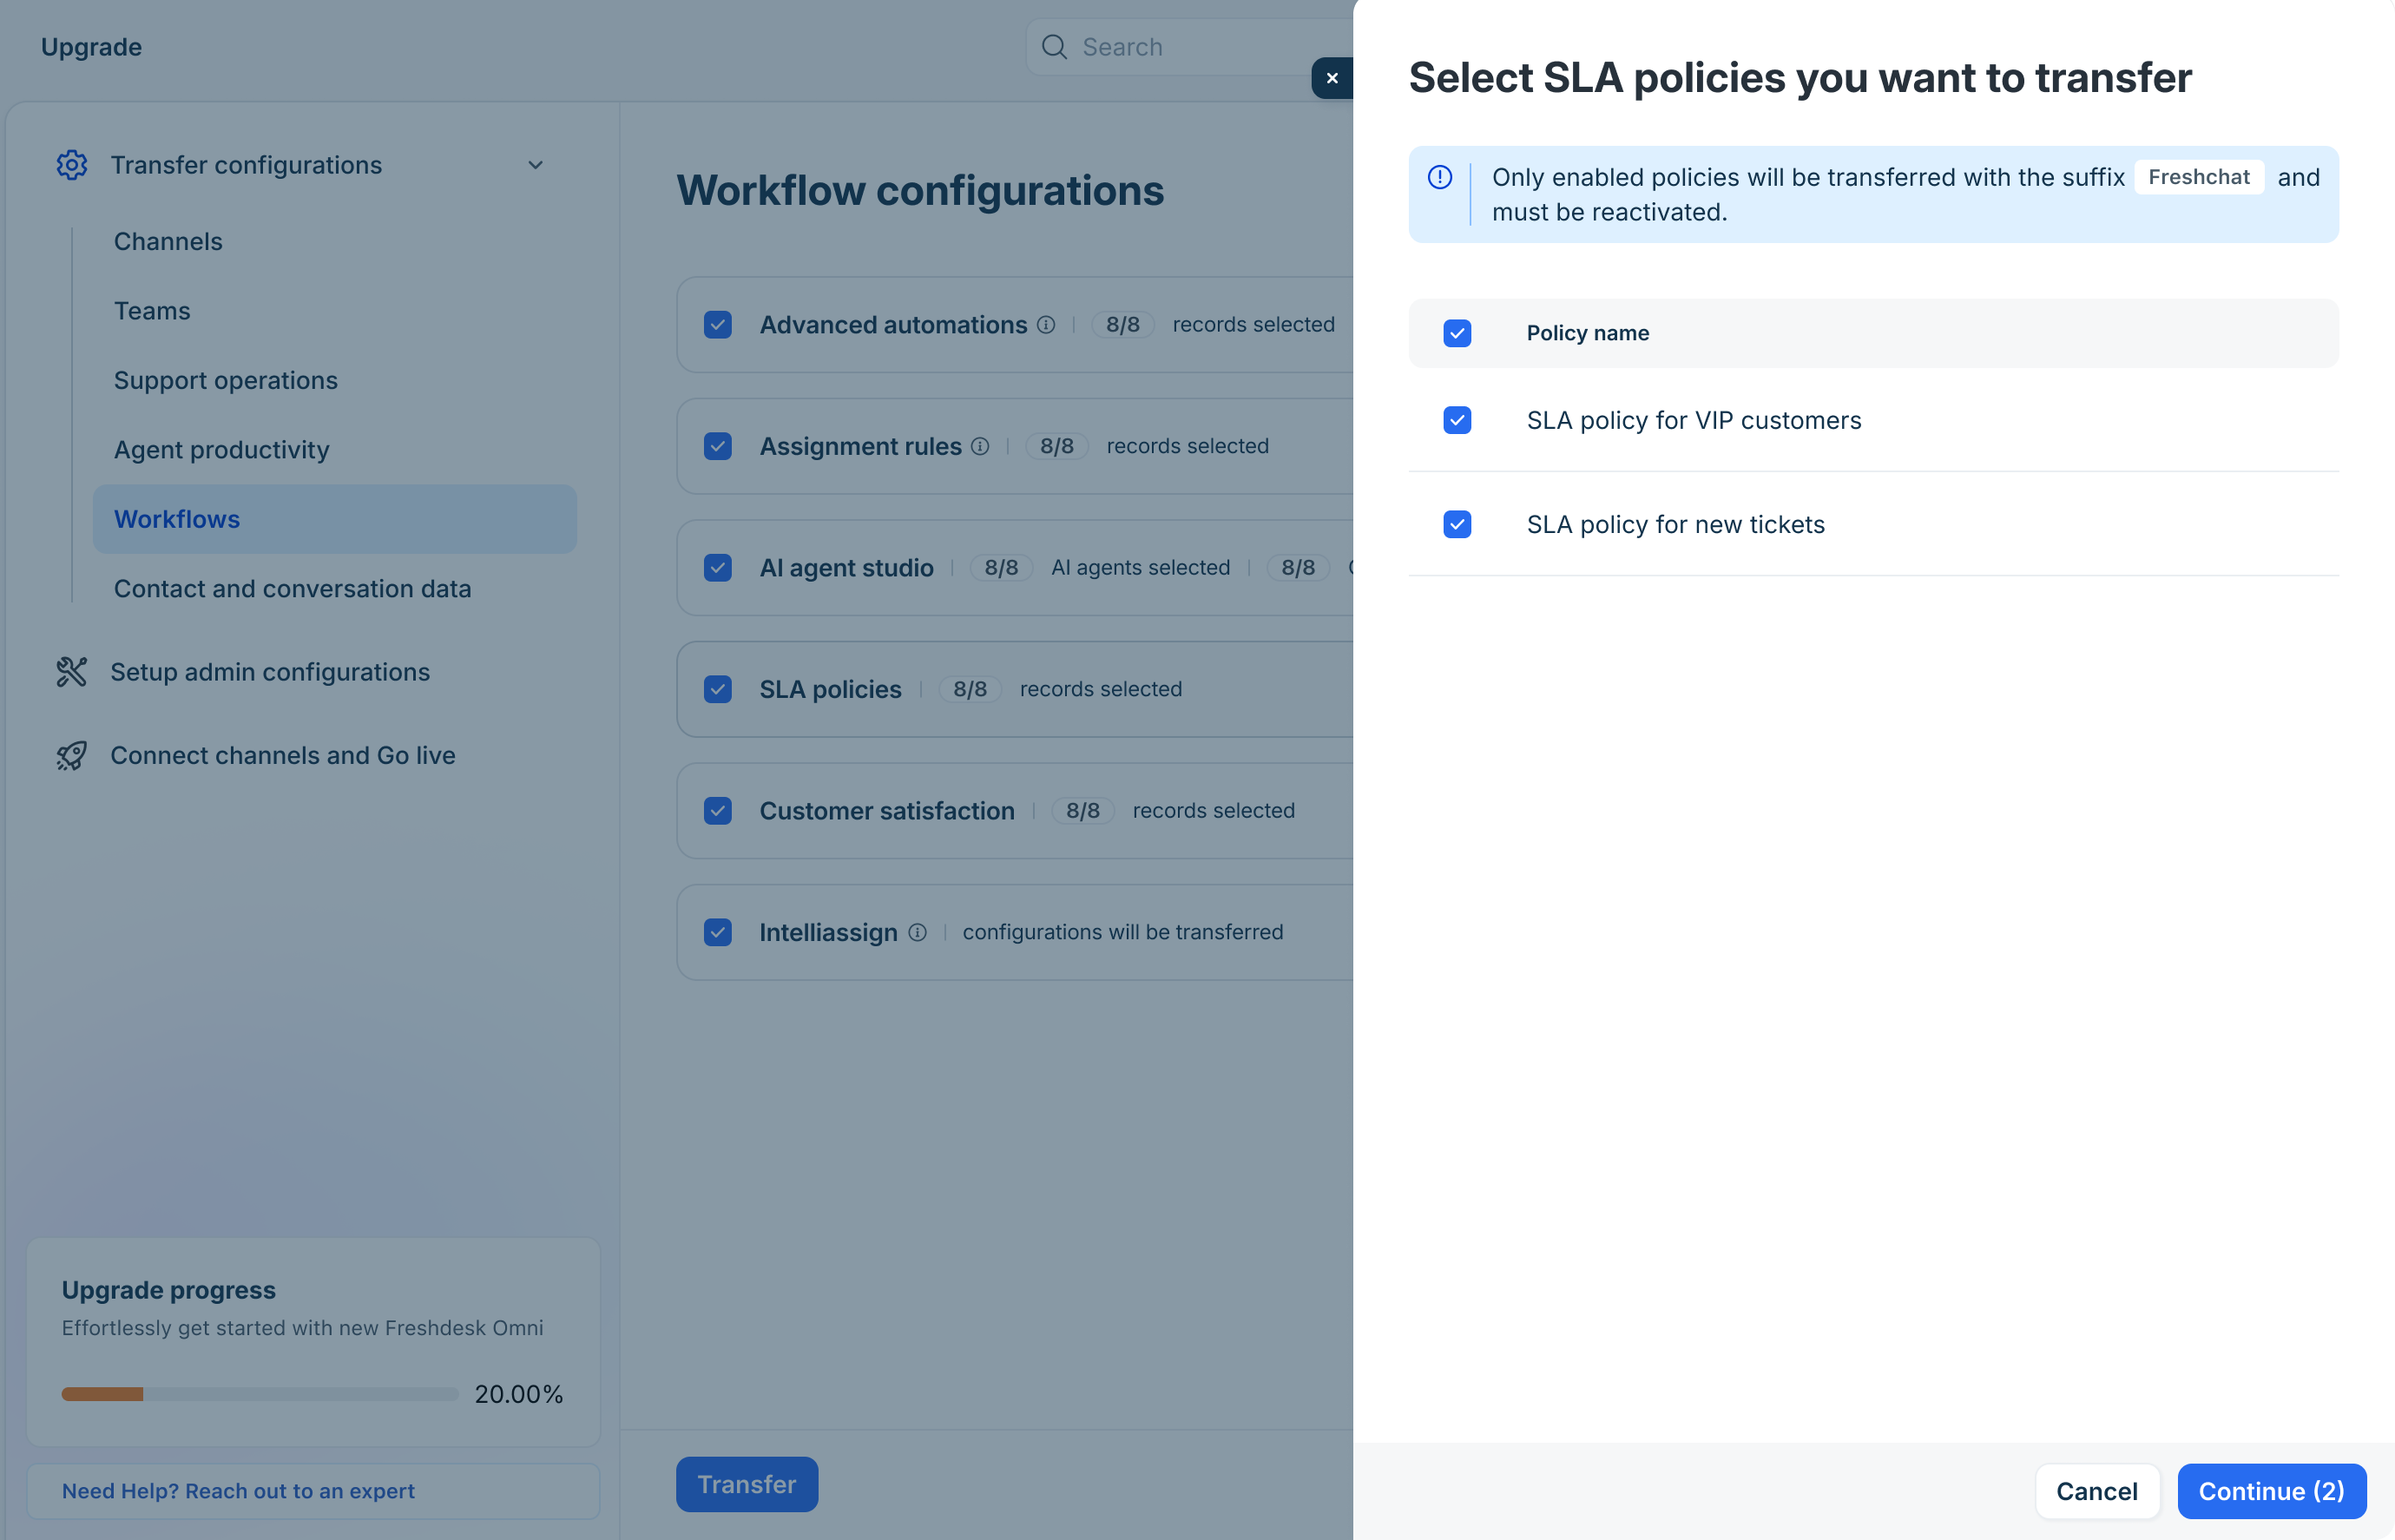
Transfer SLA policies
SLA policies define the response and resolution time targets your team is expected to meet. Transfer these policies to Freshdesk Omni 2025 so the SLA commitments stay enforced after the upgrade.
Note: Only enabled SLA policies are transferred. After the transfer, ensure to reactivate them again in Freshdesk Omni 2025. Also, the selected SLA policies are copied with the suffix "Freshchat".
To transfer SLA policies:
- In the upgrade wizard, go to Transfer Configurations > Workflows.
- Select SLA policies. You will see the available SLA policies.
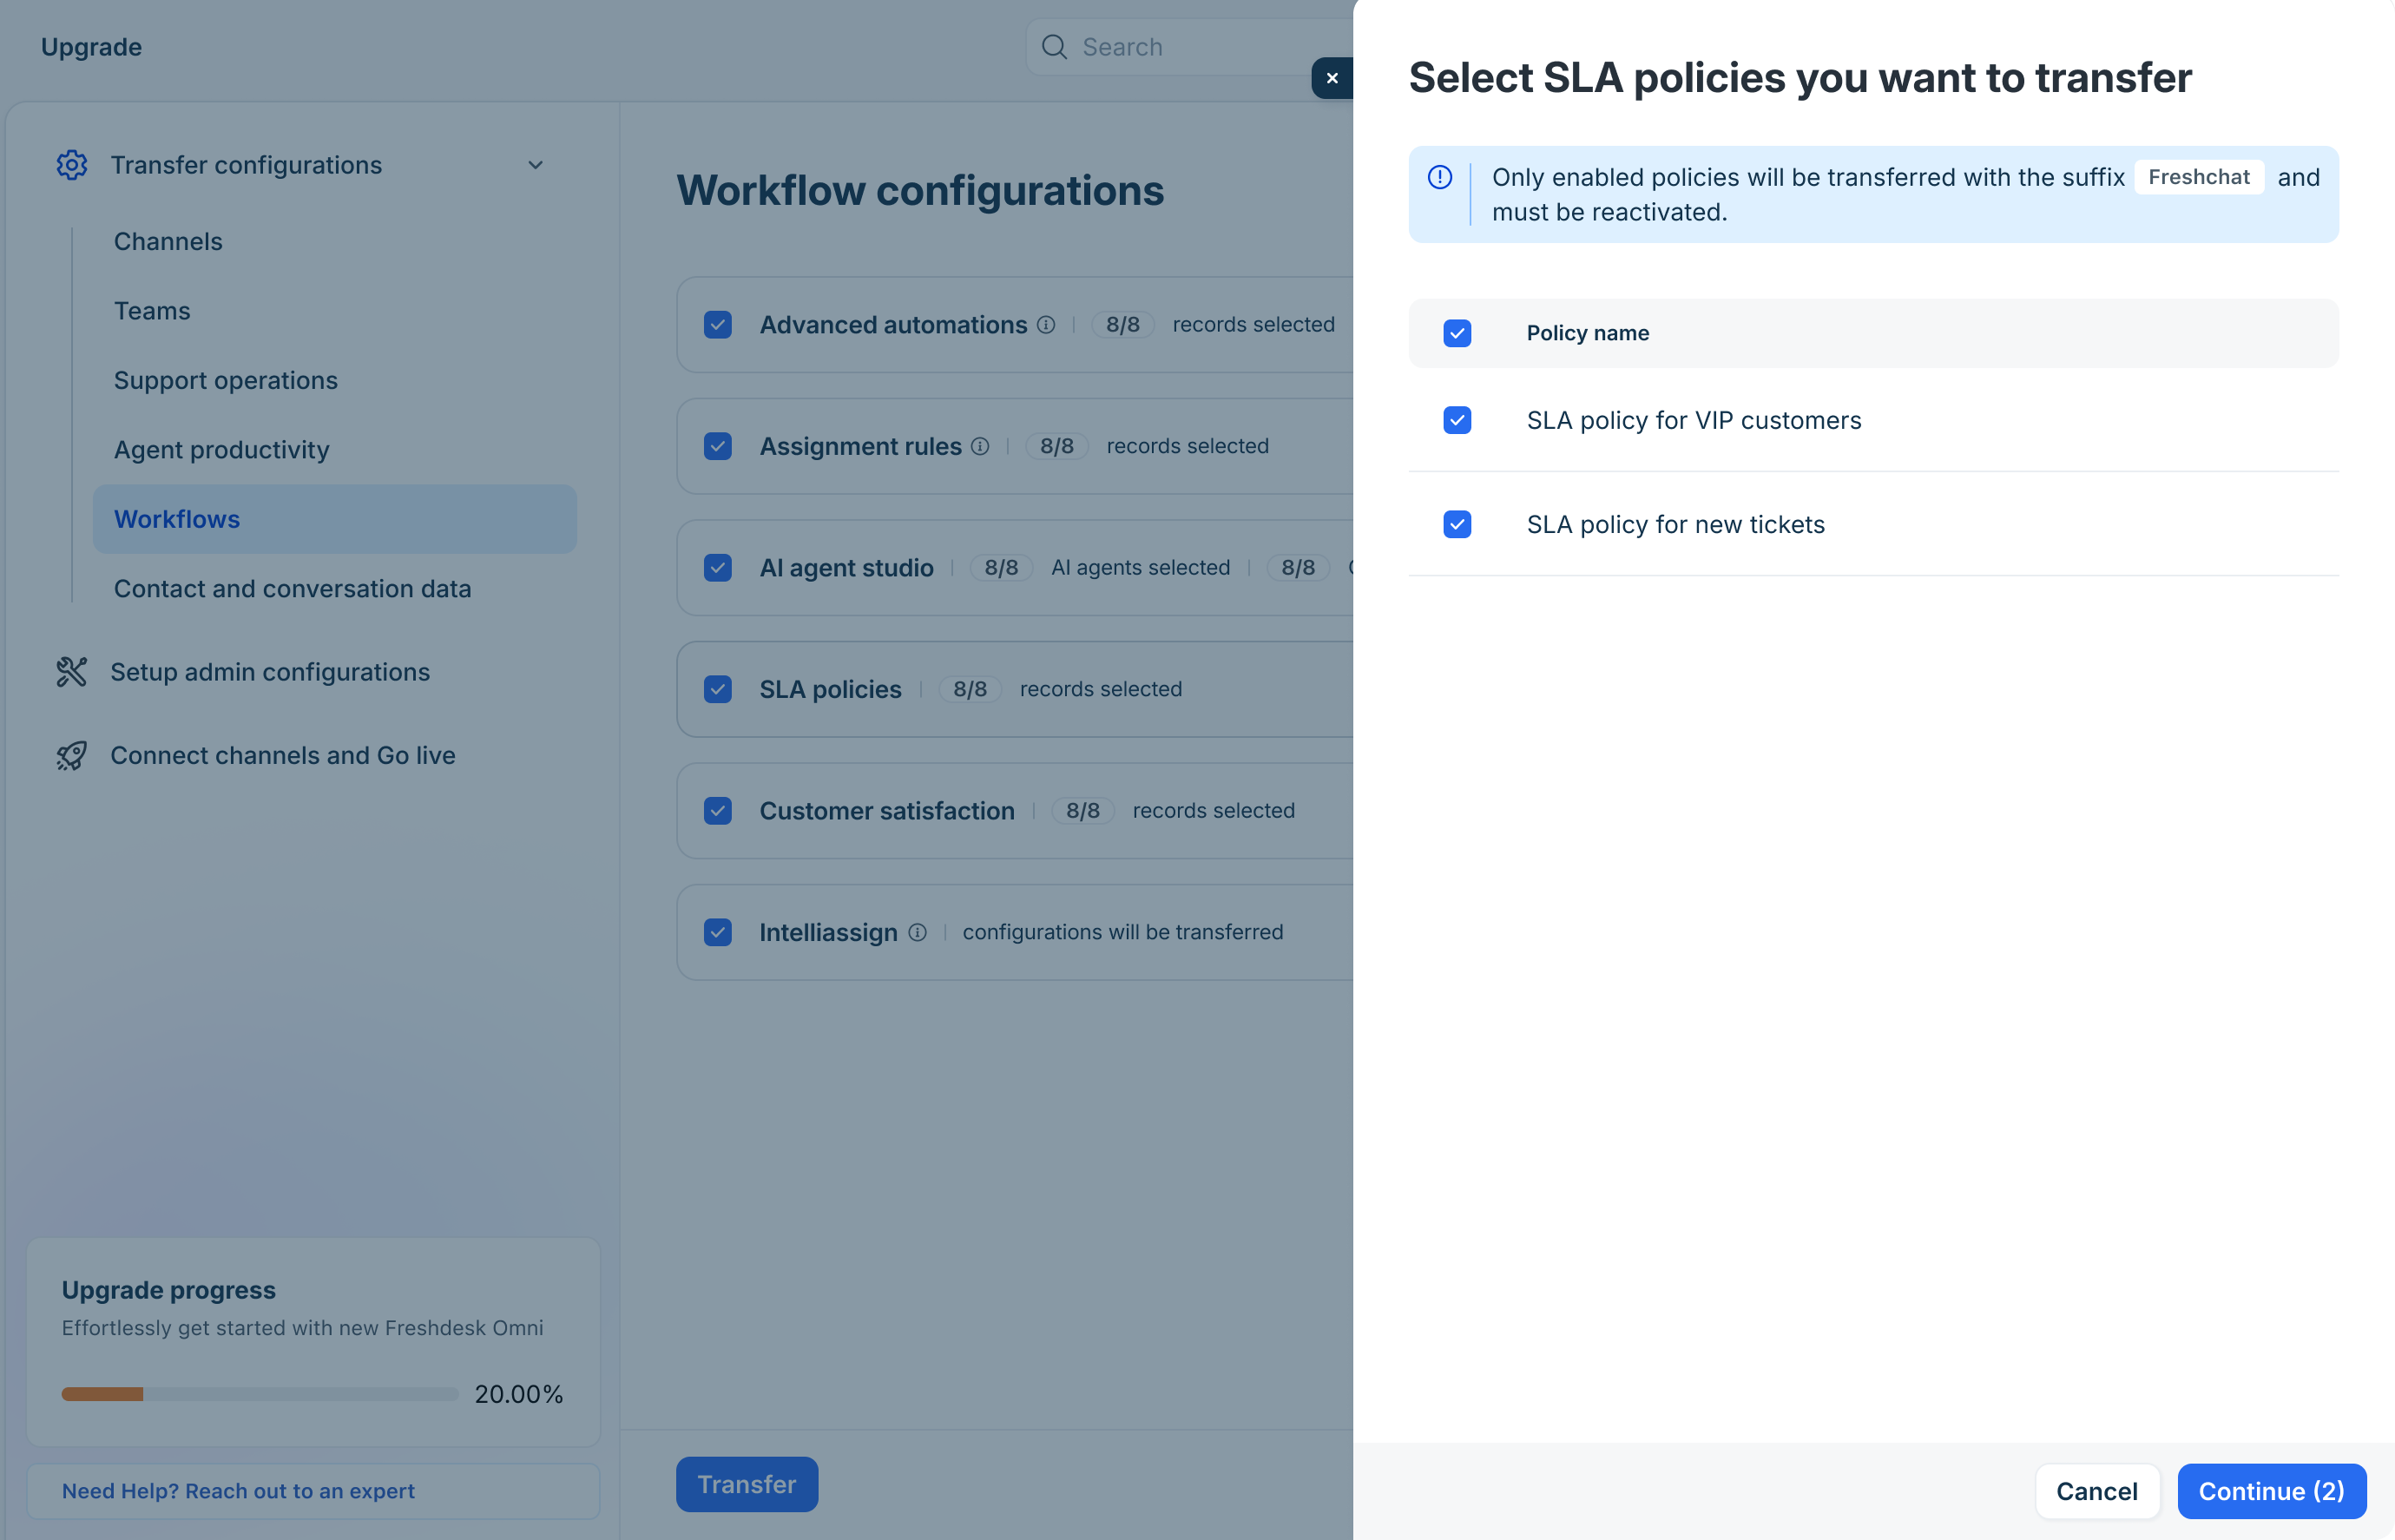
- Select the SLA policies you want to transfer. To select all listed policies, select the checkbox in the header row.
- Click Continue.
- In the upgrade wizard, click Transfer.
Transfer customer satisfaction (CSAT) surveys
CSAT surveys capture customer feedback after a conversation is resolved, giving you visibility into service quality. Transfer these surveys to Freshdesk Omni 2025 to keep your feedback collection running without gaps.
Important: Only active and paused surveys are transferred with the suffix “Freshchat”. After the transfer, you must reactivate these surveys in Freshdesk Omni.
To transfer CSAT surveys:
- In the upgrade wizard, go to Transfer Configurations > Workflows.
- Select Customer satisfaction. You will see the available CSAT surveys.
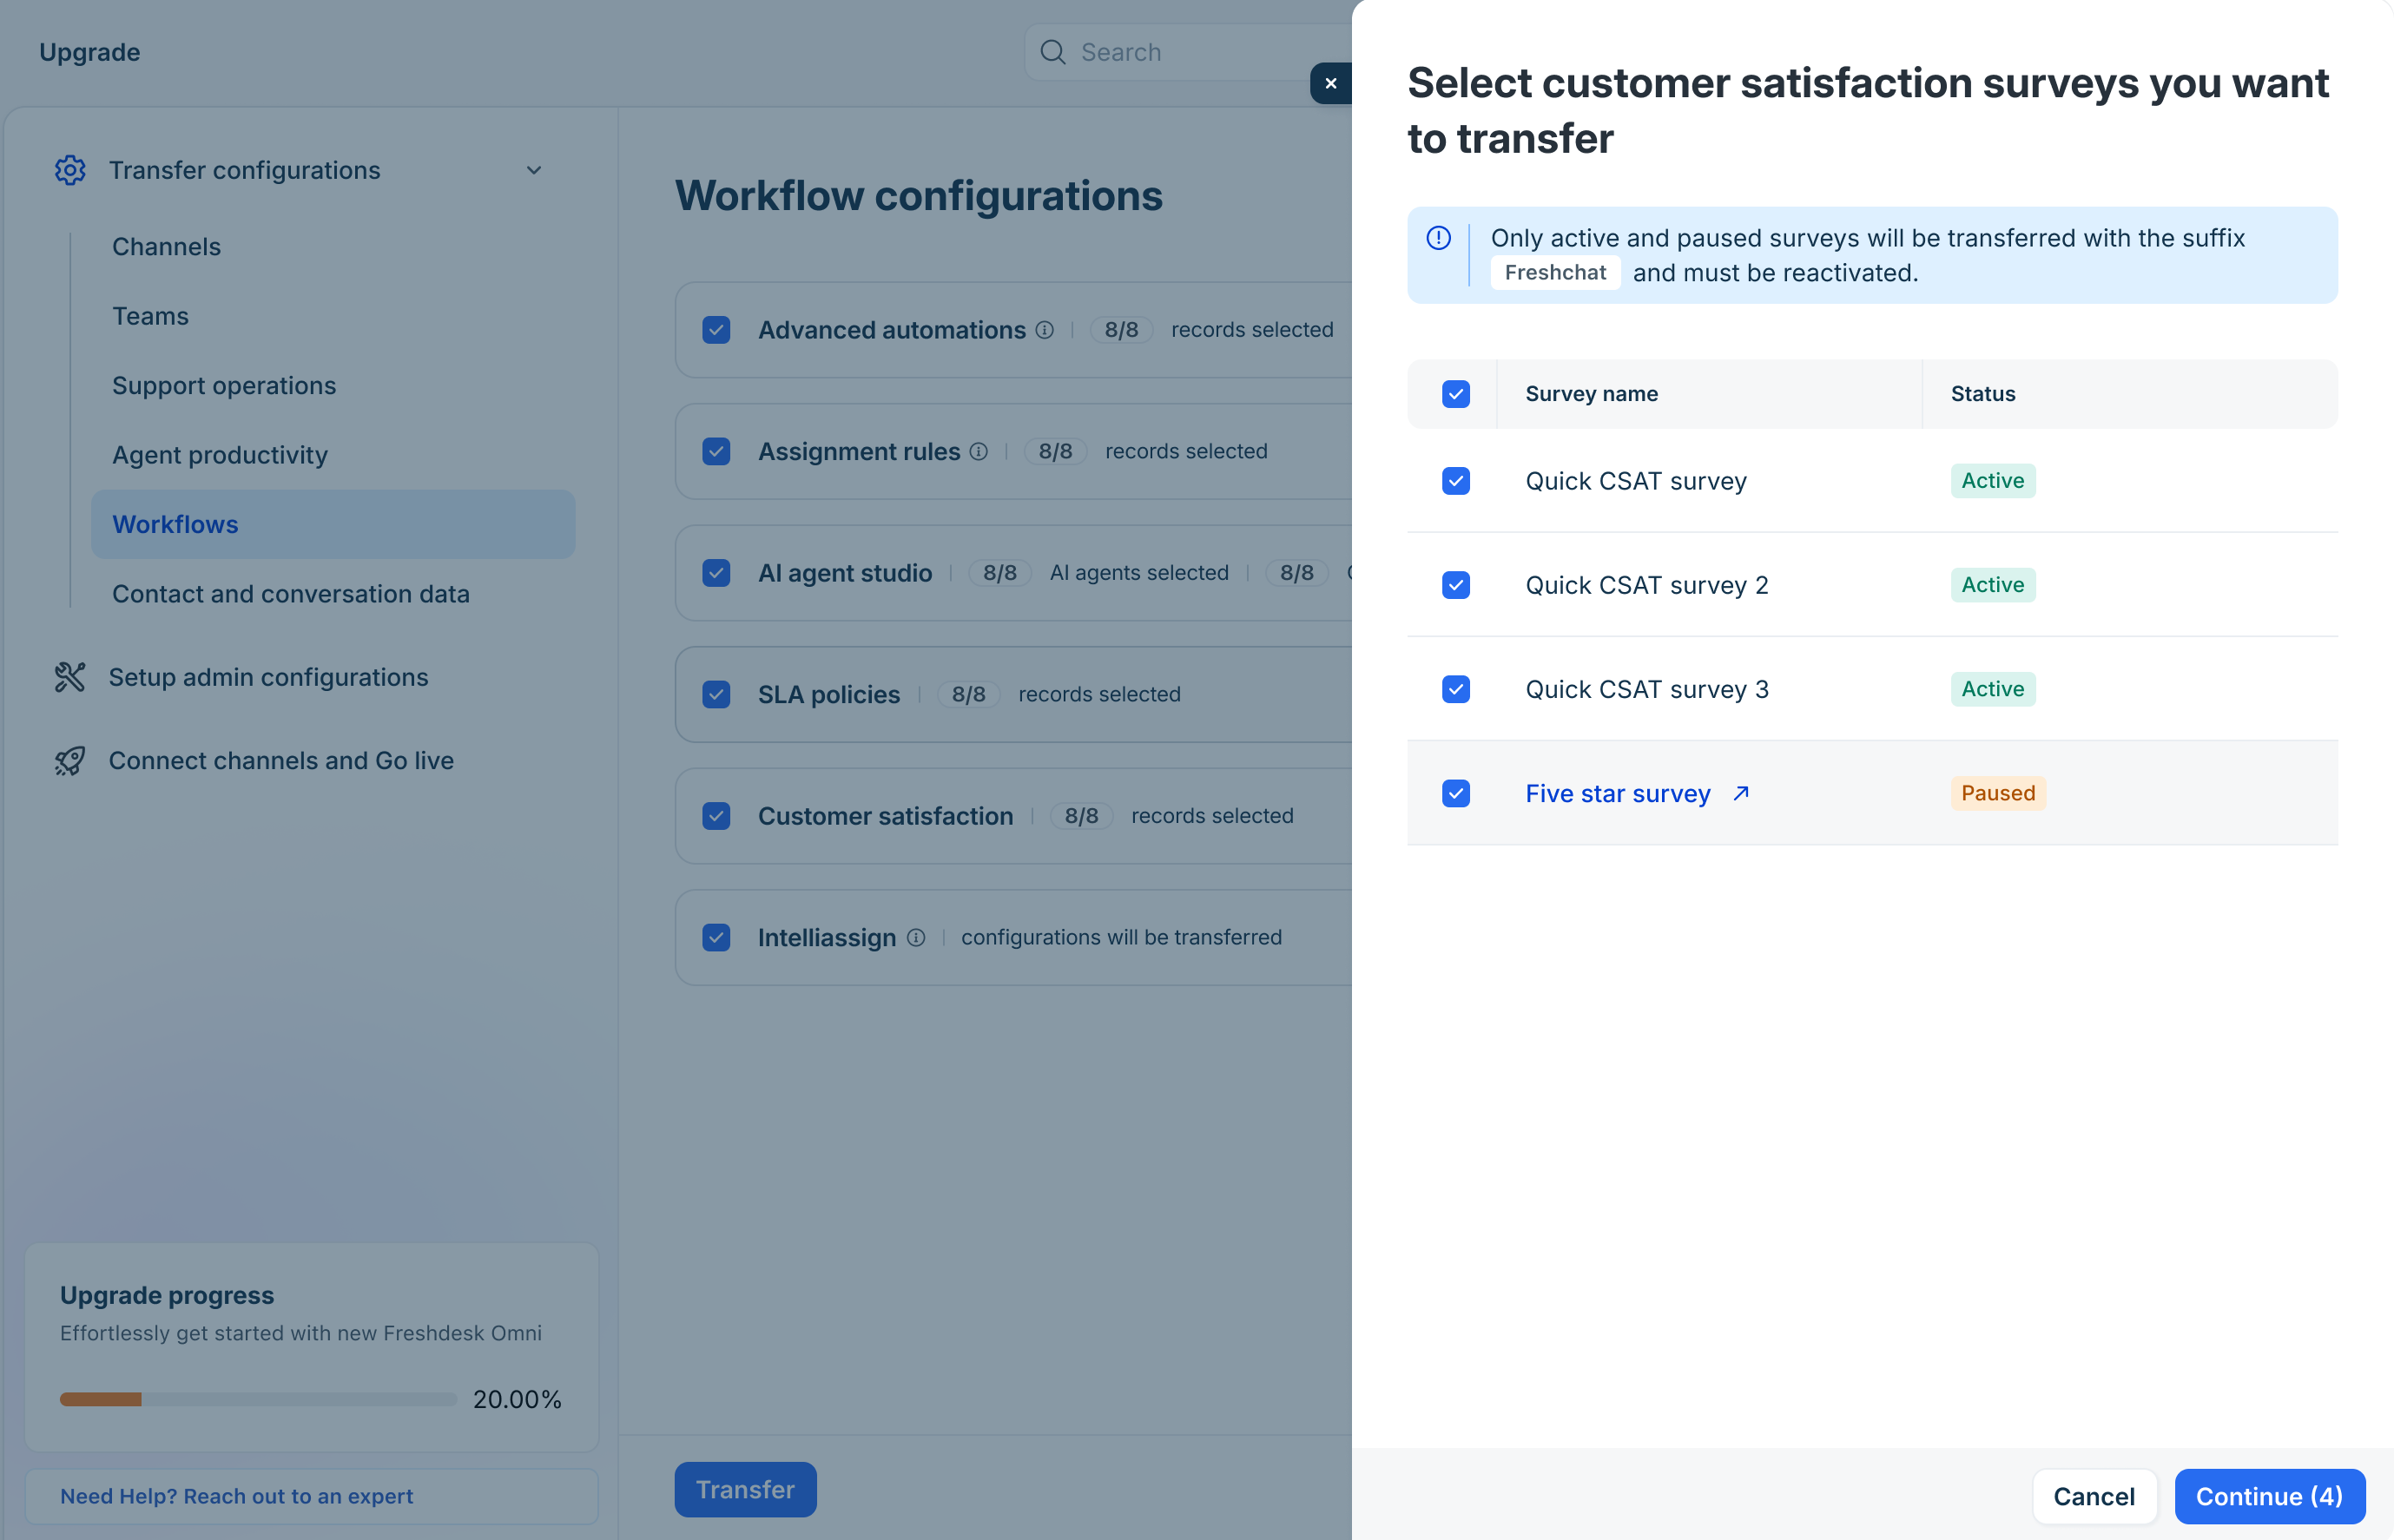
- Select the surveys you want to transfer. To select all listed surveys, select the checkbox in the header row.
- Click Continue.
- In the upgrade wizard, click Transfer.
Transfer Intelliassign settings
Intelliassign distributes incoming conversations across agents based on availability and workload, so tickets are assigned without manual effort. Transferring these settings carries that assignment logic into Freshdesk Omni 2025.
Notes:
- Individual Intelliassign records cannot be selected for transfer; instead, they are copied as complete settings.
- Intelliassign is moved under Omniroute in Freshdesk Omni.
To transfer Intelliassign settings:
- In the upgrade wizard, go to Transfer Configurations > Workflows.
- Ensure the Intelliassign checkbox is selected.
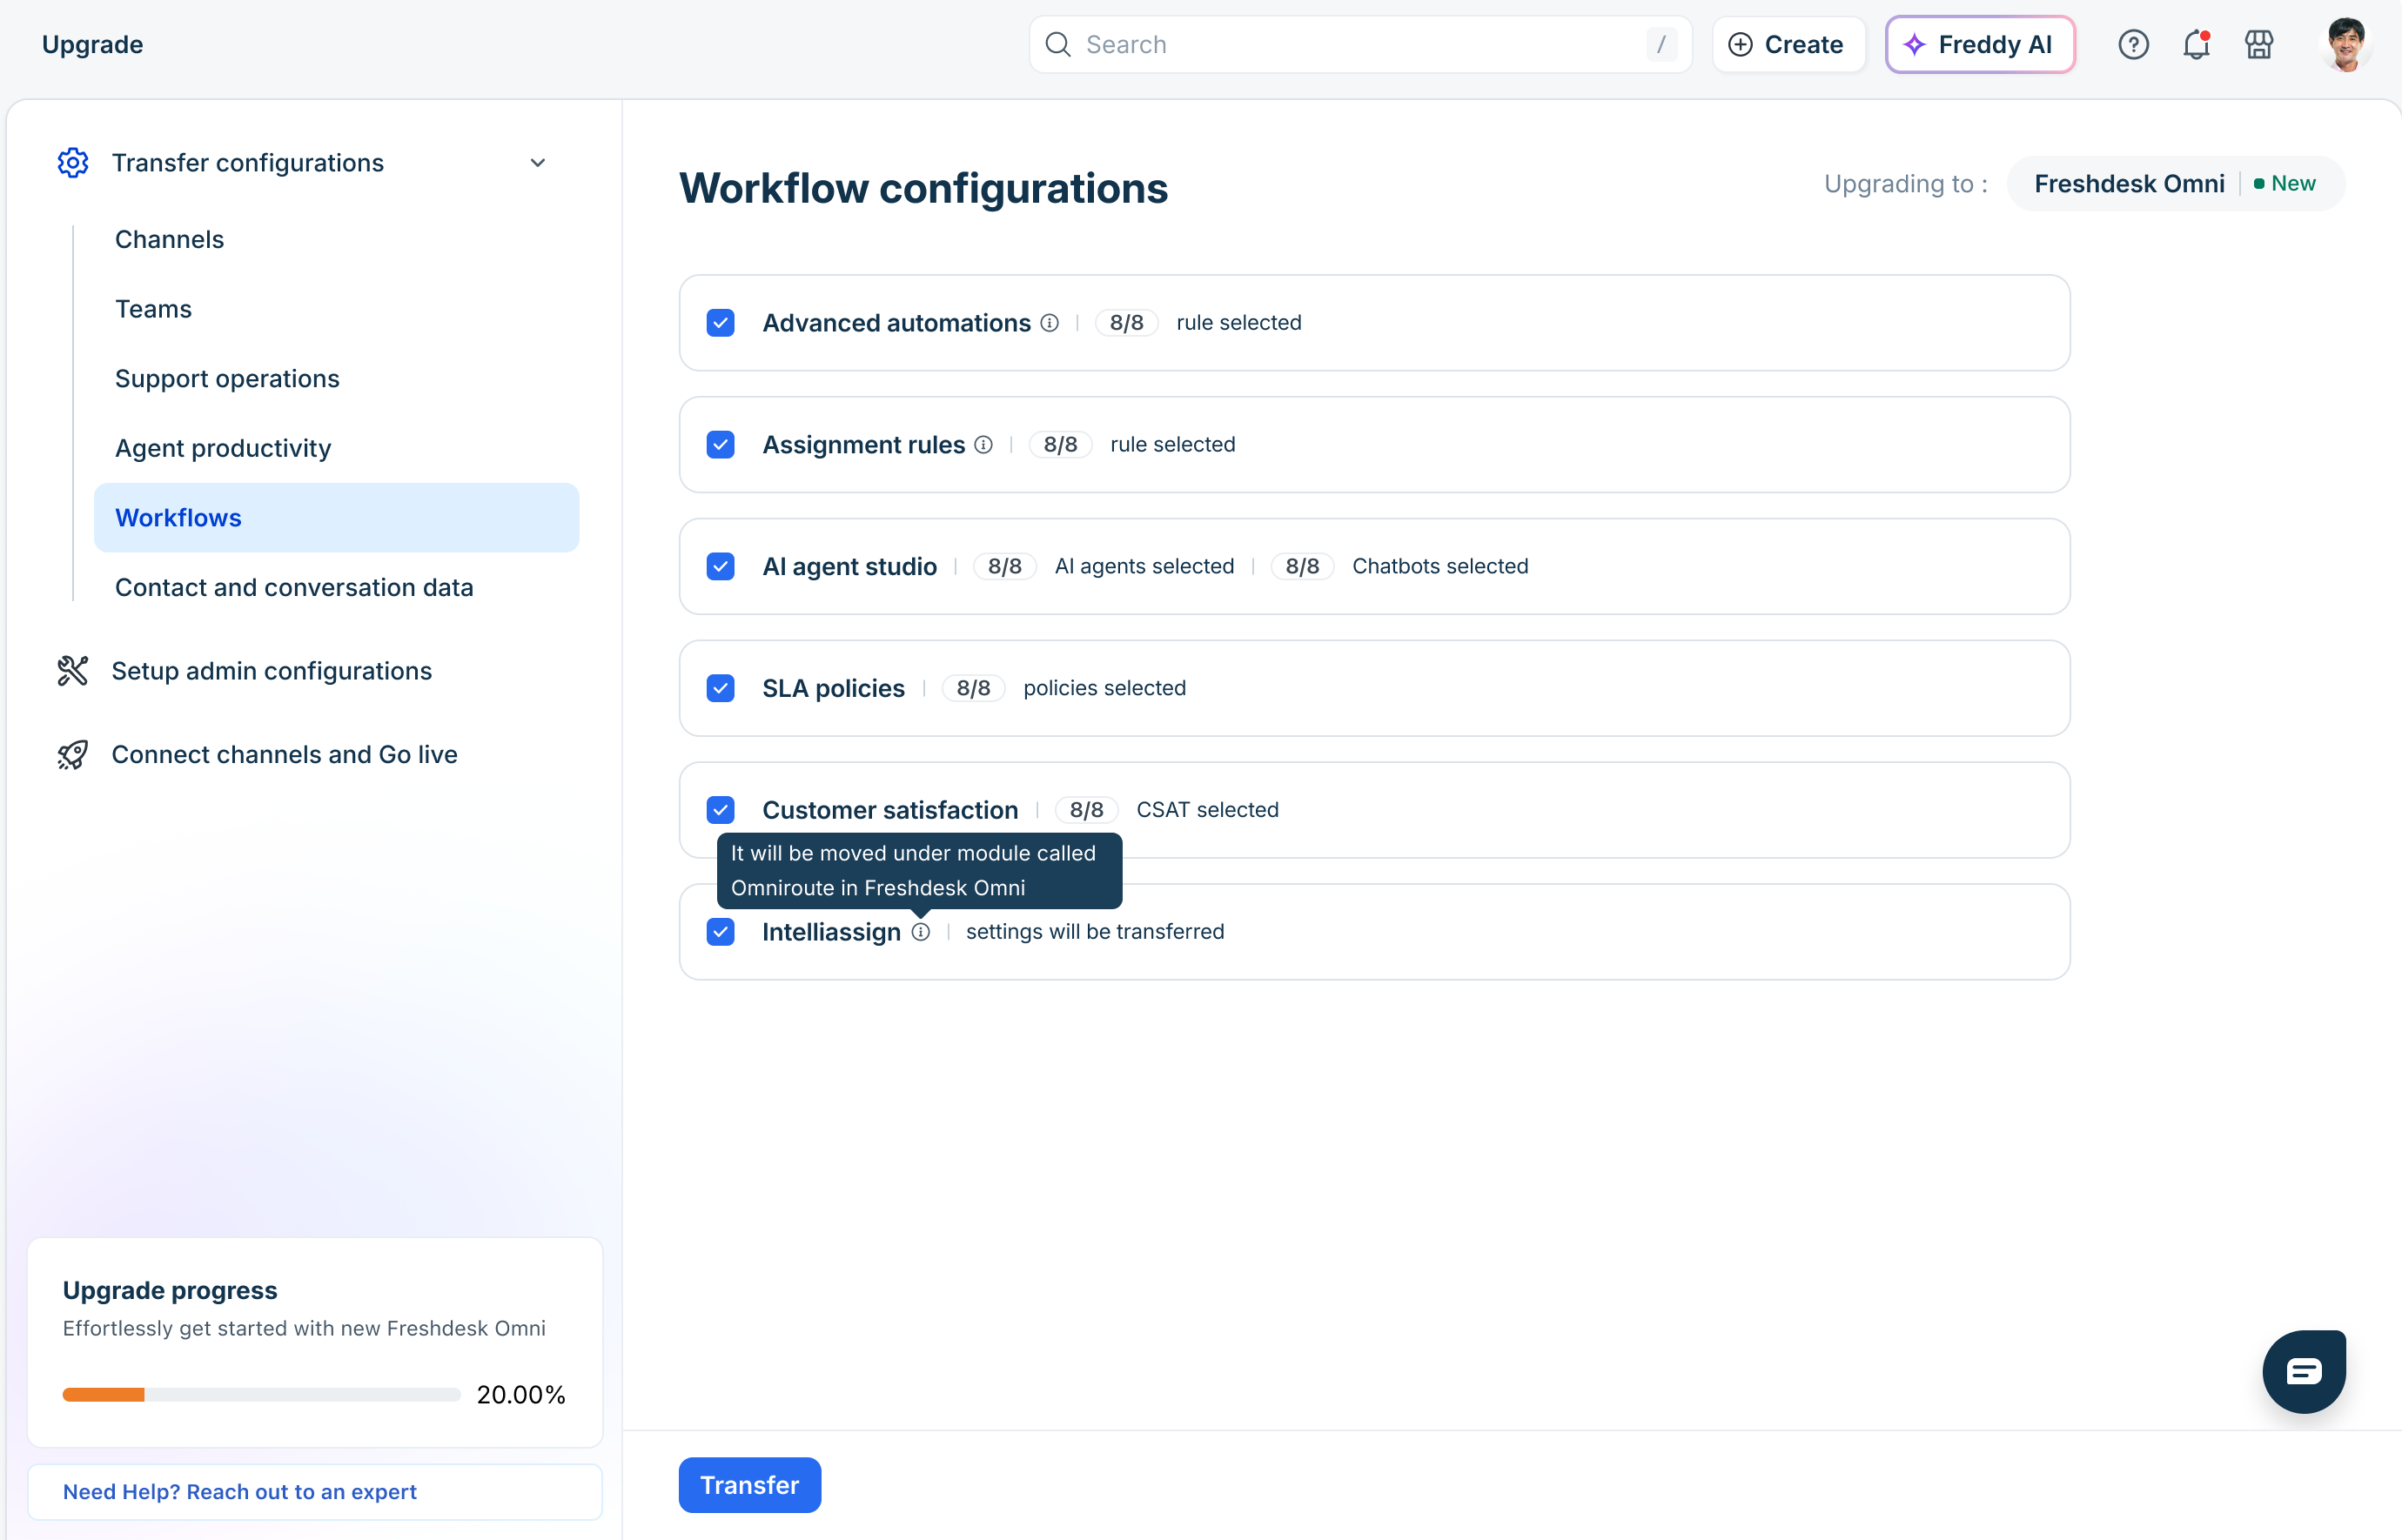
- Click Transfer to copy your Intelliassign settings to Freshdesk Omni 2025, along with the other selected workflow configurations.
Transfer contacts and conversation data
This step covers your customer records, such as contacts, companies, and the conversations associated with them. Bringing this data into Freshdesk Omni 2025 gives agents the same customer context they had in Freshchat from the moment the upgrade goes live.
The following sections explain how to transfer each type of contact and conversation data:
- Contacts
- Companies
- Conversations
Transfer contacts
Freshchat contacts contain valuable customer information gathered during past interactions, including names, phone numbers, and email addresses.
By migrating this data to Freshdesk Omni 2025, you can ensure that agents have immediate access to comprehensive customer histories, preventing them from having to work with empty records once your account is migrated.
Note: All contacts are transferred by default. It is not possible to select individual contacts to include or exclude.
Important: Once contacts are transferred, the Contacts row and its settings can no longer be edited.
To transfer contacts:
- In the upgrade wizard, go to Transfer Configurations > Contact and conversation data.
- Under Contacts and Accounts, select Contacts.
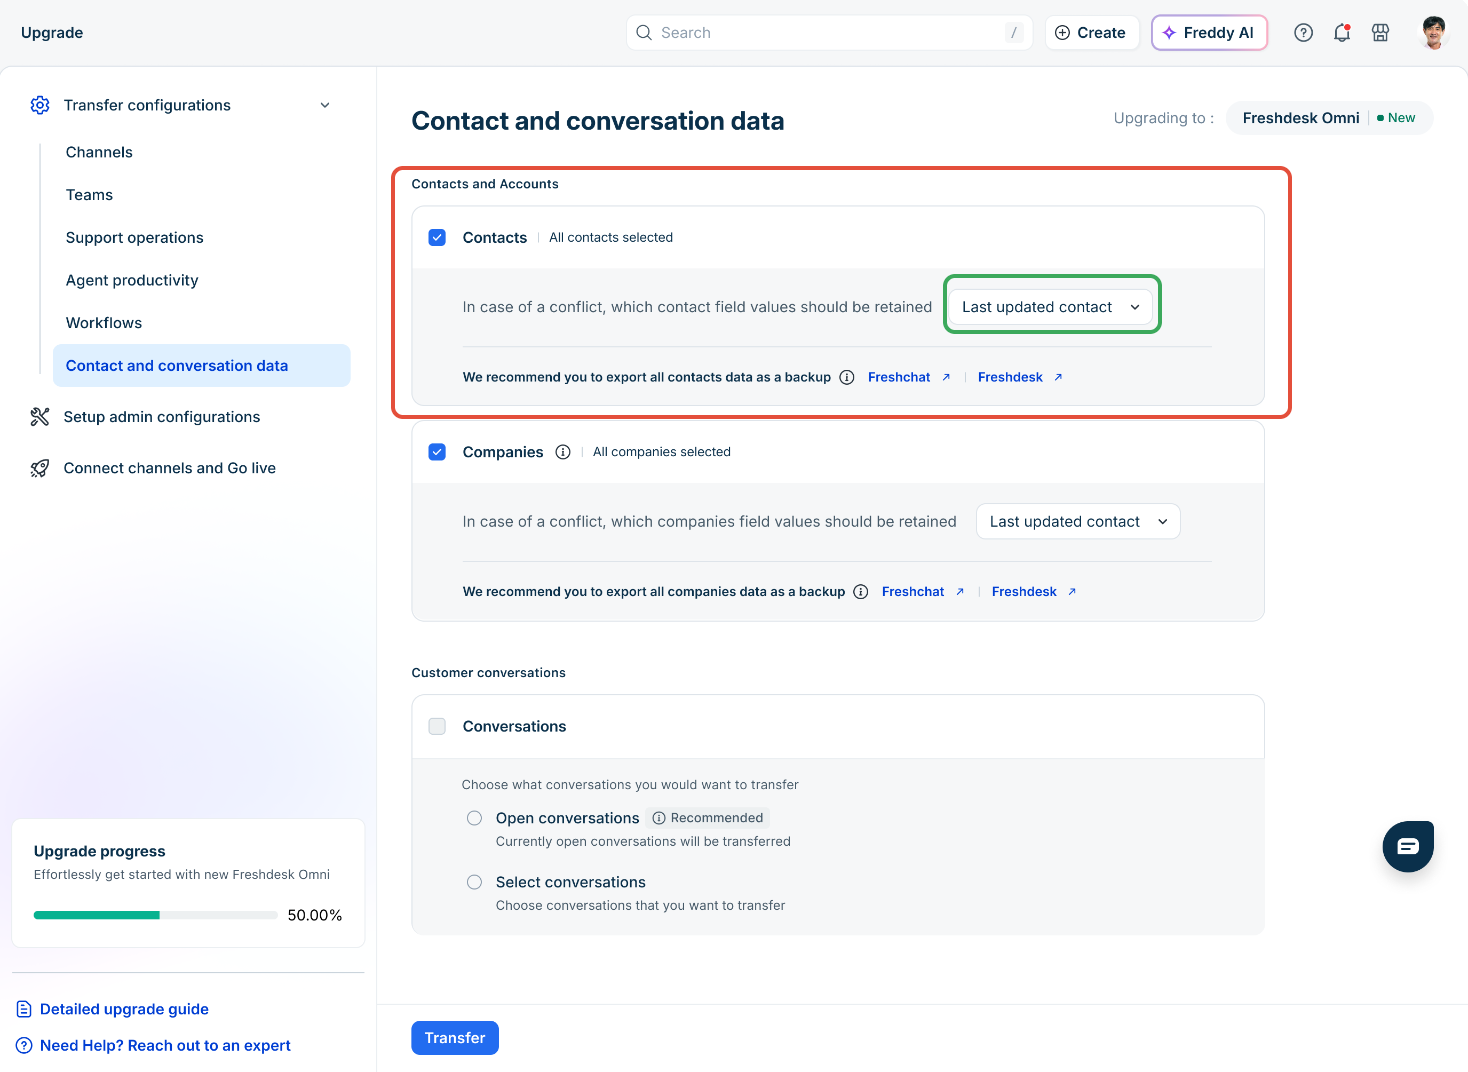
- Select how you want to restore a contact record when a company exists in both Freshdesk and Freshchat. The options are:
- Last updated contact
- First created contact
- Freshdesk contact
- Freshchat contact
- To receive a backup of your Freshdesk and Freshchat contacts by email before the transfer, click Freshdesk and Freshchat links.
- Click Transfer.
Transfer companies
Freshchat companies group related contacts under a shared organization, such as a customer's employer, and carry their own custom field data. Migrating this data to Freshdesk Omni 2025 means agents can see which organization a contact belongs to immediately, instead of that context being missing after the upgrade.
Note: Companies are copied as Accounts in Freshdesk Omni.
Important:
- All companies are transferred by default. It is not possible to select individual companies to include or exclude.
- Once companies are transferred, the Companies row and its settings can no longer be edited.
To transfer companies:
- In the upgrade wizard, go to Transfer Configurations > Contact and conversation data.
- Under Contacts and Accounts, select Companies.
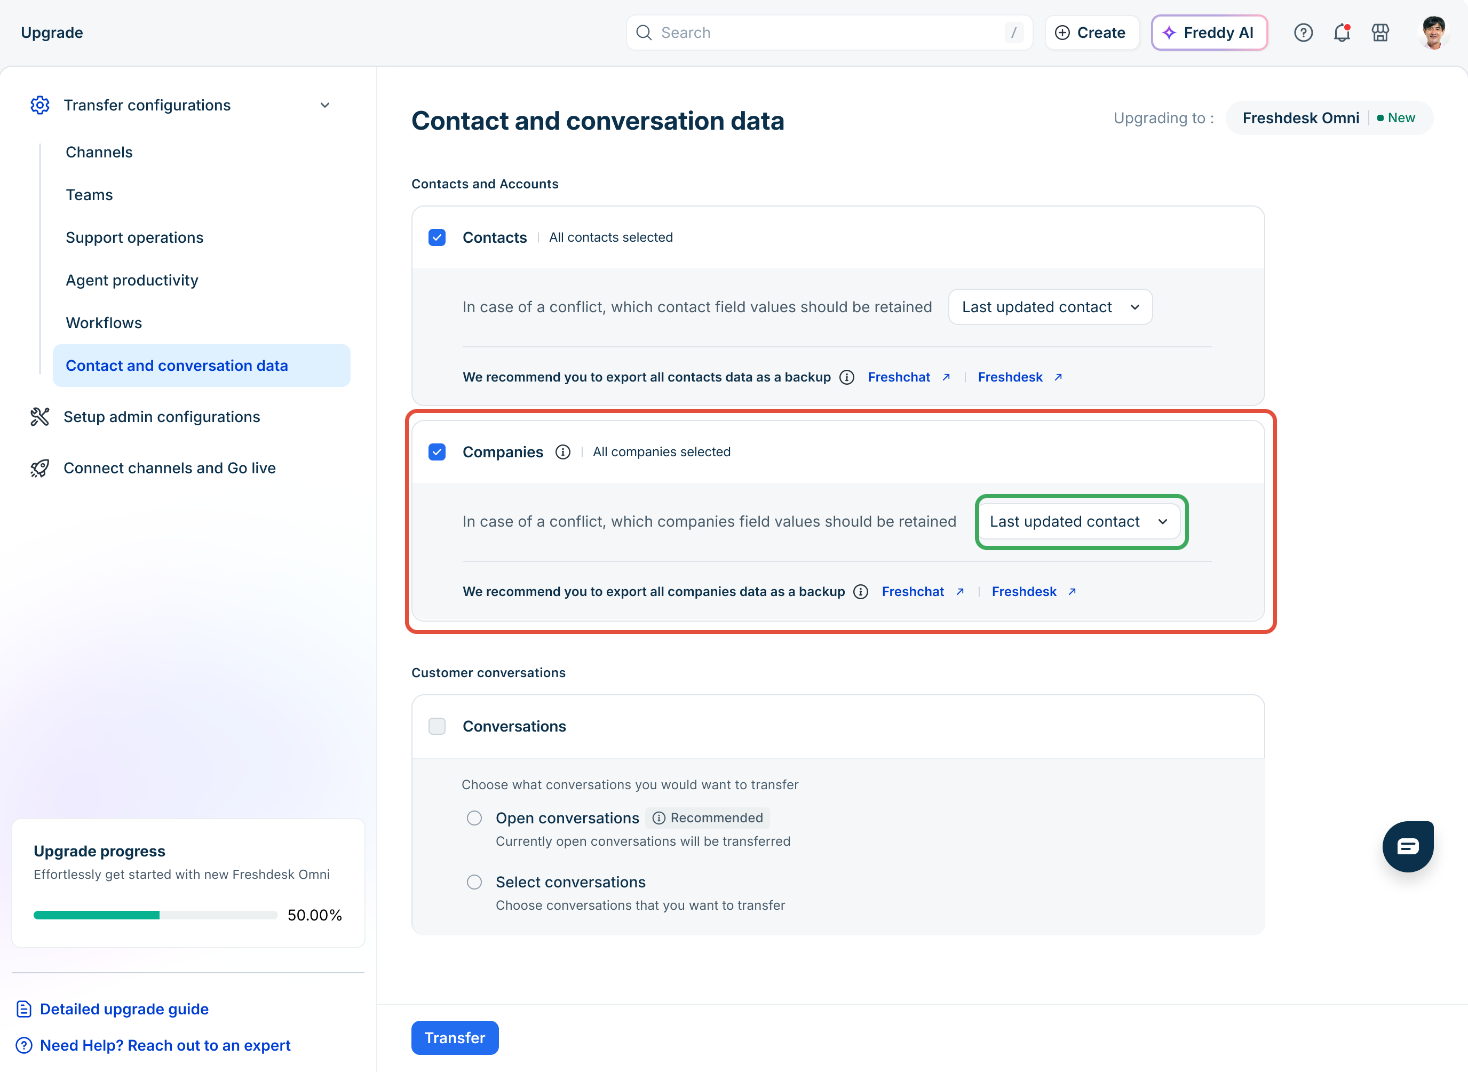
- Select how you want to restore a company record when a company exists in both Freshdesk and Freshchat. The options are:
- Last updated contact
- First created contact
- Freshdesk contact
- Freshchat contact
- To receive a backup of your Freshdesk and Freshchat companies by email before the transfer, click Freshdesk and Freshchat links.
- Click Transfer.
Transfer conversations
Freshchat conversations contain the message history between agents and customers for each ticket. Migrating this data to Freshdesk Omni 2025 gives agents full visibility into prior interactions once the upgrade is complete.
Note: If you already transferred conversations for a group in an earlier session, that group appears checked and disabled in the Groups filter, indicating its conversations were already transferred.
Important: Conversations created after this transfer will not be included in this step. These delta conversations will be transferred later, during Stage 3: Connect channels and go live.
To transfer conversations:
- In the upgrade wizard, go to Transfer Configurations > Contact and conversation data.
- Under Customer conversations, select Move conversations.
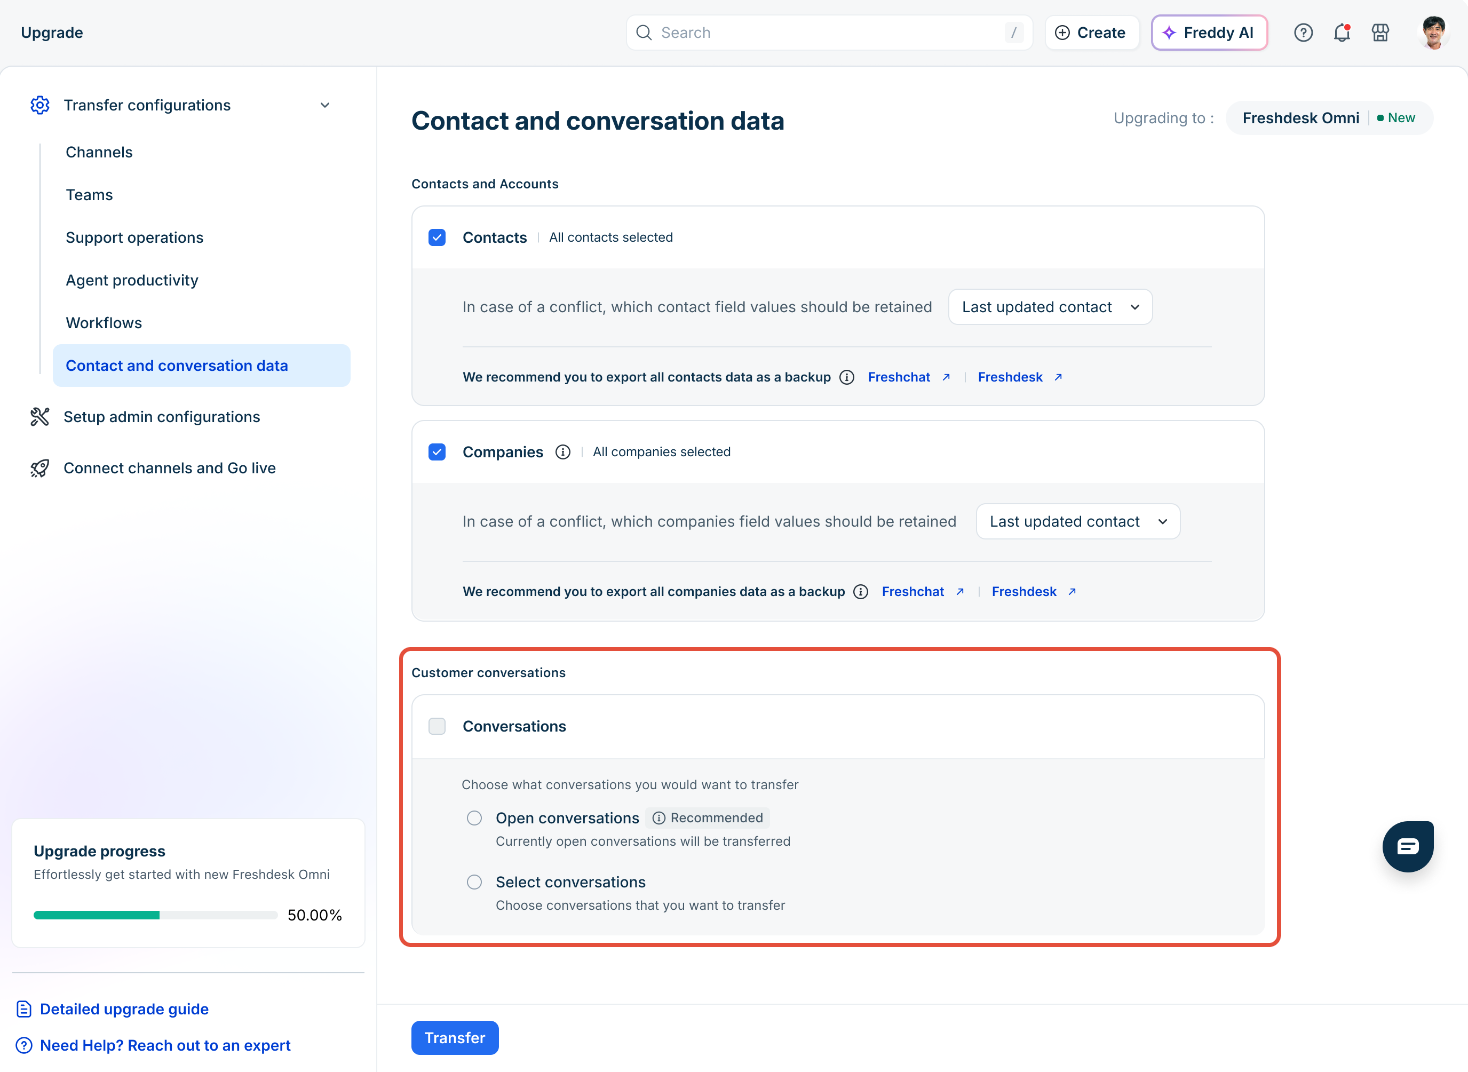
- Choose the conversations you want to transfer:
- Open conversations: Transfer only conversations that are currently open. This option is recommended.
- Select conversations: Choose the conversations you want to transfer based on Groups, Channels, or a date range: Last 6 months, From the start, or Custom date.
- Click Transfer.
Next steps
This completes all configurations. The upgrade wizard displays the number of configurations that have been transferred, are pending, or have failed. Status indicators within each configuration category help you identify completed and partially completed transfers.
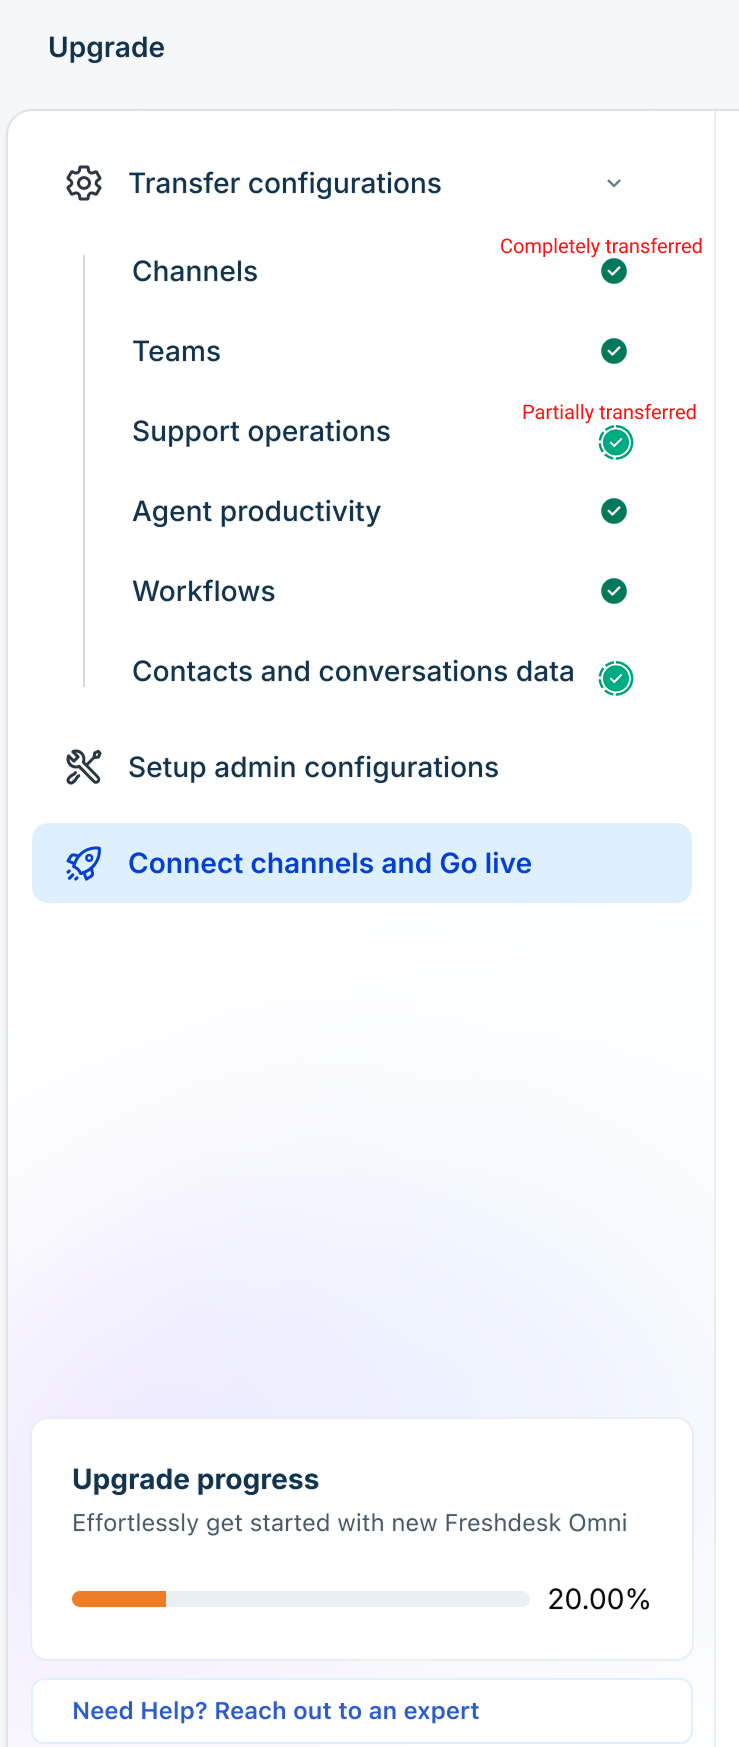
Once you've reviewed and transferred all the configurations relevant to your account, you can proceed with completing the admin setup and verification. For details, see Complete configurations and go live for Freshdesk Omni 2025 upgrade.