
 Community
 Video Library
 Agent Training
 Freshservice
 Freshdesk
 Freshchat
 Freshcaller
 Freshsales
 Freshteam
 Freshworks Neo
 Freshsurvey
 Growth
 Enterprise
Workspaces let your organization run multiple independent support operations across brands, regions, or business units from a single Freshdesk account. This article explains what Workspaces are, when to use them, and how they affect agents, groups, SLAs, automations, tickets, and other configurations.
TABLE OF CONTENTS
- Prerequisites
- Overview of Workspaces
- Workspace Use Cases - Improve operational efficiency
- Set up Workspaces
- Create a new Workspace
- Configure Workspace settings
- Move tickets between Workspaces
- Frequently asked questions (FAQs)
- Best practices
Prerequisites
Workspaces is a feature available on the Enterprise plan, and it is enabled on demand by Freshworks. It is not turned on automatically for eligible accounts. Please contact your CSM or write to support@freshdesk.com to understand if your account is eligible and to request enablement.
Overview of Workspaces
Workspaces let your organization run multiple independent support operations within a single Freshdesk account. Each Workspace has its own agents, groups, SLAs, automations, email configurations, business hours, and more. All Workspaces sit under a single account, making cross-team visibility and account management simpler than managing multiple Freshdesk instances.
When Workspaces is enabled on your account, Freshdesk creates a default (primary) Workspace named after your account. Every ticket and agent is always mapped to a Workspace.
Features under Workspace
After enabling Workspaces, specific administrative features become scoped to individual Workspaces, allowing separate configurations for each Workspace. The following features can be configured independently for each individual Workspace:
- Agents
- Groups
- Business hours
- Portals
- Email support addresses
- SLA policies
- Automations (Workspace rules)
- Products
Workspace Use Cases - Improve operational efficiency
Workspaces are the right fit when you have teams that need to:
- Operate independently. Different workflows, SLAs, automations, and configurations must not overlap across business units.
- Stay secure. Agents in one business unit must not see tickets or admin configurations belonging to another for security reasons.
- Scale separately. A new brand or region can be onboarded into its own Workspace without disrupting existing operations.
The following table lists common use cases for Workspaces:
| Scenario | Use case |
| Multiple brands under one company | A fintech company running consumer and business support separately |
| Multiple regional teams | A global manufacturer with APAC, EMEA, and Americas support organizations |
| Multiple units within an organization | Support, Legal, and Finance teams in a single Freshdesk account supporting customers |
These case studies are described here:
- Multiple brands: A company launches Acme Sales and Acme Support as separate customer-facing brands. Each brand gets its own Workspace mapped to the dedicated support email addresses, SLAs, and agent groups. Sales agents of both brands cannot view Support tickets, but account administrators retain visibility across both brands.
- Multiple regions: A manufacturer creates Workspaces for the Americas, EMEA, and APAC regions. Each region configures local business hours and holiday calendars. Regional supervisors manage their own groups and SLAs while executives with access to all three Workspaces run cross-region reports.
- Multiple business units: The Legal and Finance teams share a single Freshdesk account but require strict ticket isolation. Each unit operates in its own Workspace with separate automations and email configuration.
Note:
• The same customer (contact) and company records can appear in tickets across multiple workspaces.
• Workspaces add administrative overhead. They may not be necessary if a single team shares one set of SLAs and groups with no isolation requirement, if you need separate billing or legal ownership (separate Freshdesk accounts may be required), or if you only need portal branding without operational separation.
What to expect when Workspaces is enabled
When Workspaces is enabled on your account, the following changes apply:
- Freshdesk creates a default (primary) Workspace named after your account. You can then create additional Workspaces for each business unit. The Workspace name can be renamed. Please note that only Account Admins can access the Workspace feature. If you would like to give access to other users in your account, you can create a custom role that provides access to workspaces.
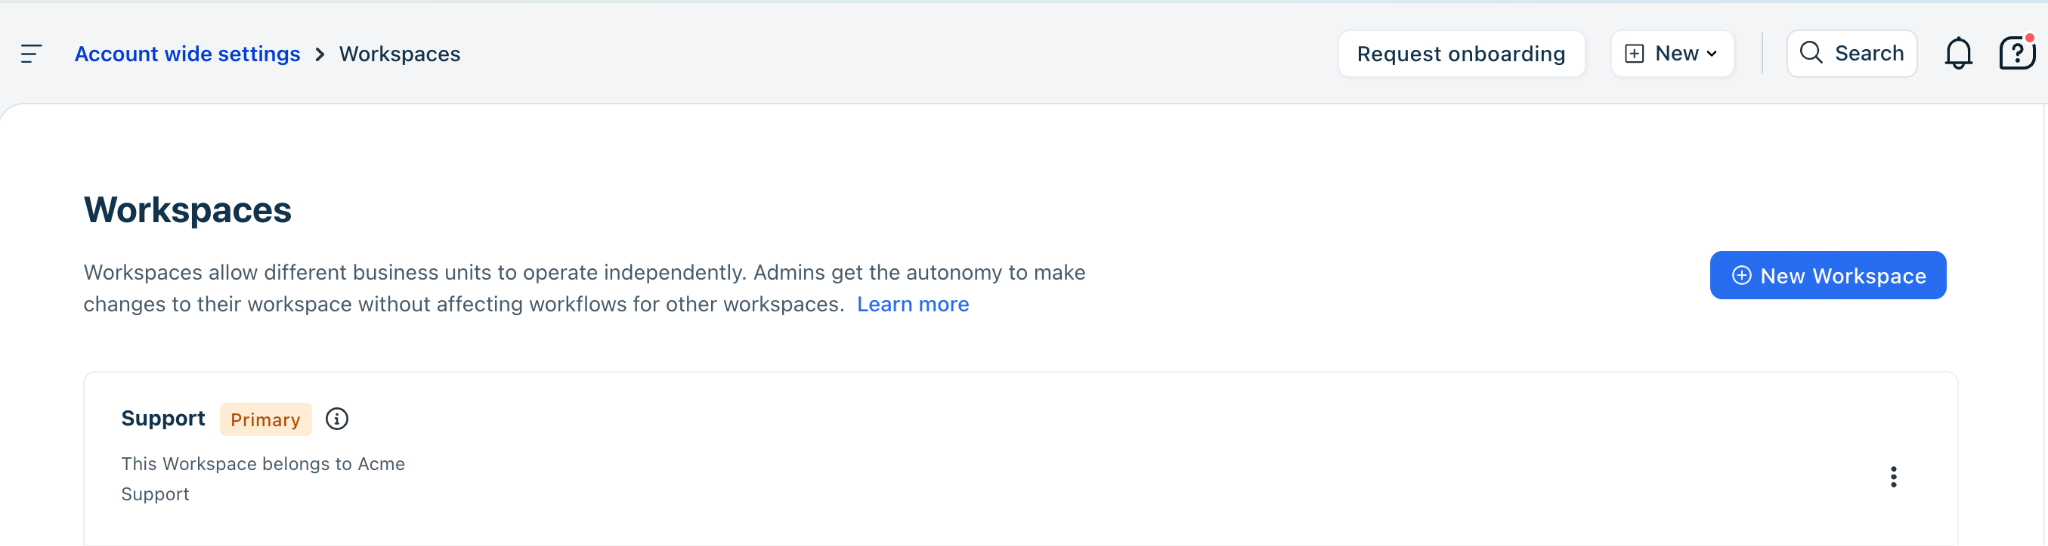
- All existing tickets, agents, automations, and admin configurations are mapped to the default Workspace. Agents retain access to the same entities before and after Workspaces is enabled, so existing operations continue without disruption.
- A Workspace switcher is visible on the Admin page. Use it to switch between:
- Account-wide settings: Admin features that apply across all Workspaces, including roles, ticket fields, and more. Changes here will apply to all Workspaces.
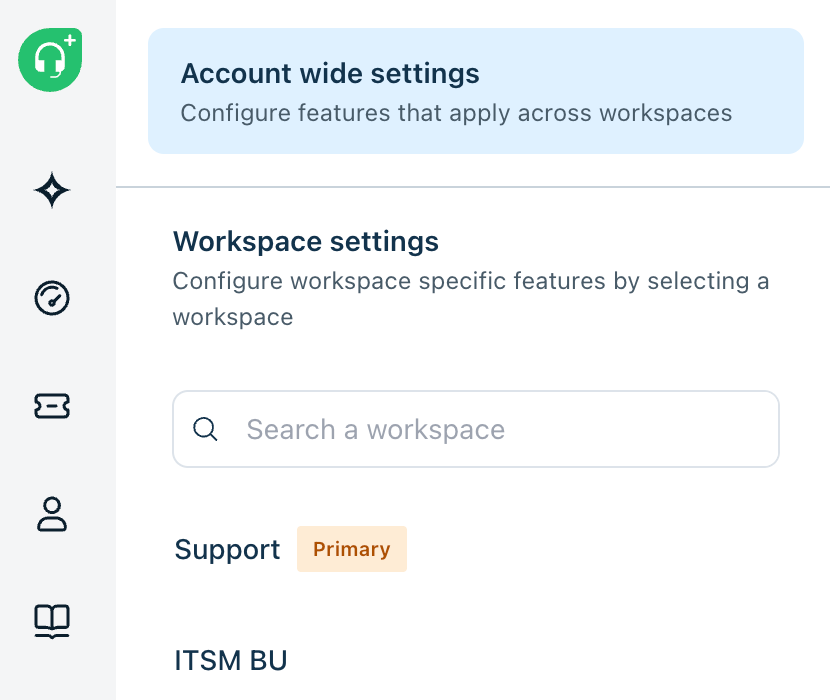
4. Workspace settings - Lists every Workspace (default/primary + any you add). Select one from the list or the switcher to configure that Workspace only. Each Workspace gets its own independent configuration:
- Agents - Agents can be mapped to a single Workspace or multiple Workspaces.
- Groups - Groups are created per Workspace; agents can only be added to groups in the Workspaces they belong to.
- Business hours - Each Workspace has independent business hours, including a default business hour
- Portals - Each Workspace gets a default portal (corresponding to the default product)
- Email - Each Workspace comes with a default email address.
- SLA policies - Each Workspace has its own SLA policies, including a default SLA
- Automations - Each Workspace has its own Ticket creation, update, and time-trigger rules, while Global rules can be added to execute across Workspaces
- Multiple products - Products specific to Workspaces can be added
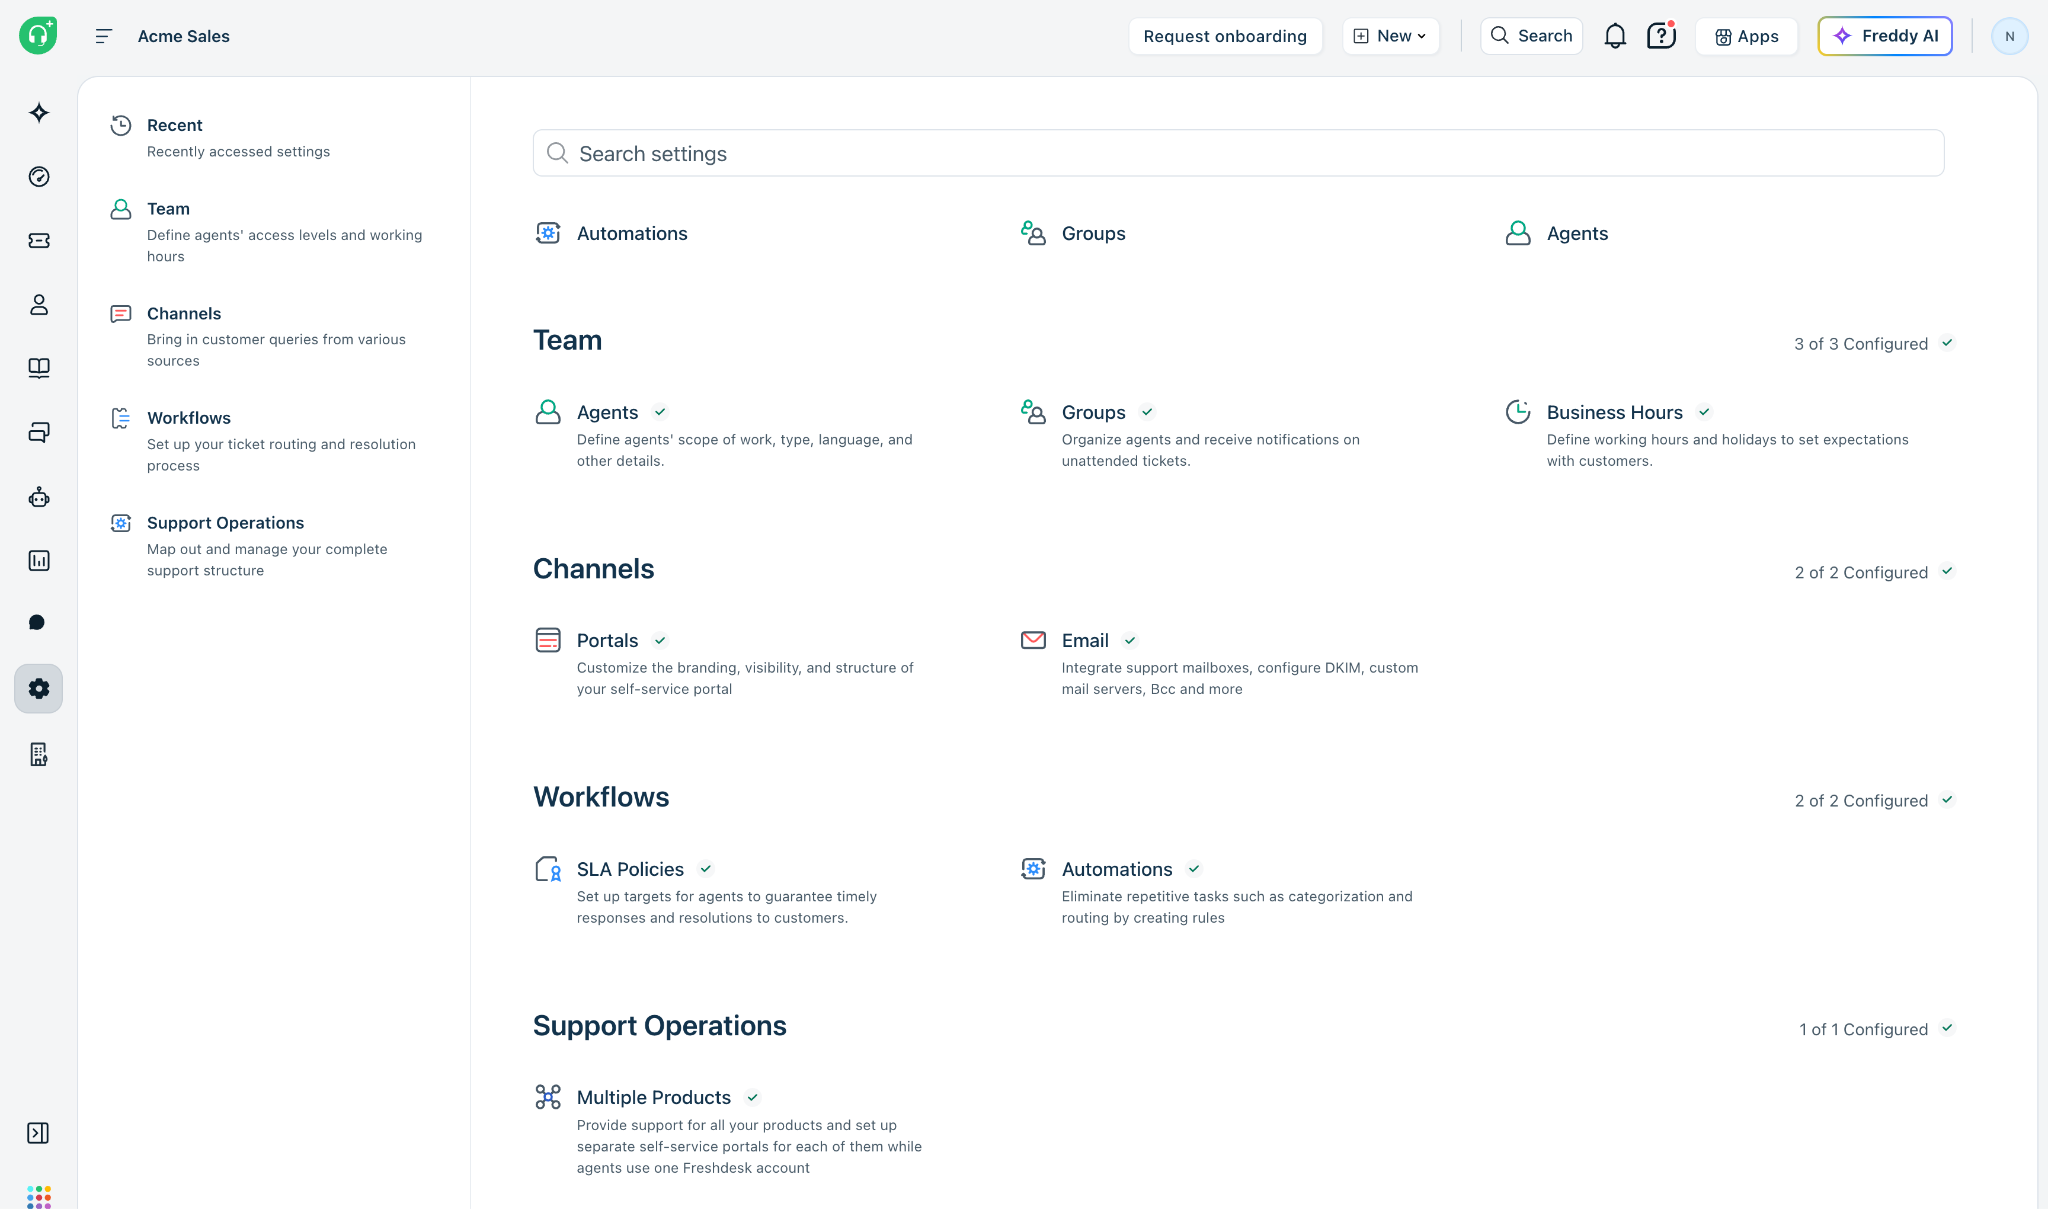
5. When you switch between Workspaces within a feature page, you stay on the same feature; you do not need to re-navigate from the Admin home page.
Workspace limits
- You can create up to 30 Workspaces on a single account.
- A Workspace cannot be deleted after it is created, even by an account administrator.
- If a ticket or agent is created without a Workspace, Freshdesk maps it to the default Workspace.
- Every ticket and agent is always mapped to at least one Workspace. If a workspace name is not specified when creating a ticket, say via APIs, the ticket is mapped to the default workspace.
Account-wide and Workspace-scoped entities
Account-wide entities are shared across all Workspaces and configured once under Account-wide settings. For example, Roles and permissions configured for an Agent apply to the Agent across all Workspaces. Workspace-scoped entities belong to a single Workspace and are configured by selecting that Workspace in the switcher. For example, Groups can only be created within a Workspace. Each Workspace maintains its own set of Groups.
Workspace-scoped features
When you select a Workspace in the switcher, you configure the following per Workspace.
- Agents
- Groups
- Business hours
- Portals
- Email support addresses
- SLA policies
- Automations (Workspace rules)
- Products
- Knowledge Base
Account-wide (global) features
The following are shared across all Workspaces and configured once under Account-wide settings:
- Roles and permissions
- Ticket fields, forms, and templates
- Security settings (login, portal, attachment settings, admin notifications, password policy)
- Email global settings and notifications, channels
- Agent profiles (including cross-Workspace membership)
- Skills
- Agent shifts and statuses
- Global automation rules
- Integrations
Note: Automations is available under both Account-wide settings and Workspace settings. You configure Global rules for ticket creation, ticket updates, and hourly triggers. These rules apply across all Workspaces. In the Workspace Rules tab, select a Workspace to configure Workspace rules for that Workspace only. An admin can view and manage Workspace rules only for the Workspaces they have access to.
Create a new Workspace
To create a new Workspace, follow these steps:
- Go to Admin > Workspaces.
- Click Create Workspace.
- Enter a name for the Workspace.
- Optionally, add a description for the Workspace.
Notes:
1) Account administrators are automatically added to every new Workspace.
2) Special characters and numbers are allowed in Workspace names. Workspace names must be unique.
Defaults created in a new Workspace
When you create a Workspace, Freshdesk automatically creates:
- A default product (named after the Workspace)
- A default portal (named after the Workspace)
- Default SLA policies
- Default business hours
- A default email support address
You must manually configure groups, additional portals, additional email addresses, Workspace-specific automations, and agent assignments.
Rename a Workspace
To rename a Workspace:
- Go to Admin > Workspaces.
- Click the Workspace you want to rename.
- Update the Name or Description field.
- Click Save.
Note: If you enter a name that already exists, Freshdesk displays an error and does not create the Workspace. Choose a unique name or append a region or brand identifier—for example, Acme Support — EMEA.
Configure Workspace settings
The following sections describe settings you configure within each Workspace.
Agents
Agents are added to one or more Workspaces. Admins can view and manage agents only in the Workspaces they have access to. An agent must be mapped to at least one Workspace.
Agent visibility and access
- Agents can access tickets in the Workspaces they belong to. They cannot open Admin settings. Admins can access tickets and Admin settings for the Workspaces they have access to.
- When an agent logs in, they work in the Workspaces they are mapped to. If they belong to multiple Workspaces, they can switch between Workspaces from the dashboard.
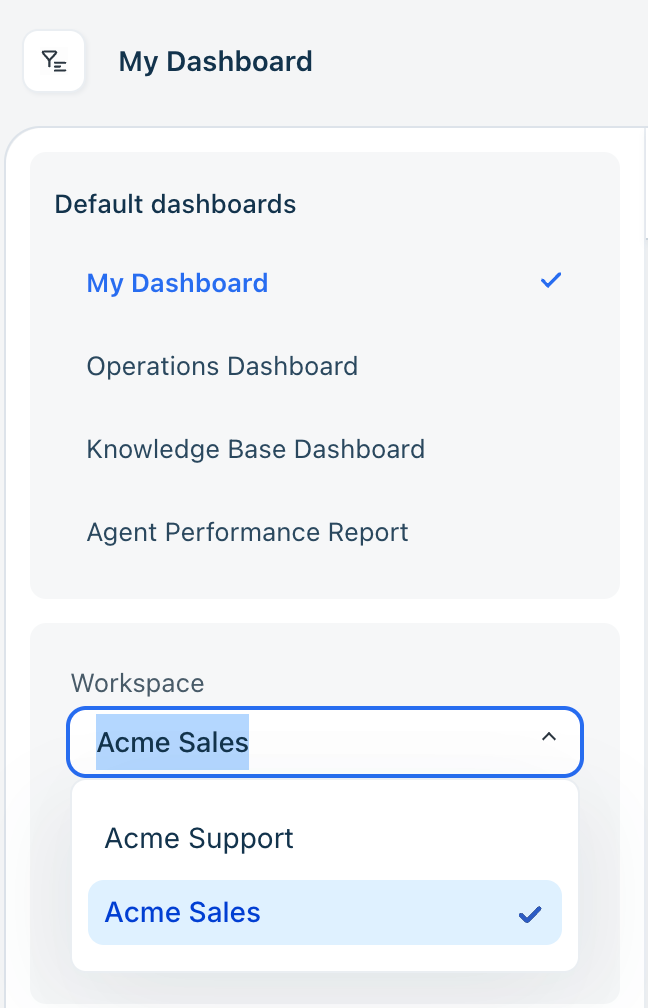
Add an existing agent to a Workspace
To add an existing agent to a Workspace,
- Go to Admin > Workspaces and select the target Workspace.
- In the Configure Workspace page, click Add agents
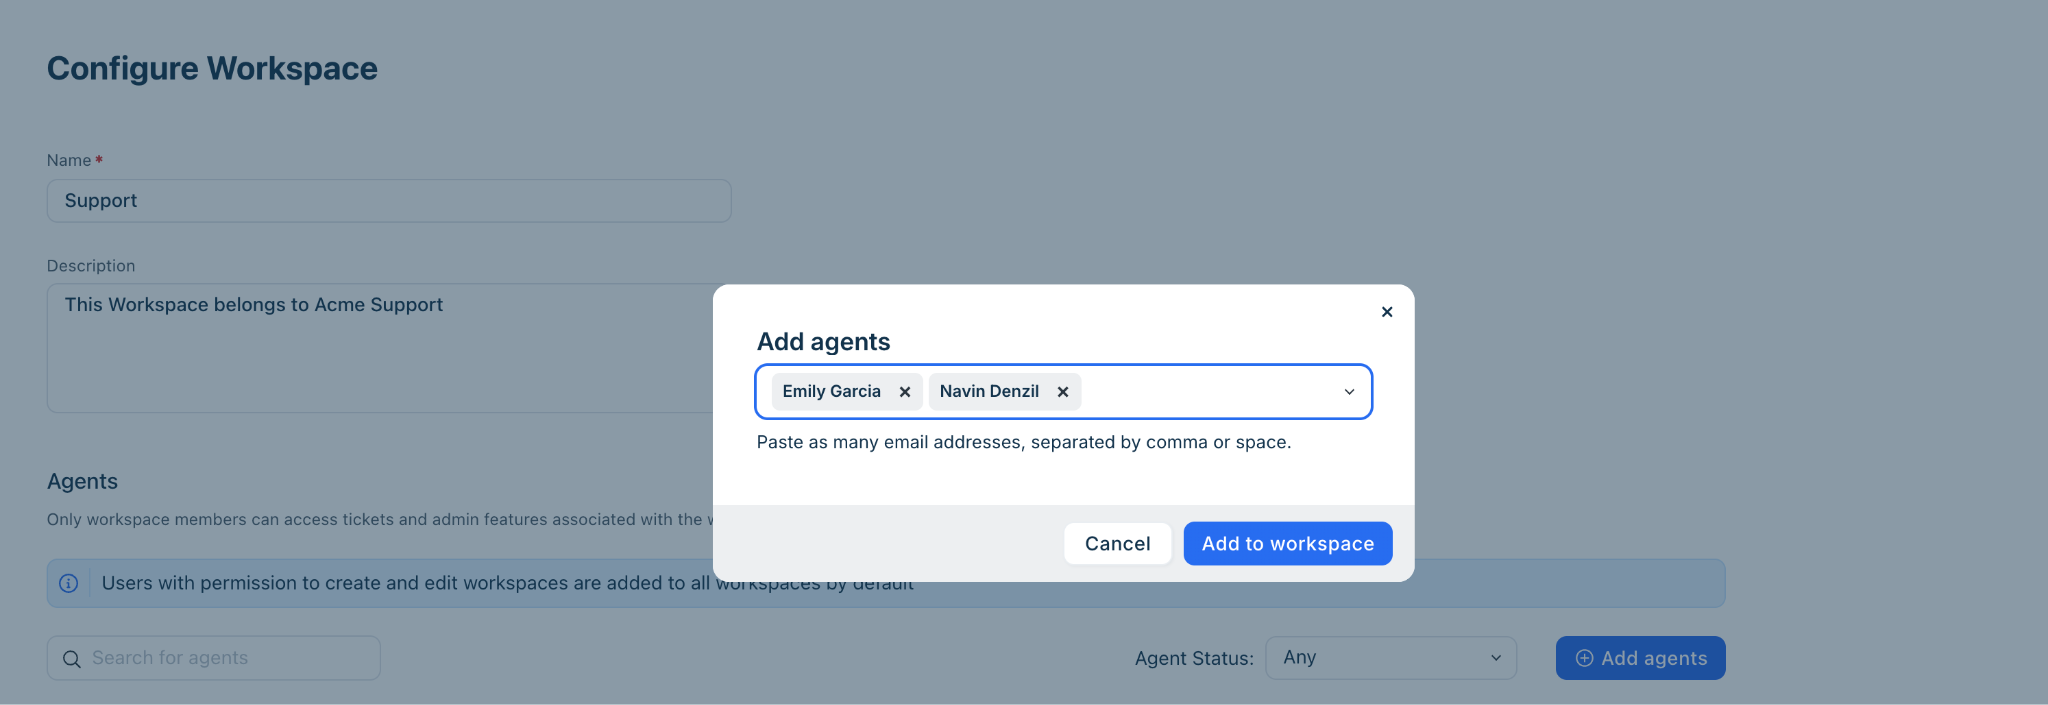
Note: The Configure Workspace page (shown in the screenshot above) lists all account administrators (as they have access to all Workspaces) and agents mapped to that Workspace.
- Choose the agents to add from the Add agents pop-up and click Add to workspace
- A "Workspace updated" toast appears, and the new agents show on the same page.
Add a new agent to a Workspace
To add a new agent to a Workspace,
- Go to Admin > Account-wide settings (using Workspace switcher) > Agents
- On the Agents page, click New Agent
- Enter the agent details and assign a role
- Add the agent to the required Workspaces from the Workspaces dropdown
- Map the agent to one or more groups within this Workspace. Only groups from the selected Workspace(s) appear in the Group drop-down.
- Click Save.
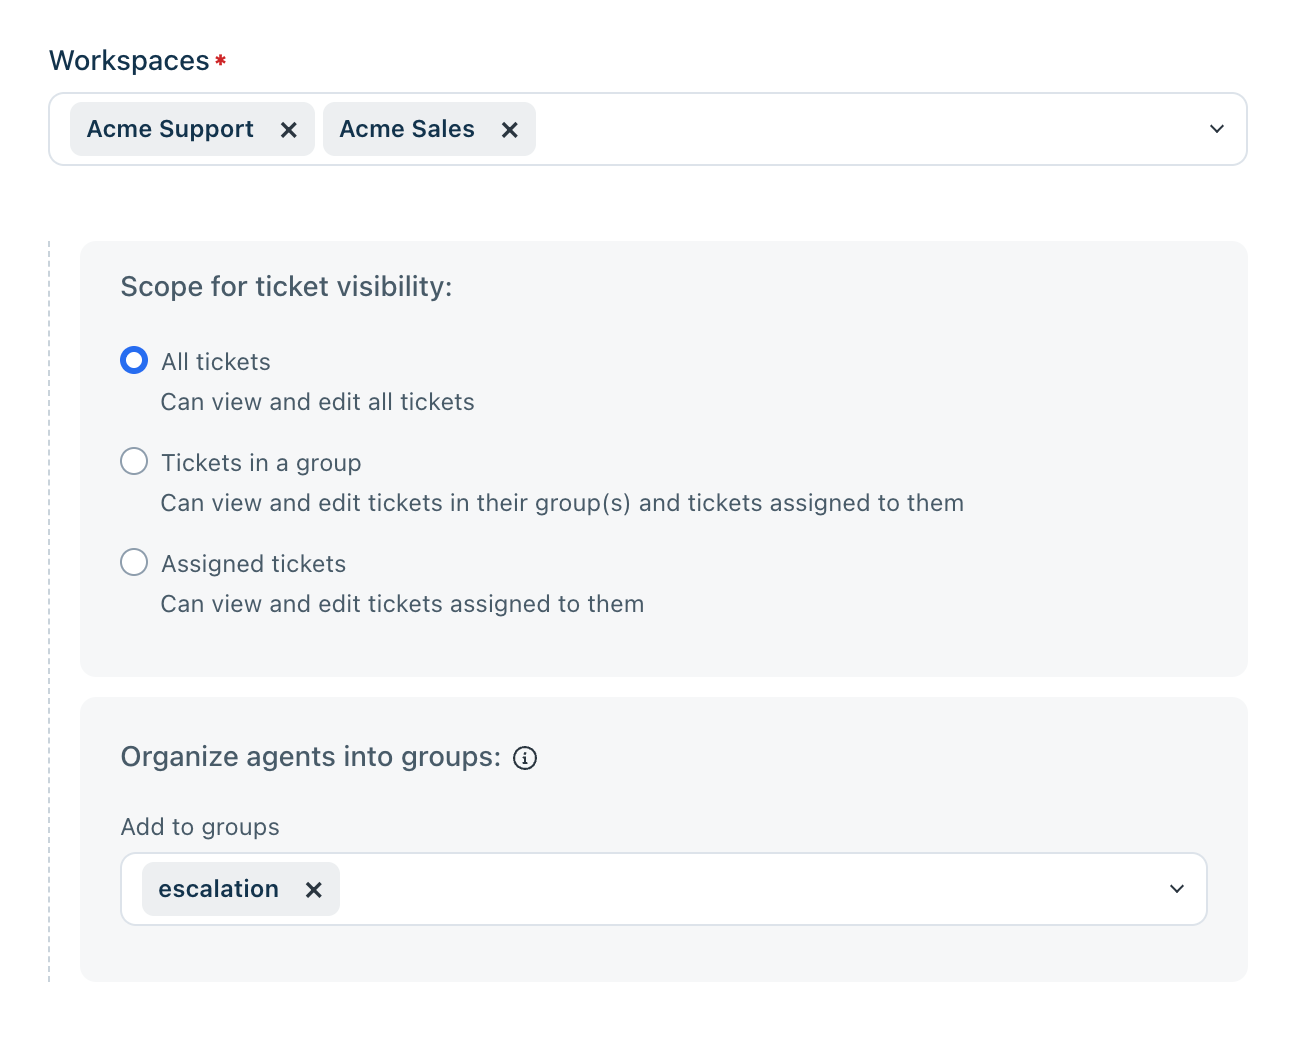
Note: License count remains the same whether an agent belongs to one Workspace or multiple Workspaces.
Cross-Workspace agent management permissions
Two permissions give admins flexible control when an agent belongs to multiple Workspaces:
- Add existing agents to your Workspace: Allows an admin to add an agent who already exists in another Workspace, without necessarily having access to that other Workspace.
- Edit roles, scope, skills, and agent availability: Allows an admin to modify an agent's settings even if the admin does not have access to all Workspaces the agent belongs to.
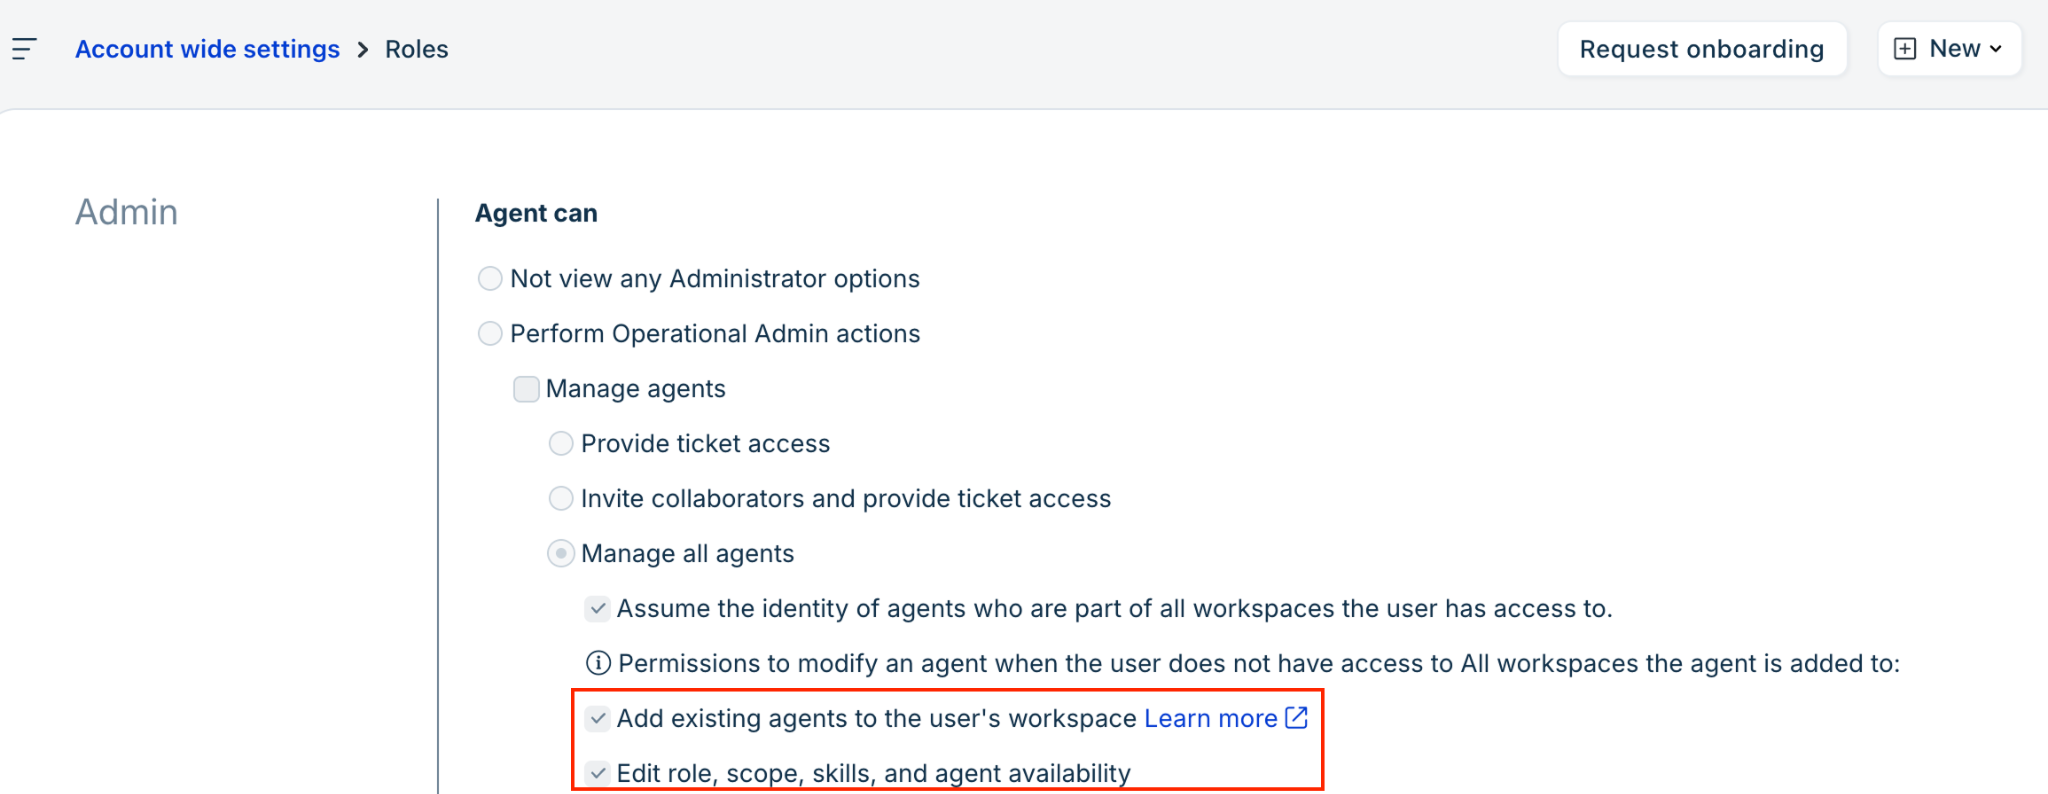
Note: Changes made through the second permission apply across all Workspaces the agent is part of.
Permissions matrix: Agent management across Workspaces
| Task | Account admin | Workspace admin (same Workspace) | Workspace admin (different Workspace) |
| View the agent in the Workspace agent list | Yes | Yes (same Workspace) | View only, with permission |
| Edit agent role in a Workspace | Yes | Yes (same Workspace) | Needs “Edit roles, scope, skills, and agent availability” permission |
| Add existing agent from another Workspace | Yes | With “Add existing agents to your Workspace” permission | |
| Remove agent from a Workspace | Yes | Yes (same Workspace) | Requires Create workspaces and edit records mapped to all workspaces permission |
Occasional agents and collaborators
Occasional agents can be added to multiple Workspaces the same way as full-time agents. They consume an occasional license regardless of how many Workspaces they belong to.
Collaborators added through discussion threads can access the ticket regardless of their Workspace. When a collaborator is added through a discussion thread, they are granted view access to the ticket even if they belong to a different Workspace.
Groups
Groups are scoped to a Workspace.
- Agents can only be added to groups within their own Workspace.
- When you create a group, business hours default to the Workspace's default business hours.
Clone Groups to different Workspaces
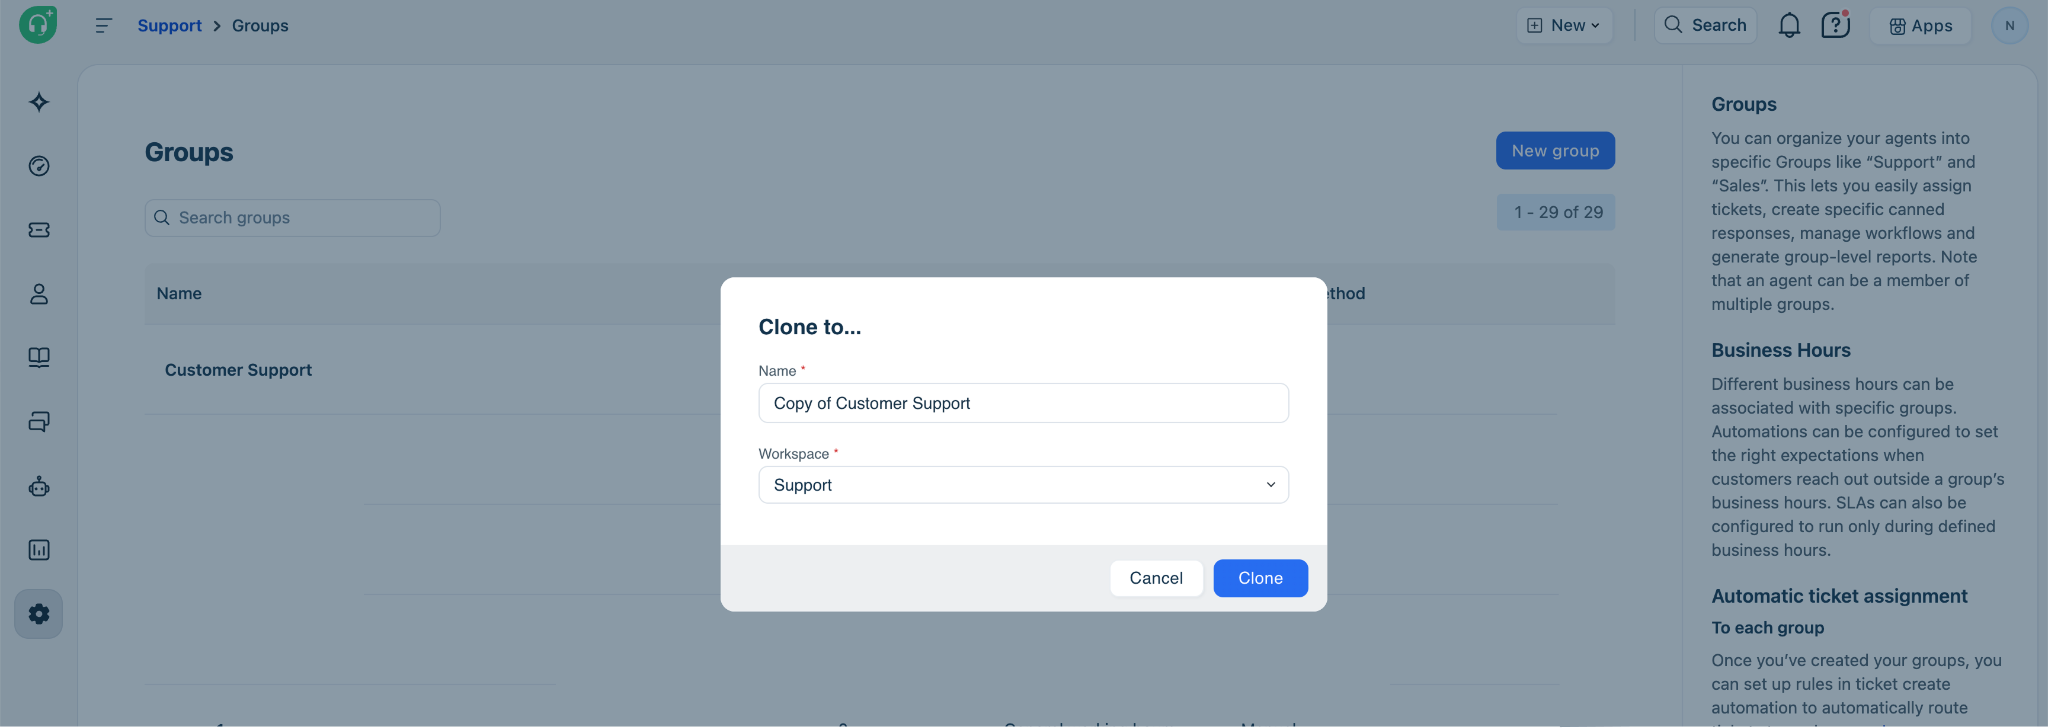
- If a group must exist in a different Workspace, you can use the Clone to option and add the same Group to the other Workspace
- When tickets are created through a customer portal, only groups belonging to that portal's Workspace are available for selection.
What transfers on clone: Group name, description, and business hours mapping (if the business hours profile exists in the destination Workspace or is cloned separately).
What does not transfer: Agents who are not in the destination Workspace. Round-robin and auto-assignment settings carry over, but verify agent membership before you enable auto-assignment in the new Workspace.
The following is an example of how Groups exist in Workspaces:
- Agents can belong to multiple Workspaces: Bryce belongs to both Acme Sales Workspace and Acme Support Workspace. Bryce can be a member of Groups in both Workspaces
- An agent can only join Groups in a Workspace they belong to: Sam belongs only to Acme Support Workspace. Sam cannot be added to the Back office Group in Acme Sales Workspace.
- Groups cannot move/be shared across Workspaces: The Subscriptions Group belongs to Acme Support Workspace only. If Sales also needs a Subscriptions Group, you must clone or create a new Group in the Sales Workspace.
Note: Two groups with the same name under different Workspaces can coexist (even if they are not cloned). They may appear multiple times when you add an agent to groups. To avoid confusion, append the Workspace name to the group name—for example, escalation - Acme Support and escalation - Acme Sales.
SLA policies
Each Workspace has its own set of SLA policies. A default SLA is automatically created whenever a new Workspace is created, ensuring every ticket has a due-by time from day one.
- SLA policy names can repeat across Workspaces, but must be unique within a Workspace.
- Workspace is not available as a condition in Workspace-specific SLA rules. This is because SLAs within a workspace are mapped only to tickets in that workspace.
Clone an SLA policy to another Workspace
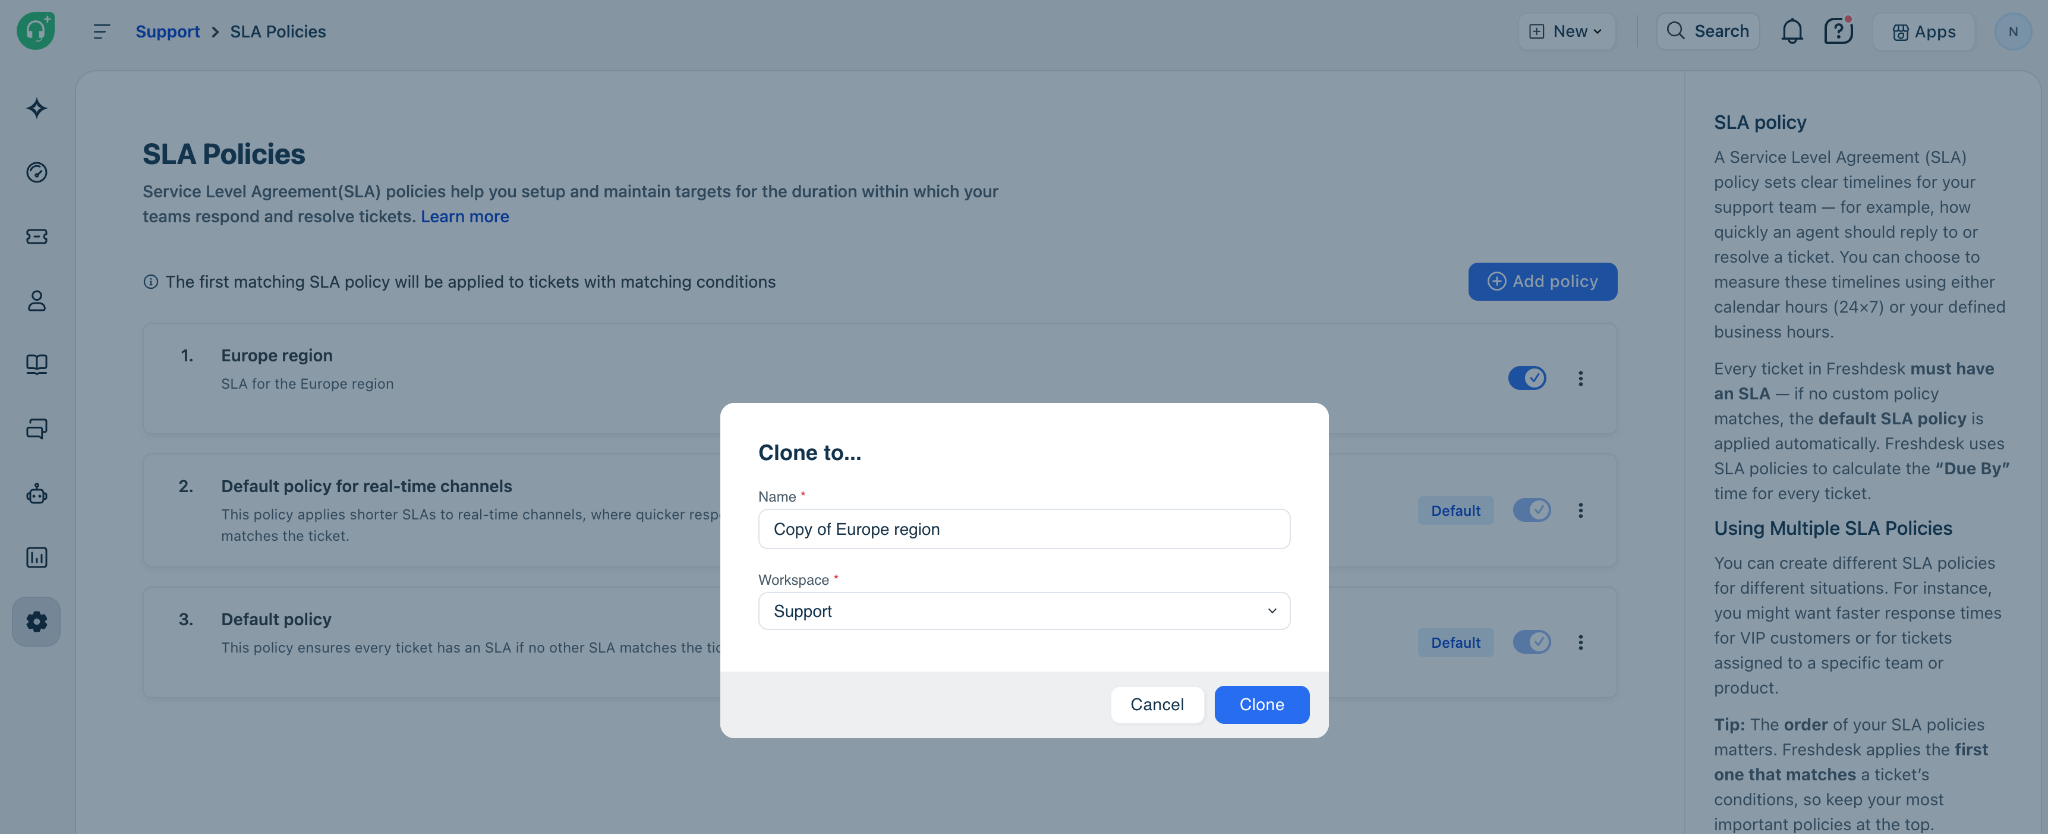
While cloning an SLA policy, conditions based on ticket priority, source, or requester type are transferred over to the cloned SLA policy in the destination Workspace. Conditions based on groups or products must be reconfigured in the destination Workspace. To clone an SLA policy to another Workspace:
- Go to Admin > Workspaces and select the source Workspace.
- Open SLA policies and select the policy to clone.
- Click Clone to and select the destination Workspace.
- Open the cloned policy in the destination Workspace and reconfigure conditions that has groups or products, or other Workspace-specific entities as are not transferred on Clone.
SLA behavior when a ticket moves between Workspaces
When a ticket is transferred to another Workspace, it adopts the target Workspace's SLA policies and business hours. Due-by dates will recalculate immediately if the target Workspace uses different business hours or SLA targets.
Business hours
Business hours are configured independently per Workspace. A default business hours profile is created automatically when a new Workspace is created. The following are some key pointers to note:
- Groups can only be associated with business hours from the same Workspace.
- When a ticket moves from one Workspace to another, it adopts the new Workspace's business hours.
Clone business hours to another Workspace
You can clone business hours to another Workspace. Mapped groups are removed from the clone because groups are Workspace-specific. To clone business hours to another Workspace:
- Go to Admin > Workspaces and select the source Workspace.
- Open Business hours and select the profile to clone.
- Click Clone to and select the destination Workspace.
- Open the cloned profile in the destination Workspace and reassign groups in the destination Workspace to the cloned business hours profile.
Scenario: Ticket transfer and business hours
A ticket created in the Americas Workspace (08:00–17:00 Eastern) is transferred to the Canada Workspace (09:00–17:00 Eastern). The ticket uses Canada business hours, and SLA due-by times are recalculated accordingly.
Automations
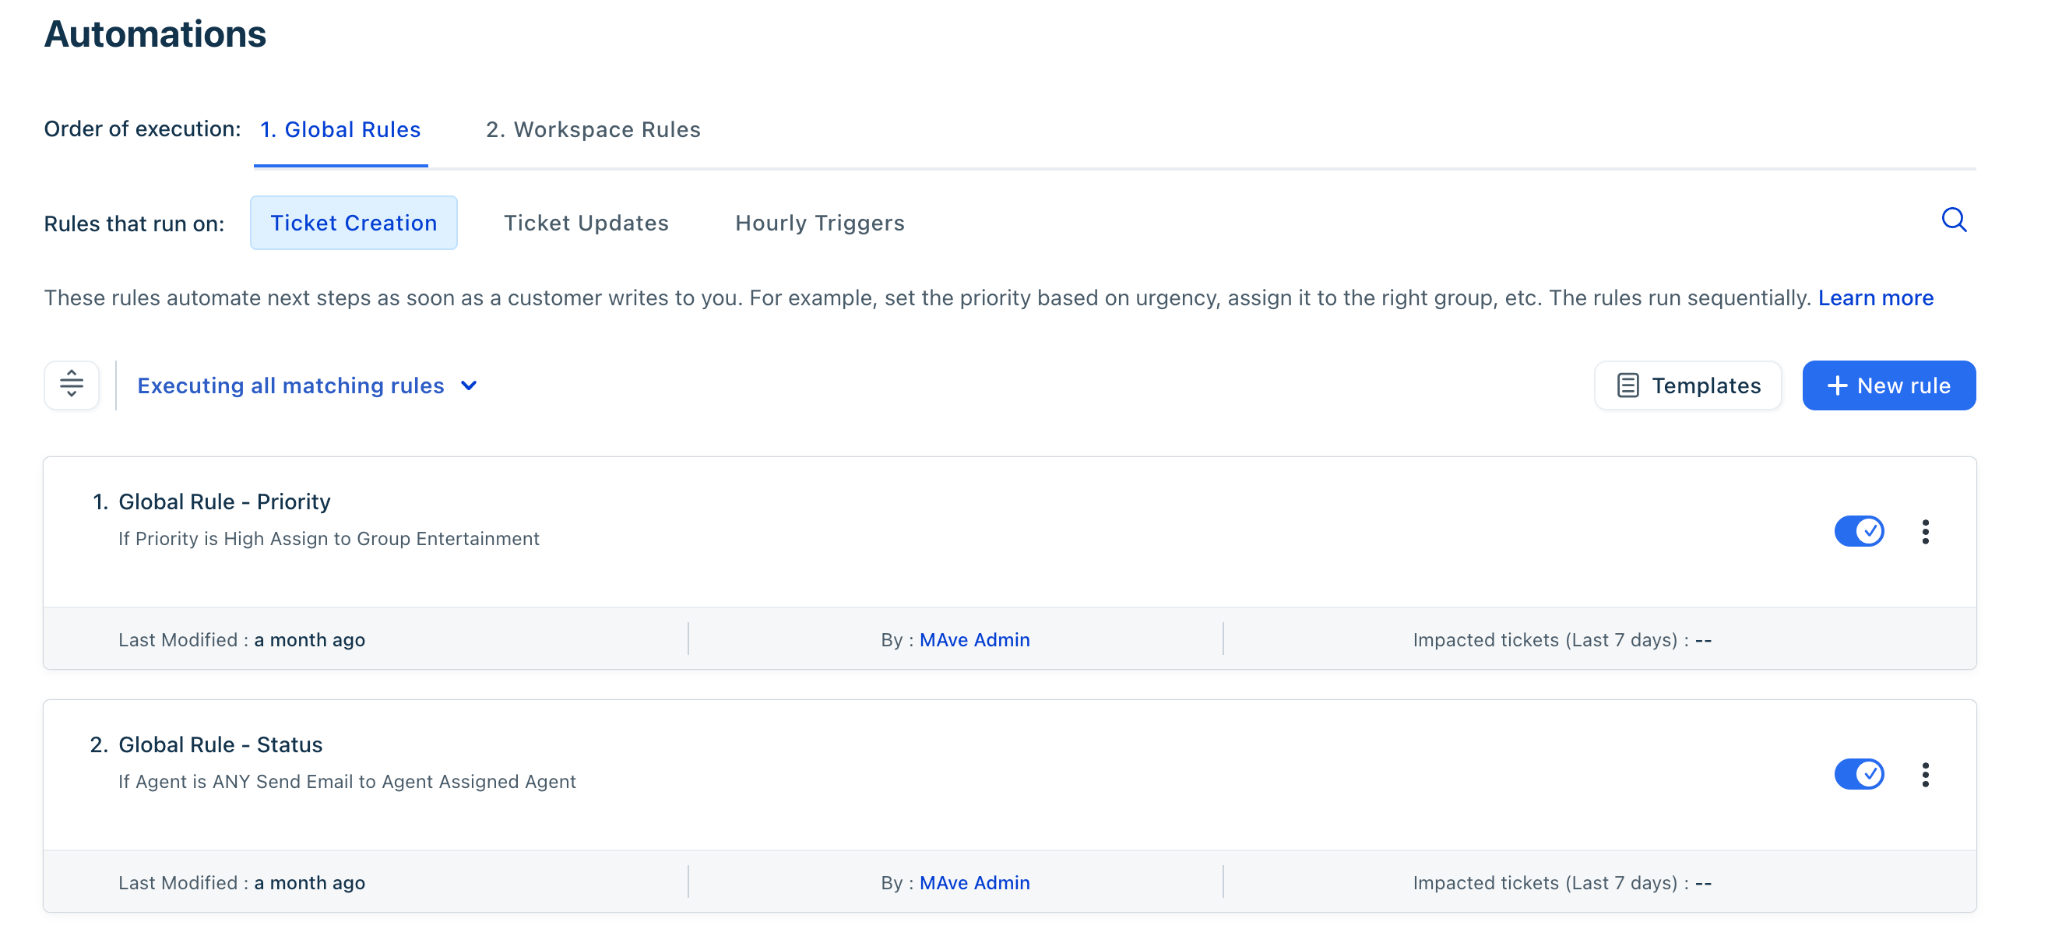
Automations in Freshdesk work at two levels when Workspaces is enabled.
Global rules (account-wide)
Global rules execute on a ticket regardless of which Workspace it is mapped to. You can use Workspace as a condition or action. For example, Set Workspace as X. Automations added to Global rules apply to all Workspaces.
Workspace rules
Workspace-specific automation rules are executed only on tickets associated with the same Workspace. When you clone rules across Workspaces, conditions tied to Workspace-specific values (groups, products, agents not in the destination Workspace) are automatically cleared.
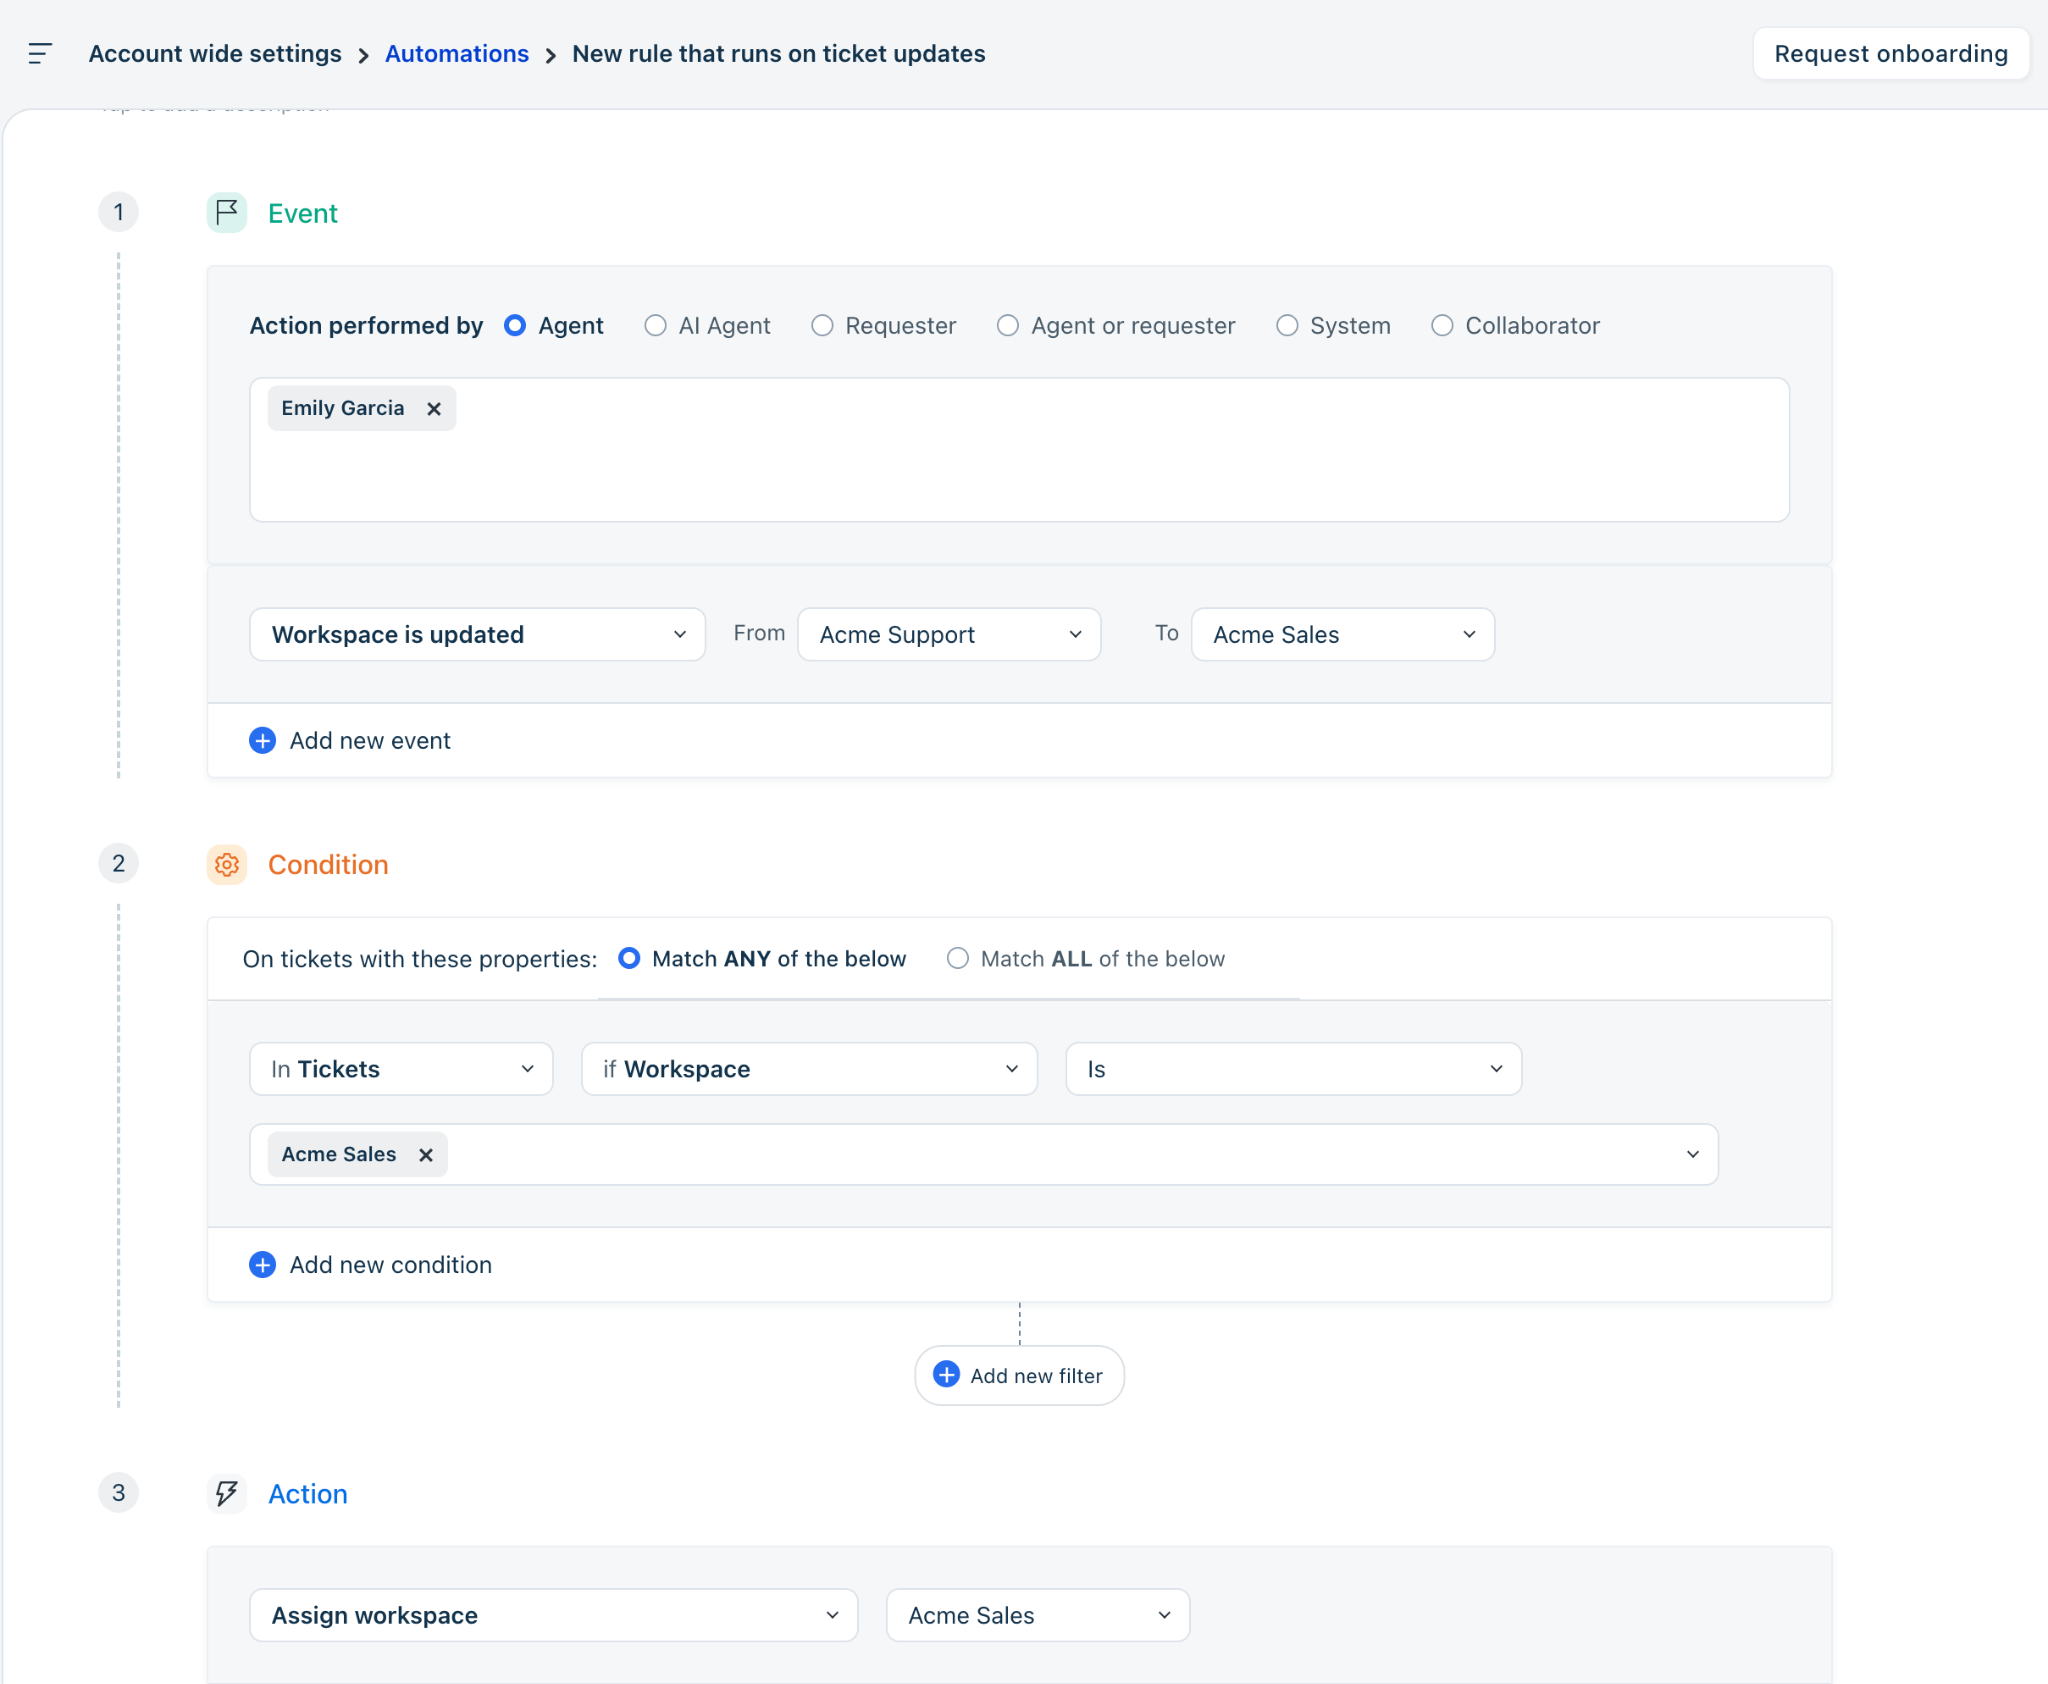
You can include Workspaces within the Event, Condition, and Action components. While it is automatically implied for Workspace automations, it must be explicitly added as a condition for Account-wide automations.
Execution order
Freshdesk evaluates Global automation rules first, followed by Workspace-specific automation rules.
Global rules do not override Workspace rules. Global rules run first and can assign a ticket to a Workspace; only Workspace rules for that assigned Workspace run next.
Example Scenario: Global rule routes inbound email to the correct Workspace
- A Global Ticket creation rule checks the To email address.
- If the email is sales@acme.com, the rule sets Workspace to Acme Sales.
- Workspace-specific rules in Acme Sales then assign the ticket to the Sales group.
Email configuration
Email addresses are mapped to a Workspace. When a ticket is created through an email address, Freshdesk assigns it to the corresponding Workspace.
Cross-Workspace email behavior:
- Agents can initiate outbound communication only through email addresses and other communication channels mapped to the Workspaces they belong to.
- If a ticket is transferred from Workspace A to Workspace B, agents in Workspace B can continue to reply from the original email address the customer wrote to, so there is no customer-facing disruption.
Products
When a new Workspace is created, Freshdesk creates a new default product. Products are Workspace-specific. Product names must be unique only within a Workspace, so identical product names can exist across different Workspaces.
Portals
- Tickets created through a portal are automatically mapped to the Workspace associated with that portal. Customers do not select the Workspace manually.
- Products, groups, and agents listed on a portal form are filtered to show only those belonging to the portal's Workspace.
- Every portal is associated with a Workspace by default.
- On non-default portals, the Product field is not displayed because the portal automatically determines the product.
- KnowledgeBase categories and articles can be scoped per portal within the same Workspace.
If a ticket moves between Workspaces, its product updates to the default product of the new Workspace. If a ticket is moved to another Workspace, it no longer appears in the original portal's ticket list. The requester can still access the ticket using its direct URL.
Example Scenario: Ticket transfer and portal visibility
- A customer submits a ticket through the Acme Sales portal. The ticket appears in their portal ticket list.
- An agent transfers the ticket to the Acme Support Workspace.
- The ticket disappears from the Acme Sales portal list.
- The customer can still open the ticket using the direct link from their confirmation email.
Knowledge Base
The Knowledge Base is Workspace-scoped. Categories and solution articles depend on the product and portal they belong to. Content is not shared automatically across Workspaces.
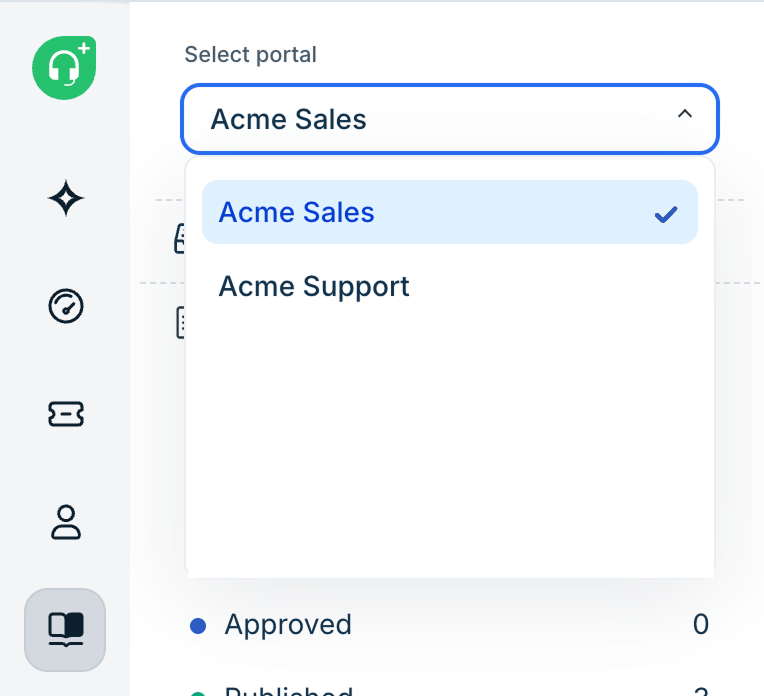
Example: An agent mapped to the Acme Sales and Acme Support workspaces can view both portals under the “Select portal” dropdown. An agent mapped only to Acme Sales can view only Acme Sales portals, not portals from Acme Support.
Category visibility across portals
When you create or edit a category, use Visible in portal to choose which portals display that category. A single category can appear on multiple portals, including those in different Workspaces.
Categories can be shared across portals only when the user has access to the products and portals in those Workspaces. If an agent belongs only to Acme Sales, they cannot configure or manage categories on Acme Support portals.
Example: The "Getting Started" category for Acme Sales is visible on both the Acme Sales and Acme Support portals.
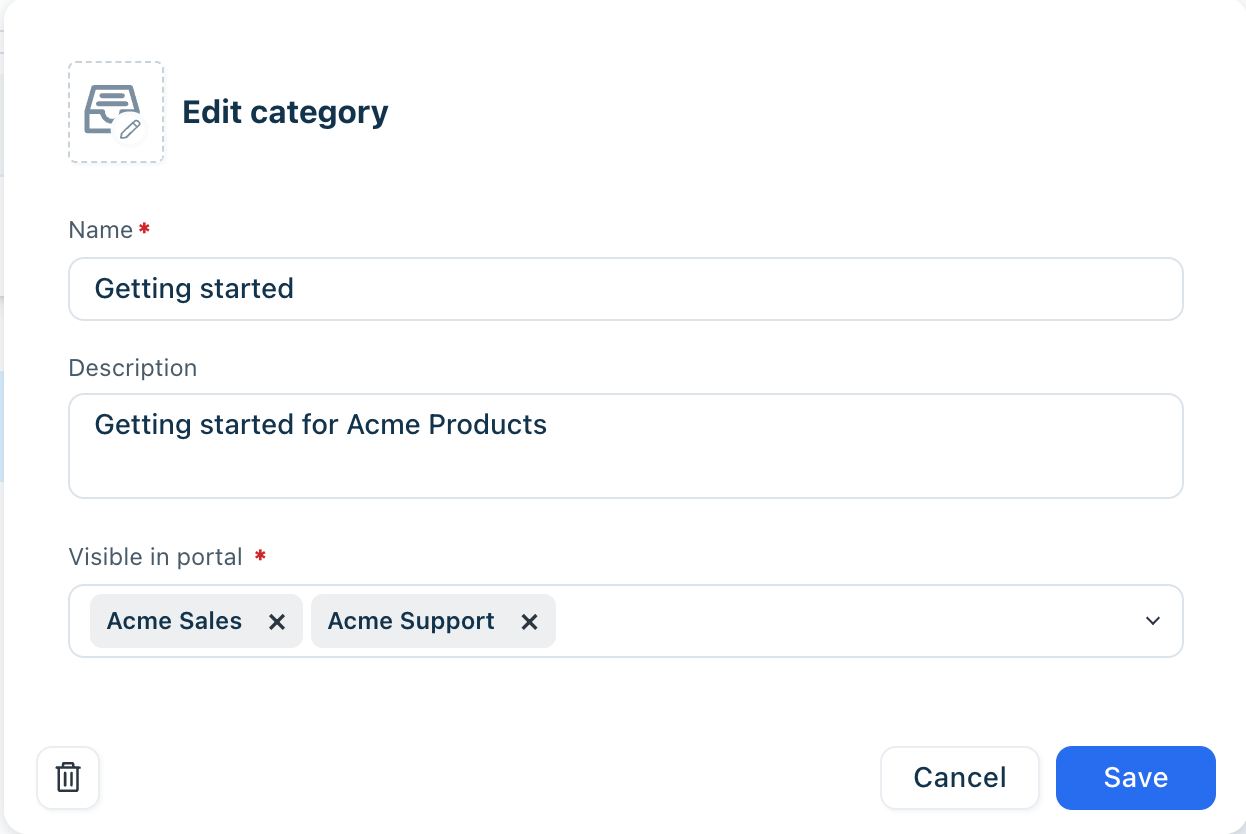
Note: If an agent has access to Acme Sales only, they can view a category visible in both Acme Sales and Acme Support, but they cannot remove Acme Support from “Visible in portal”.
Move articles across portals
You can move a solution article to a category under a different portal. When you move an article, use Select hierarchy to pick the destination portal and category. The Current portal lists portals in the current context. Other portals list additional portals the agent can access, including portals in other Workspaces.
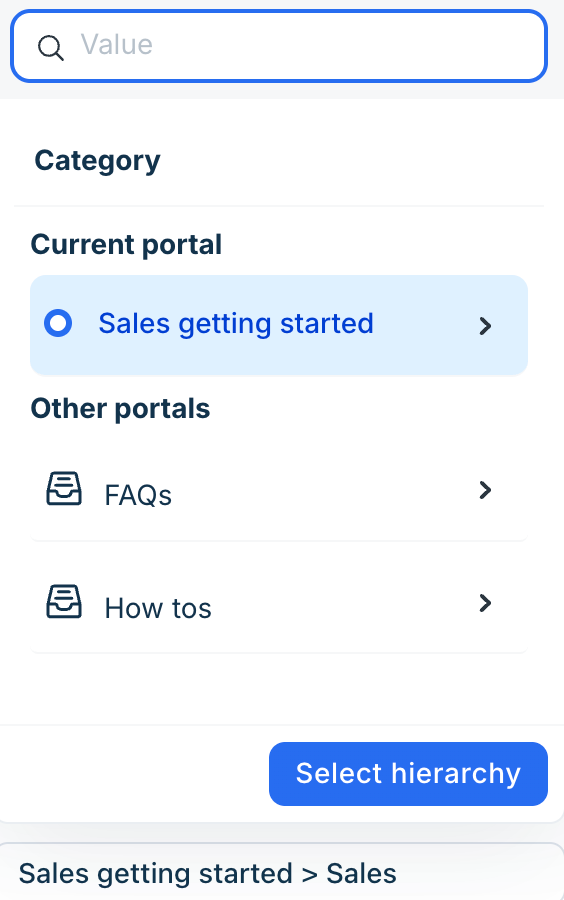
Note: An agent can move an article to a portal in another Workspace only if they belong to that Workspace and have access to its products and portals.
Access across Workspaces
| Who | What can they access |
| Agent in one Workspace | Categories, folders, and articles for that Workspace only |
| Agent in multiple Workspaces | Categories, folders, and articles from every Workspace they belong to |
| Account administrator with access to all Workspaces | All categories, folders, and articles |
Note: Making a category visible on multiple portals does not copy the category to another Workspace. It controls which portals display that category (there will be only one version of the category across Workspaces).
Analytics and dashboards
Analytics respects your Workspace membership. Metrics, reports, dashboards, and exports include data only from the Workspaces you belong to.
Filter metrics by Workspace
Workspace is available as a filter across Analytics reports and curated reports. While creating widgets, on metrics, use the Workspace name to narrow results to a Workspace.
- Select All Workspaces to include data from every Workspace you have access to (not every Workspace in the account)
- Select a specific Workspace, for example, Acme Sales or Acme Support, to view metrics for that Workspace only.
- If your account has only one Workspace, the Workspace name filter does not appear in Analytics.
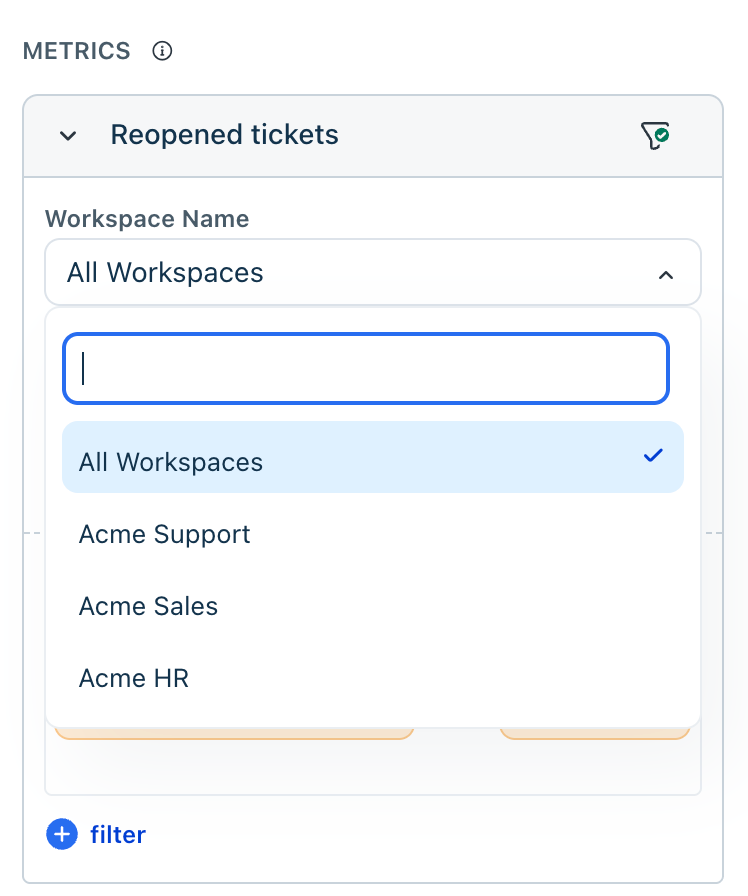
Note: An agent mapped to Acme Sales only sees Acme Sales in the Workspace Name list. They cannot filter into Workspaces they do not belong to.
Filters and Attributes
- All metrics, underlying data, and exports reflect only your accessible Workspaces.
- Workspace is available as a page and a report filter
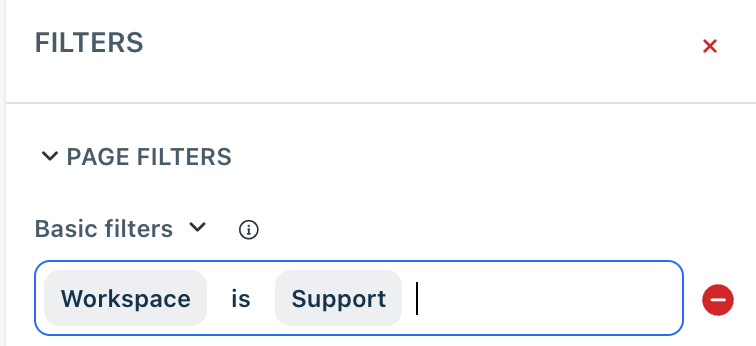
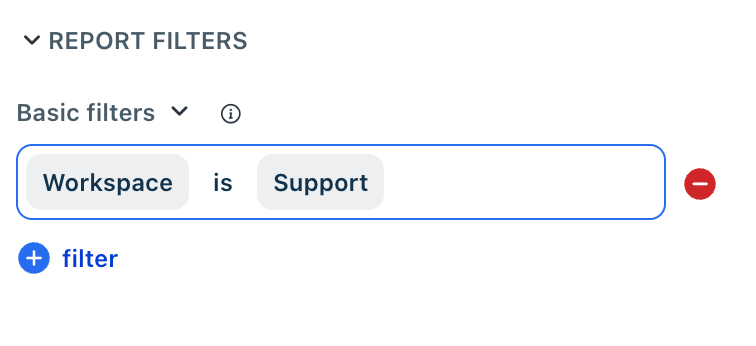
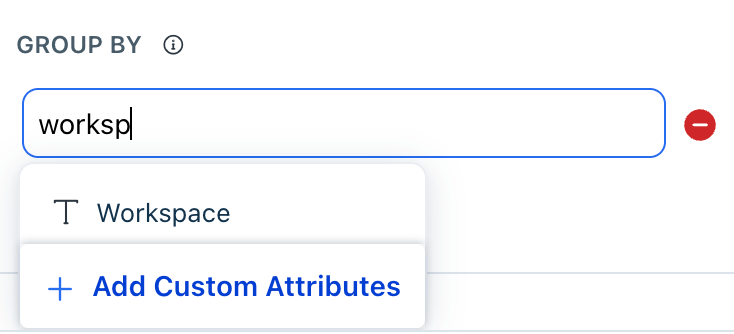
- Workspace is also a group-by (attribute) across reports.
Dashboards
- All default dashboards (My Dashboard, Operations, Availability, KnowledgeBase, Agent availability and performance) include a Workspace filter.
- Each metric on a dashboard reflects only the Workspaces you belong to. If you are in Acme Sales only, all ticket counts and SLA numbers come from Acme Sales.
- Custom dashboards are scoped per Workspace. Each Workspace supports up to 15 custom dashboards.
- When creating a custom dashboard, Admin can choose the visibility based on Workspaces or Groups.
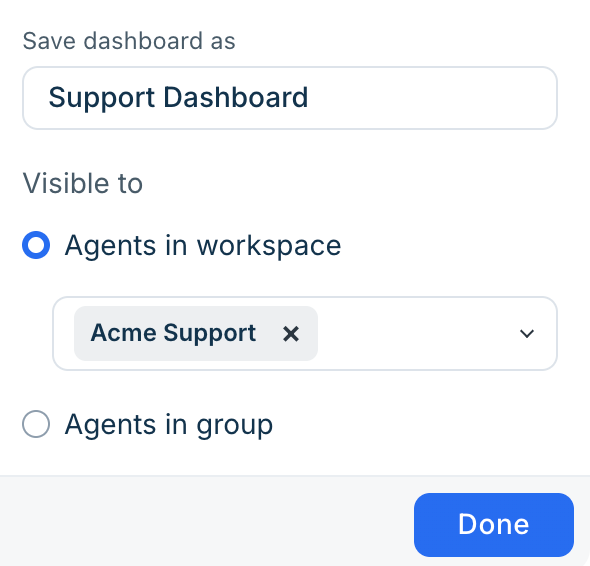
- Workspace and Group-specific widgets can be added using the Workspace drop-down while adding a widget.
- Dashboards can be cloned and shared with multiple Workspaces.
Cross-Workspace reporting
An administrator with access to multiple Workspaces can:
- Filter or group reports by Workspace to compare volume, SLA compliance, or CSAT across brands or regions
- Export data scoped to selected Workspaces
Tickets
The following rules apply to tickets across Workspaces:
- Every ticket belongs to exactly one Workspace at a time.
- The Workspace field appears on the ticket form and is required for closure.
- Shared ownership can be configured only for agents within the same Workspace.
- A child ticket can belong to a different Workspace from its parent ticket.
- For collaboration, agents who don’t have access to a ticket’s workspace can be granted access to a specific ticket by tagging them in a private note. Once this is done, threads can be used to collaborate on a ticket.
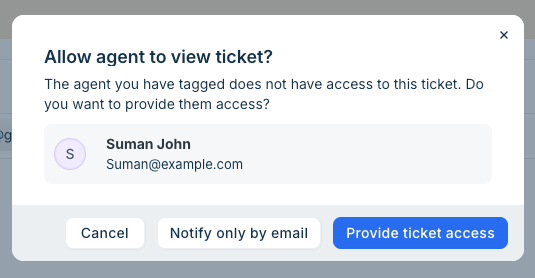
- Agents see tickets based on their Workspace membership, role, and scope.
Tickets created without an explicit Workspace assignment map to the default Workspace (or the Workspace determined by the inbound email address, portal, or Global automation rule).
Move tickets between Workspaces
Use ticket transfer when a conversation belongs in a different brand, region, or business unit. Transferring updates the ticket's Workspace context, including SLA, business hours, and portal visibility while preserving the customer email thread.
Transfer a ticket to another Workspace
- Open the ticket.
- Click Edit (or use the property panel, depending on your UI version).
- Change the Workspace field to the target Workspace.
- If prompted, assign a Group in the target Workspace. The previous group is cleared because groups belong to a single Workspace.
- Click Save.
To bulk transfer tickets, choose the tickets to transfer, click Bulk Update, and choose the destination Workspace and Group.
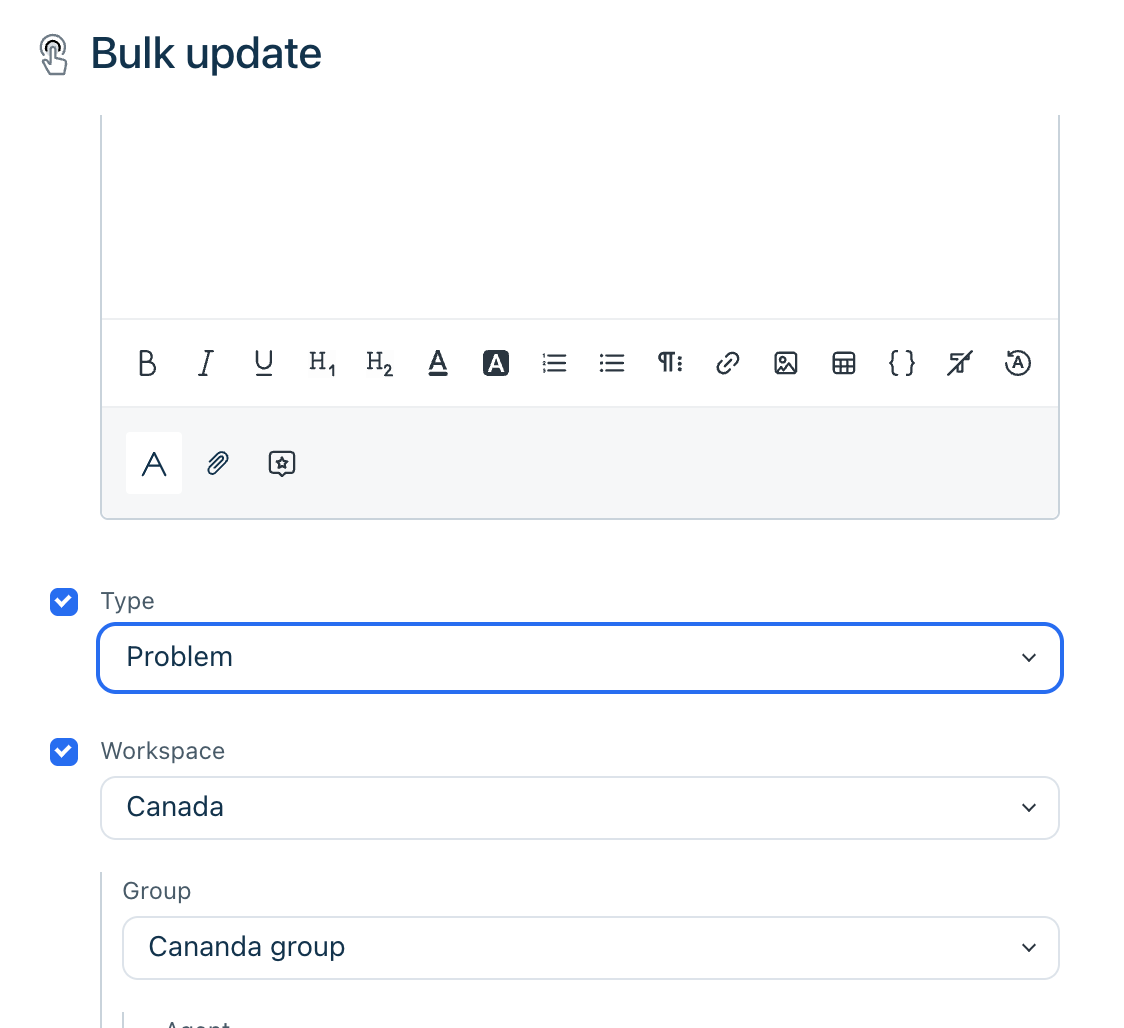
What changes on transfer
The following table summarizes transfer effects on ticket transfers to a different Workspace:
| Attribute | On transfer |
| Workspace | Updates to the target Workspace |
| Group | Cleared if the current group belongs to the source Workspace; assign a new group in the target Workspace |
| Agent (ticket responder) | The agent is retained only if they already have access to the destination Workspace. Otherwise, the agent is not added to the destination Workspace. |
| Support email/thread | Original inbound address retained; agents can reply from the same address |
| SLA due-by / first response due | Recalculates when the target Workspace has different SLA policies or business hours |
| Business hours | Adopts the target Workspace group’s calendar |
| Product | Updates to the default product of the target Workspace |
| Portal visibility | Ticket removed from source portal list; direct URL still works for requester |
| Custom field values | No changes |
| Automations | If the destination workspace has an event “Workspace updated”, these rules will run |
| Status, priority, subject, tags | No changes |
Get started with Workspaces
Use this ordered checklist to launch a new Workspace or enable Workspaces for the first time.
Enable Workspaces on an existing account
 Confirm your account is on the Enterprise plan.
 Confirm if you are on Freshdesk or Freshdesk Omni (2025 version)
 Confirm if you are on the latest SLA policy (Day-based SLA)
Launch a second Workspace
 Create the Workspace — Admin > Workspaces > Create Workspace
 Map email — Add support addresses for the new workspace
 Add agents — Assign agents who will handle this workspace
 Create groups — Set up routing groups and business hours
 Configure SLAs — Adjust targets for the new brand's commitments
 Set up automations — Add Global routing rules or Workspace-specific rules
 Customize the portal — Brand the portal and configure the ticket form
 Document transfer paths — Define when tickets move between Workspaces and train agents on the transfer procedure
Frequently asked questions (FAQs)
- Can an agent belong to more than one Workspace?
Yes. Agents can be added to multiple Workspaces. Their role and scope apply wherever they are added. One agent license covers all Workspaces the agent belongs to.
- What happens to my existing data when Workspaces is first enabled?
All existing tickets, agents, and configurations are mapped to the default Workspace. Nothing is lost.
- Can two Workspaces share an automation, SLA, or group?
No. Each Workspace has its own independent automations, SLAs, and groups. You can clone configurations from one Workspace to another as a starting point.
- Is there a limit to the number of Workspaces I can create?
Yes. You can create up to 30 Workspaces on a single account.
- Can I delete a Workspace?
No. After a Workspace is created, it cannot be deleted. Plan names carefully before you save. This is a limitation in the early access program. If you need a workspace to be deleted, please reach out to support once all tickets and admin configuration for this workspace is deleted. We can help you delete the workspace.
- Can I rename a Workspace?
Yes. Go to Admin > Workspaces, open the Workspace, update the name, and click Save.
- What happens when I move a ticket to another Workspace?
The ticket adopts the target Workspace's SLA policies and business hours, the assigned group is cleared (assign a new one), the product may update to the target default, and the ticket may disappear from the original portal list. The customer experience doesn’t change. They continue to receive messages from the original email address, web widget, Facebook page, etc.
- What happens to the assigned group when I move a ticket?
The group is cleared because groups belong to a single Workspace. Use destination-workspace-based rules to auto-assign the ticket to the right group.
- Does the support email address change after transfer?
No. The original inbound support address is preserved so agents can reply without disrupting the customer thread.
- Does SLA change when I transfer a ticket?
Yes. SLA due-by times recalculate using the target Workspace's SLA policies and business hours.
- Can parent and child tickets be in different Workspaces?
Yes. Automation rules can be created to sync notes.
- Why do I see duplicate group names?
The same group name can exist in multiple Workspaces. When you assign groups to an agent who belongs to multiple Workspaces, duplicate names appear. Append the Workspace name to each group—for example, escalation - Acme Sales.
- Can global automations override Workspace rules?
Global rules run before Workspace rules. They do not override Workspace rules. A Global rule can set the Workspace, and then Workspace rules evaluate in that context.
- Do agents need a separate license per Workspace?
No. One agent license applies across all Workspaces the agent belongs to.
- Why can't an agent see a ticket in their Workspace?
The agent may lack access to that Workspace, their scope may be Group tickets and the ticket is in another group, or the ticket may have been transferred to a different Workspace.
- Can I bulk-move tickets between Workspaces?
Yes. Use Bulk Update at the top of the Tickets list page.
- Do automations run again when I transfer a ticket?
Yes, automations in the destination Workspace run again when the ticket is transferred.
- Can contacts be scoped to a workspace?
No. Contacts are not workspace-scoped by default. If you need to restrict which contacts agents can access, consider the following approaches:
- Restrict contact access using custom roles. Create a custom role that prevents agents from accessing the Contacts page. When an agent searches for a contact, they will only see contacts associated with tickets they have access to.
- Use a custom app for workspace-specific contact access. If the Contacts page is an important part of your workflow, you can develop a full-page custom app that fetches and displays only the contacts associated with tickets belonging to the agent's workspace.
- Can I create workspaces in a sandbox?
Yes. You can create workspaces in a sandbox to test your workspace configuration. However, new workspaces created in a sandbox are not synced back to your production instance. If you need the same workspaces in production, you must create them separately in the production instance.
- How do exports work with workspaces?
Exports include only the data corresponding to the tickets the user has access to.For example, if an agent has access to tickets in only the Acme workspace, an export generated by that agent will include only the tickets they can access from that workspace.
- What are the limitations in Early Access?
The following limitations currently apply to workspaces in Early Access:
- Workspaces cannot be deleted. If you have a workspace that is not associated with any tickets or admin entities, contact Support. The team can help you delete the workspace.
- Audit logs are visible across workspaces. Audit logs across all workspaces are currently visible to admins with access to audit logs, regardless of workspace. This gap will be addressed in the coming months.
- Ticket list refresh indicator: If an agent is viewing All Tickets and a new ticket is created in a Workspace they cannot access, the ticket list may show a refresh indicator. After the agent refreshes, that ticket does not appear in their list.
Example: Amy has access only to Acme Sales and is viewing All Tickets. A new ticket is created in Acme Support. Amy may see a refresh indicator, but the Acme Support ticket does not appear in her list after she refreshes the page.
Best practices
- How do I configure workspaces when I already have admin configurations set up for different business units?
Create the required workspaces and clone the relevant configurations from your primary workspace to the destination workspaces.
For the initial setup:
- Create the destination workspace.
- Clone configurations such as automations, SLAs, groups, and other admin settings from the primary workspace.
- Review and customize the cloned configurations for the destination workspace.
- Configure channels after the rest of the workspace configuration is complete.
Tip: Consider keeping your email configuration in the primary workspace so you do not have to reconfigure all your email addresses for every workspace.
When a workspace is enabled, all existing email addresses are initially mapped to the default workspace. To route emails from a specific address to another workspace, create a global rule that routes tickets created for that email address to the destination workspace.
For example, if you have 10 support email addresses, all 10 are initially mapped to the default workspace. If support@example.com should belong to a custom workspace, create a global rule that routes tickets created for support@example.com to that workspace.
- How should I decide which workspaces my agents can access?
The right approach depends on whether you want to optimize for collaboration or security.
- Optimize for collaboration by giving agents and admins access to all workspaces. This approach is useful when workspaces are primarily used to organize admin configurations rather than restrict agent access.
- Optimize for security: Grant agents access only to the workspaces they need. This ensures that agents can access only the tickets and configurations relevant to their teams.
Agents can still collaborate across teams when needed, using parent-child tickets or ticket threads (once access to tickets is provided on a need-to-know basis).