 Free
FreeTABLE OF CONTENTS
- About ticket assignment preferences
- Choose an assignment order
- Configure assignment order
- Control agent load behavior by ticket status
About ticket assignment preferences
The Advanced Automatic Routing, powered by Omniroute™, ensures that tickets are equally distributed to agents. Within the Omniroute settings, the Assignment Preferences feature lets you configure the rules for ticket assignment, so your team can handle tickets more efficiently.
User Requirements: Ensure that you have admin permissions to configure Assignment Preferences in Omniroute.
Before you begin:
Ensure that you configure and understand the following before proceeding:
- Enable Advanced Automatic Routing for your groups
- Learn about Omniroute Settings
- Configure SLA policies
The key settings you can configure in the Assignment Preferences section are:
Setting | Description |
Assignment order | Choose the order in which tickets are assigned to agents. |
Agent load behavior by ticket status | Decide which ticket statuses should count towards an agent’s workload. |
Notes:
- Assignment Preferences within Omniroute™ is an account-level setting and works only for groups where advanced automatic routing is enabled
- While this is a group-level setting, you can override a few configurations at the group level.
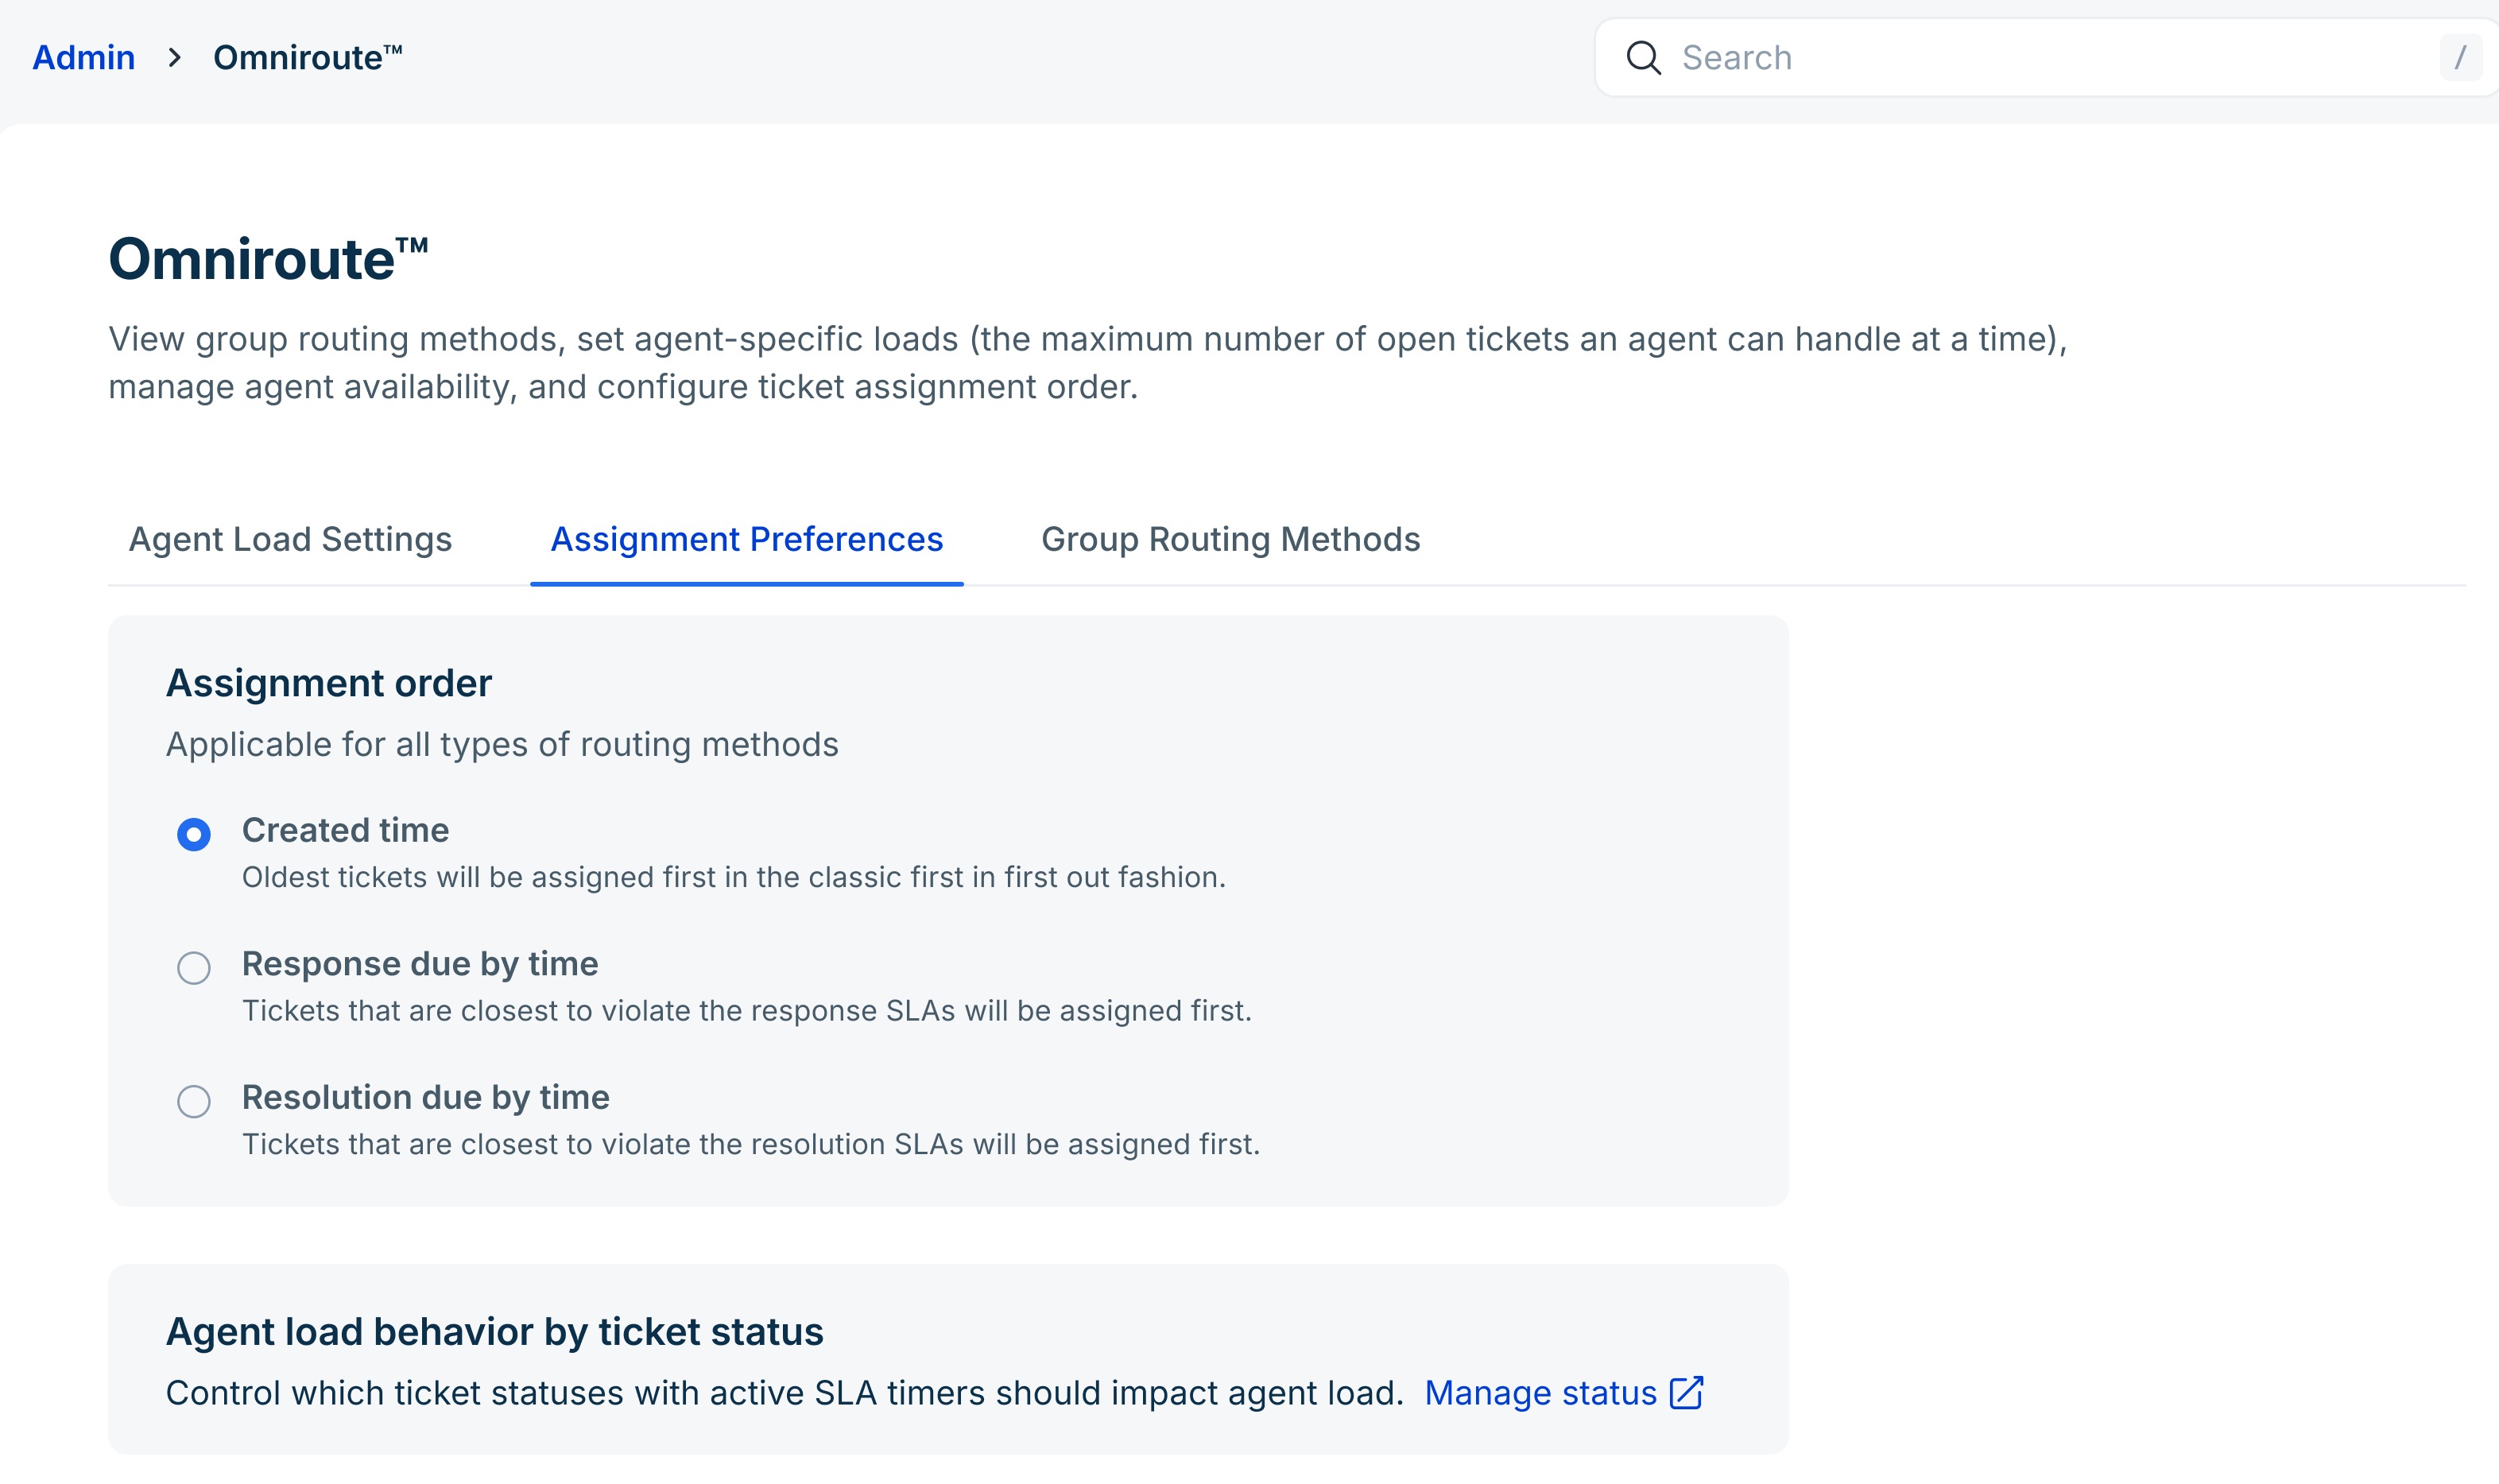
Choose an assignment order
Assignment order determines which ticket will be assigned first when multiple tickets are waiting. You can choose from the following options:
- Ticket creation time
- Response due by time
- Resolution due by time
Note:
- By default, tickets are assigned based on Ticket creation time.
- When you change the assignment order, the new conditions apply only to the new incoming tickets or reassignments done later.
Ticket creation time
Tickets are assigned in the order they were created, so the oldest ticket is always assigned first. This ensures the oldest tickets are prioritized even if they are reassigned to another group.
Tip: Use this when you want simple workflows where ticket creation time is the primary focus and you want an equal distribution.
Example:
Assume three tickets arrive one after another with the following timelines.
Ticket | Created time | Event | Assignment order |
Ticket A | 10:00 AM | Created | First |
Ticket B | 10:30 AM | Created | Second |
Ticket C | 11:00 AM | Created | Third |
Assignment order:
Based on the ticket creation time, the assignment order is A -> B -> C.
Response due by time:
Tickets that are closest to violating their response SLA are assigned first.
- The first response SLA (first response due by time) is considered for new tickets.
- For reopened tickets (e.g., customer replies again), the next response SLA (next response due by time) is considered.
This ensures agents have enough time to respond before SLA violation.
Tip: Use this option if your team handles a large volume of urgent or time-sensitive queries and SLA compliance is your top priority.
Example:
Consider the following scenario:
- Ticket A is an urgent ticket in the L1 group with a response SLA of 1 hour.
- Ticket B is a medium-priority ticket in the L2 group with a response SLA of 4 hours.
- After 3 hours, Ticket B is reassigned to L1.
At this point,
- Ticket A still has 60 minutes left before the SLA is breached.
- Ticket B also has only 60 minutes left (since three hours have passed).
Ticket | Priority | Group | Response SLA | Event | Assignment order |
Ticket A | Urgent | L1 | 1 hour | Created | Second |
Ticket B | Medium | L2 | 4 hours | Created -> Reassigned after 3 hours | First |
Assignment order
Since both tickets have 60 minutes left, Ticket B is assigned first since it is considered closer to breaching its SLA, followed by Ticket A. The assigment order is Ticket B -> Ticket A
Resolution by time
Tickets that are closest to violating the resolution SLAs will be assigned first and ensures agents enough time to respond or resolve tickets before they breach the resolution SLA.
Tip: Use this option if your team goal is overall resolution goals instead of just responses.
Example:
Consider the following scenario:
- Ticket A is an urgent ticket in L1 with a resolution SLA of 2 days.
- Ticket B is a medium-priority ticket in L2 with a resolution SLA of 3 days.
- After 2 days, Ticket B is reassigned to the L1 group.
Ticket | Priority | Group | Resolution SLA | Event | Assignment order |
Ticket A | Urgent | L1 | 2 days | Created | Second |
Ticket B | Medium | L2 | 3 days | Created -> Reassigned after 2 days | First |
Assignment order:
Since both tickets have 1 day left, Ticket B is assigned first since it is considered closer to breaching its SLA, followed by Ticket A. The assignment order is Ticket B -> Ticket A
Configure assignment order
- Log in to your account as an admin.
- Go to Admin > Omniroute.
- Click on the Assignment Preference tab.
- Choose the preferred assignment order. The options are
- Created time
- Response due by time
- Resolution due by time
- Click Save.
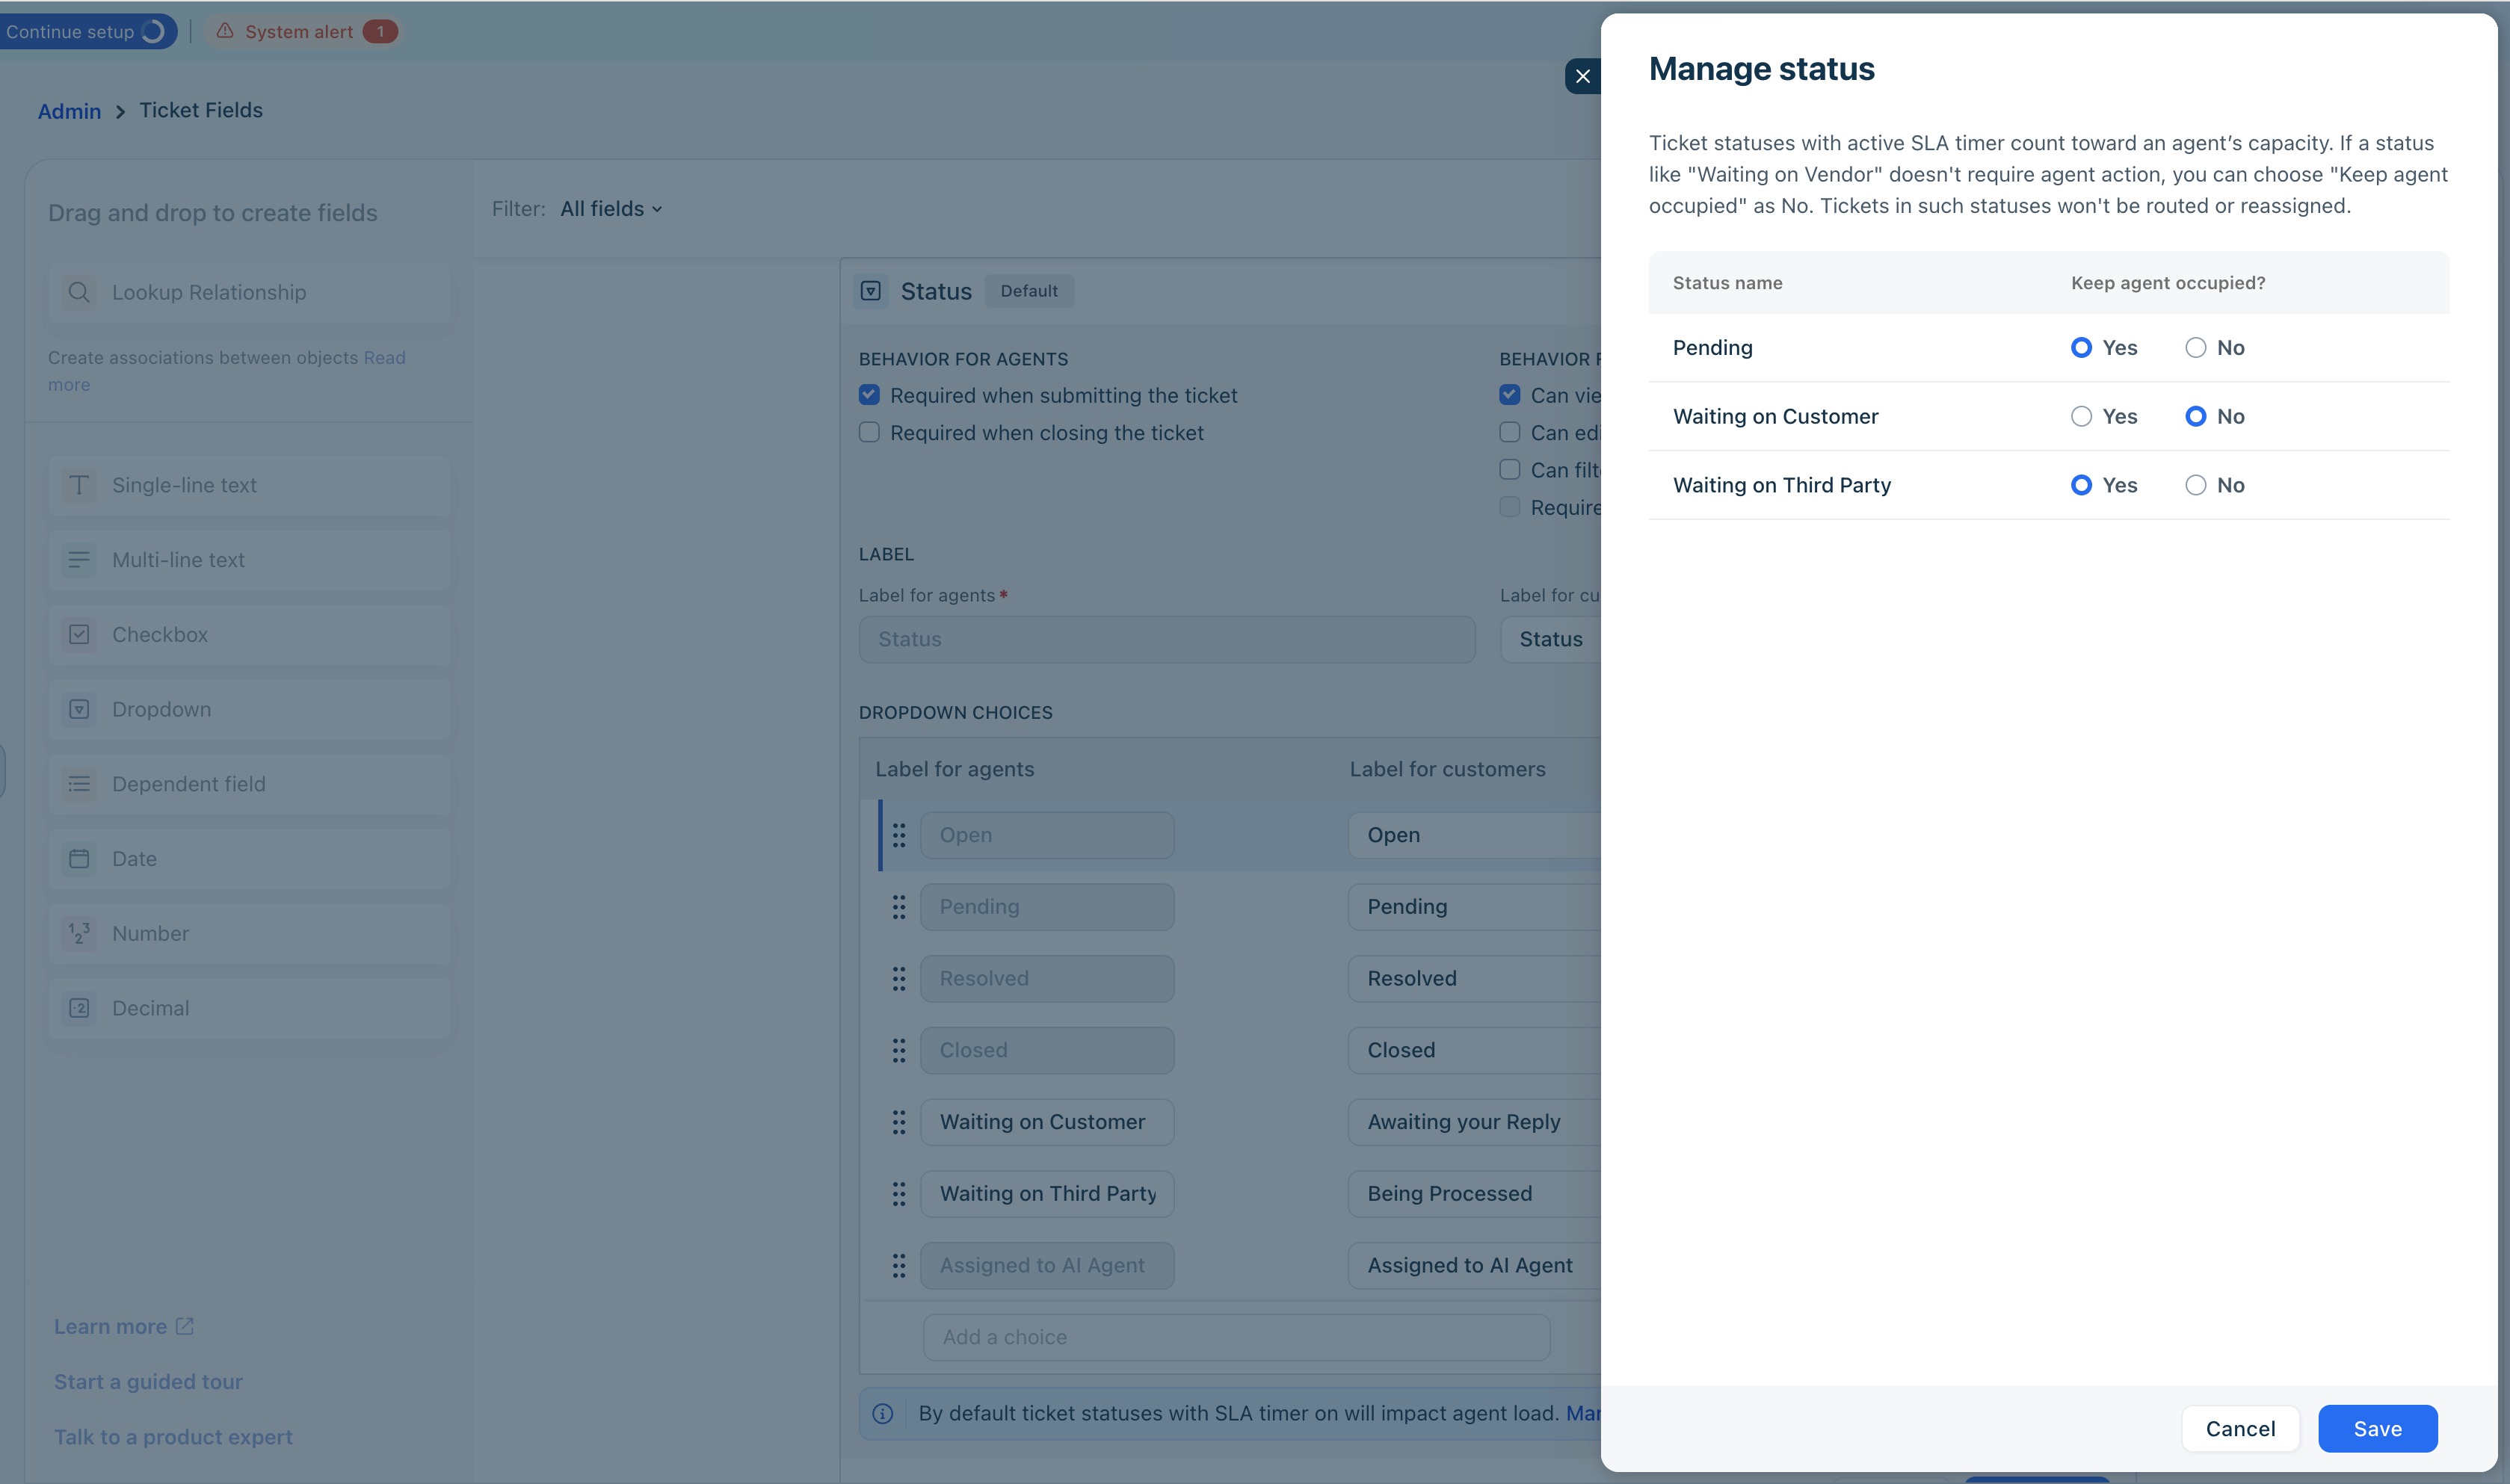
Control agent load behavior by ticket status
By default, only tickets with an active SLA timer count towards an agent’s workload. Once an agent reaches their ticket capacity, new tickets will not be assigned to them.
Why could this be an issue?
Not all tickets with an active SLA require the same level of attention from agents. For example, some tickets may be waiting for information from a vendor or third party and may not need immediate action from agents. Since these tickets are part of the agent’s load, they block new assignments and reduce team efficiency.
How to solve this?
This feature allows you to control how ticket statuses affect workload calculation. You can decide which statuses to exclude from counting toward an agent’s ticket capacity, even when the SLA timer is running. This ensures that these ticket statuses do not block ticket assignment flow.
For example, if the SLA timer is active for tickets with a Waiting on Customer status, you can exclude this status from being counted for agent workload. As a result, these tickets will not affect the agent’s capacity to receive new tickets.
How to manage agent workload by ticket status?
- Go to Admin > Omniroute.
- Click on the Assignment Preference tab.
- In the Agent load behavior ticket status box, click Manage status.
 You will be redirected to the Custom Ticket fields page.
 - Choose if you want to keep the agent occupied for the specific statuses.
For details on custom ticket fields, see Understanding Custom Ticket Fields.