 Growth
TABLE OF CONTENTS
- About web chat topics
- Create web chat topic
- Map topics to web widget
- Understand customer and agent experience
Web Chat Topics enable live chat experience on the widget. Customers can chat in real-time with an AI Agent or a human agent. For a general overview of Web Chat channel, see Overview of Web Chat Channel.
Prerequisites:
Ensure that you have admin permissions to create and configure Web Chat Topics.
Note: The Web Chat Topic configuration is available only for Freshdesk Omni customers.
About web chat topics
Web chat topics or live chat categorize incoming chats so customers can easily route their queries to the right team. This ensures that every chat reaches the most relevant agents, improving both efficiency and response time. Additionally, you can enable self-service by routing the chats to AI Agents before handing them over to an agent.
How do web chat topics fit into the widget?
Web chat topics are part of your Web Widget setup. When customers click the widget on your website or portal, they will see a list of topics to choose from. Each topic represents a type of query and routes chats to a human agent or an AI Agent.
You can map multiple topics to a single widget, such as order tracking, billing, and promotions, without needing separate widgets for each purpose. Web chat topics are directly tied to how your widget behaves:
- Each topic determines which agent group receives the chat, ensuring customers connect with the right team.
- Settings such as response expectations, away messages, and pre-chat forms can be tailored for every topic, creating unique experiences for different types of queries.
- Customers will only see the topics that are mapped to a specific widget, allowing you to control what’s displayed on each portal or website.

For example, a retail business can have the following topics in the widget:
| Topic | Purpose | Group |
|---|---|---|
Contact Support | Handle general customer queries | Support Group |
Order Tracking | Check order or shipping status | Order Tracking |
Returns & Exchanges | Process return or refund requests | Returns Team |
Promotions and Discounts | Share current offers or loyalty programs | Marketing Team |
Each topic can also include custom settings for different time zones, non-business hours, and languages, making your chat experience both contextual and localized.
Benefits:
Web chat topics offer several operational and customer experience benefits:
- Streamlined routing: Connect customers with the right team instantly.
- Faster response times: Reduce triage effort by categorizing upfront.
- Personalized interactions: Tailor responses, forms, and messages per topic.
- Localized experience: Offer translated topics for global users.
Create web chat topic
- Log in to your account as an admin and go to Admin > Channels > Web Chat > Web Chat Topics.
- Click Create new > New Web Chat Topic.

- You will be redirected to the configuration page.
 The various configuration settings available are:
- General info
- Start with an AI Agent
- Assign to agent group
- Away experience
- Prechat form
- Response expectation
- Send survey
- Threading interval
- Manage translations
General Info
Add a name, welcome message, and an optional logo for your topic.
- On the Web Chat Topic configuration page, click General Info.

- Add the following details:
- Logo: Up to 5MB in JPEG or PNG format (recommended size: 128 × 32 px).
- Welcome message: Displayed when the customer selects this topic.
Start with an AI Agent
Link an AI Agent to drive deflection using automated responses and assist customers with predefined, personalized, and conversational answers. This allows your customers to get instant help without waiting for a human agent, while still providing them the option to connect to one if needed.
Note: If you do not have an AI Agent yet, create one. For details, see Set Up AI Agent.
To configure:
- On the Web Chat Topic configuration page, click Start with AI Agent.
- Choose the AI Agent to map with the topic. You can also preview the AI Agent to see how it appears within the web chat topic.

Assign to agent group
Use this option to route chats automatically to a specific group. When customers click on the topic and initiate conversations, they are automatically assigned to the selected group. This ensures queries are directed to the most qualified agents, reduces handoffs, and improves response times.
To configure:
- On the Web Chat Topic configuration page, click Assign to agent group and enable it.
- Choose the group to assign.
If you do not have any groups, click Manage Groups to add new groups. The business hours applicable to the selected group will be automatically applied.
Note: If you map AI Agents, the customers will be assigned to the selected group only after being transferred from the AI Agent.
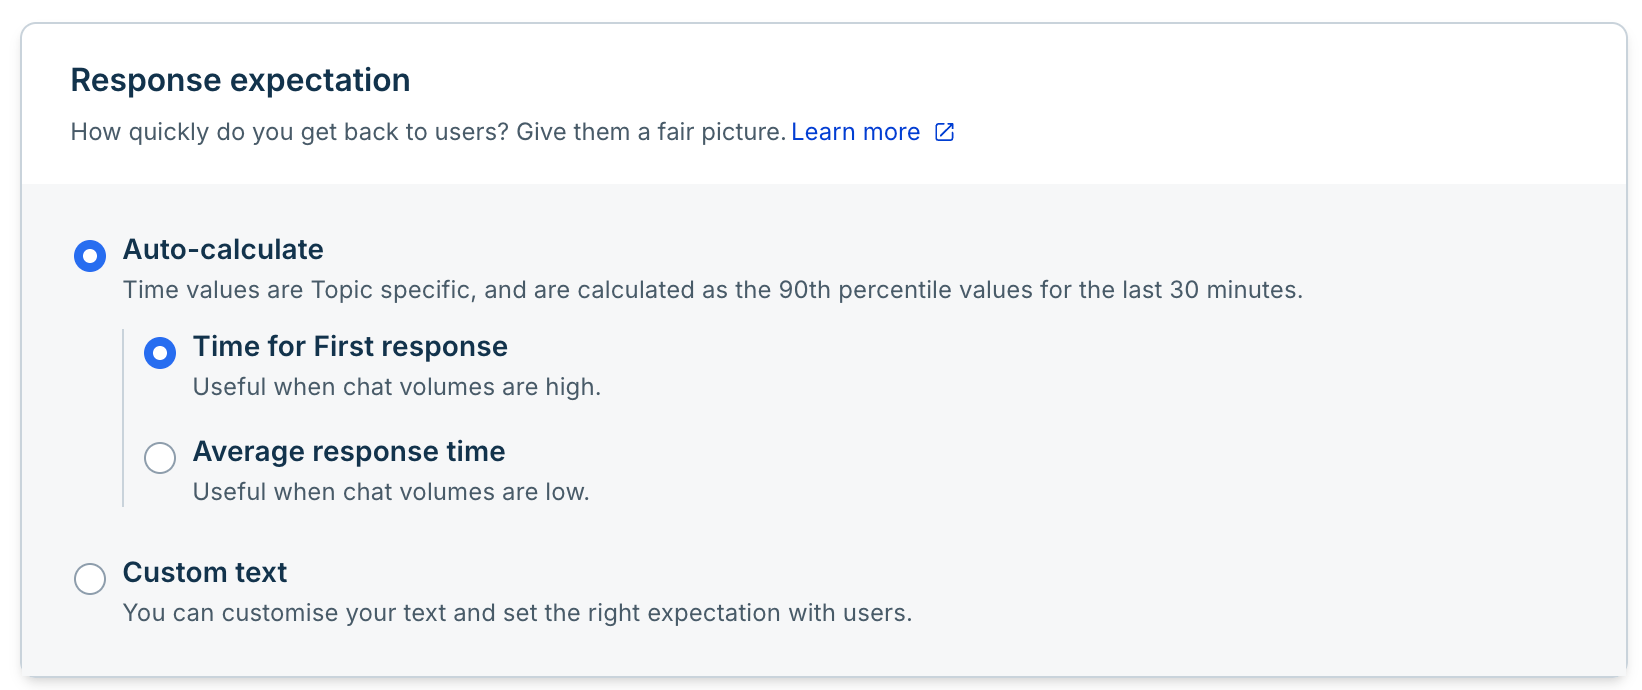
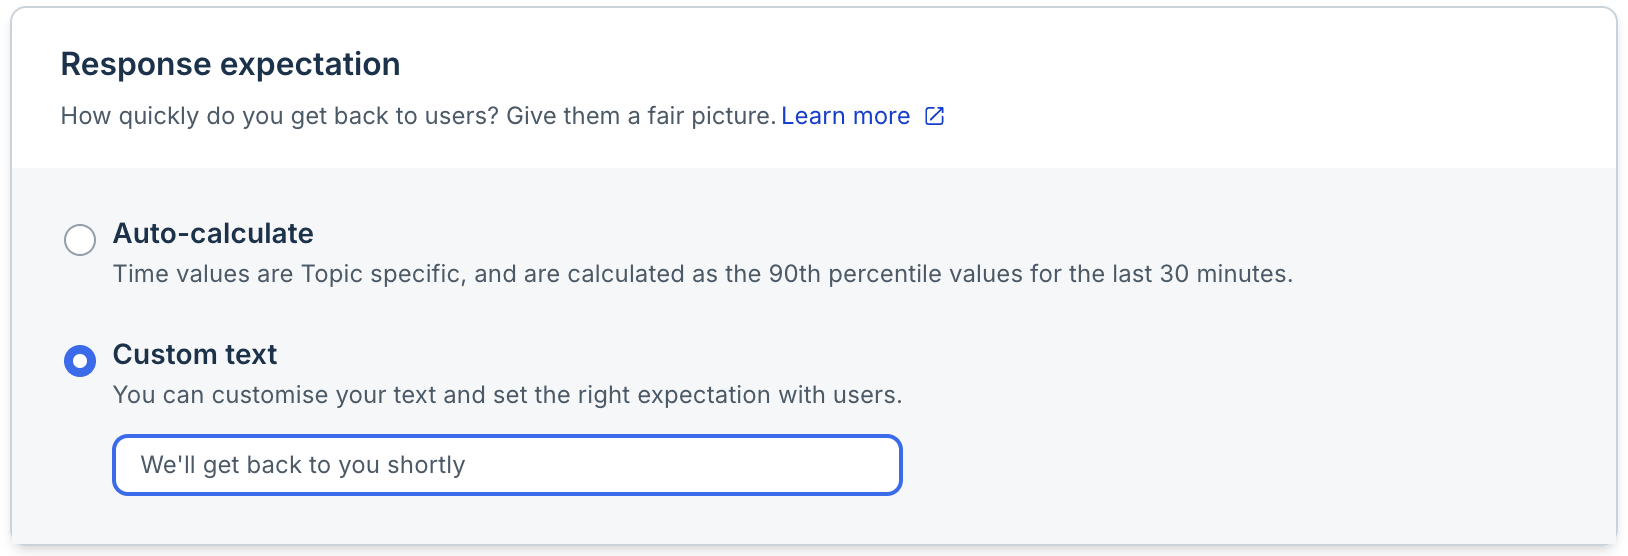
Set up response expectation
Set clear expectations with customers by showing how quickly your team responds to conversations on a selected topic. When a customer selects a topic in the chat widget, the response expectation is displayed below the topic name. For example, customers may see messages such as “Typically responds in 3 mins” when they start a conversion.
You can configure response expectations for each topic using auto-calculate or custom text methods.
Auto-calculate
Automatically displays a response time estimate based on your team's recent performance for the selected topic. Freshdesk analyzes recent conversations and automatically updates a response time estimate based on the auto-calculation methods you choose.
You can choose between time for first response or average response time auto-calculation methods.
Time for first response
This mode is best when your topic receives a high volume of chats. Freshdesk analyzes the time agents take to send their first reply to customers in the last 30 minutes across conversations. Based on this, it estimates and displays the time to respond.
For example, if your agents sent their first reply within two minutes across recent conversations, customers will see: "Typically replies in 2 mins."
Average response time
This mode is best when your topic receives fewer chats. Freshdesk analyzes the time agents took to respond to each message in a conversation and provides an estimate based on your team's overall responsiveness.
For example, if your agents responded to messages throughout conversations in about five minutes on average, customers see: "Typically replies in 5 mins."
Note: In both auto modes, the calculation is done from the last 30 minutes and automatically excludes unusually slow responses, so the value always reflects your team's typical performance.
Custom text message
Displays a fixed message instead of an automatically calculated response time. Use this option when you want to communicate a specific expectation regardless of recent support activity. The message you configure is displayed directly to customers when they select the topic.
Examples
- "We'll get back to you shortly"
- "Our team typically responds within one business day"
- "Thank you for reaching out. We'll respond as soon as possible"
Fallback behavior
Auto-calculated response expectations rely on recent conversation activity. If sufficient data is not available, it displays the configured fallback text.
The fallback text is displayed in the following scenarios:
- A topic is newly created and does not yet have enough conversation data.
- Insufficient recent activity to calculate a response time estimate.
- A response time estimate is temporarily unavailable.
Once enough conversation data becomes available, the calculated response time estimate will be displayed again.
Note: It is recommended to configure a custom response expectation message even when using auto-calculate methods.
Configure response expectation
- On the Web Chat Topic configuration page, click Response Expectation next to the topic you want to configure.
- Select one of the following options:
- Auto-calculate: Choose Average Response Time or Time for First Response.
- Custom text: Enter the message you want to display to customers.
- Auto-calculate: Choose Average Response Time or Time for First Response.
- Click Save.
Configure away experience
The Away Experience lets you customize what customers see when they contact you outside of business hours or when agents are unavailable. You can configure this per topic, so different teams can have unique messages.
This reduces customer frustration and makes them feel acknowledged even when no agents are online.
Note: The away experience cannot be configured for an AI Agent-mapped topic. In this case, you need to configure AI Agent handoff experience in your AI Agent settings.
To configure:
- On the Web Chat Topic configuration page, enable Away Experience.
- Add custom away and acknowledgement messages.
Example: “Our Returns Team is currently offline. Please leave your order number and issue details, and we’ll get back to you during business hours.”
You can preview the widget to see how the Away experience will appear to customers. - Choose if you want customers to create an email or chat ticket for after-hours chats.

For more information, see Configure Away Experience.
Set up pre-chat forms
The pre-chat form appears before a customer starts a chat and allows agents to collect the necessary information before engaging in the conversation. This reduces back-and-forth, as there is less need to ask for details after the conversation starts.
Note: Pre-chat form is powered by Ticket Forms configured in your account. If you do not have any ticket form yet, create one.
To configure:
- On the Web Chat Topic configuration page, click Prechat form and enable it.
- Enter the button name for the prechat form.
- Choose the relevant ticket form to display.
- Select the experience for customers while choosing the form. The options are:
- Editable: Customers can view and edit prefilled information.
- Read only: Customers can view the pre-filled information but cannot make changes.
Hidden: Details are pre-filled and sent to the agent, but not visible to the customer. If all fields are hidden and prefilled, the pre-chat form will be skipped, and the user will directly move to the chat screen.

For more details, see Configure Pre-chat Forms.
Configure threading interval
Define the time frame after which a returning chat from the same customer is considered a new conversation. This helps maintain continuity and organize chats.
Note: You cannot add a threading level for an AI Agent-mapped topic.
To configure:
- On the Web Chat Topic configuration page, click Threading interval.
- Set the interval in minutes, hours, or days.
Example:
If the threading interval is set to 30 minutes and a customer reopens a chat within that time, the conversation continues in the same thread. If they reopen after 30 minutes, it starts a new ticket. For more information on threading logic, see Understand Threading Logic.
Tip: Shorter intervals help keep chats separate when repeated inquiries occur frequently. Longer intervals help maintain conversation flow over longer periods.
Send surveys
Enable this option to trigger a Customer Satisfaction (CSAT) survey after a ticket is resolved. This allows you to collect direct feedback from customers about their support experience and measure how effectively your team handled their query. If survey question types are not supported within the Web Widget interface, the survey will be sent to customers as a web link.
To configure:
- On the Web Chat Topic configuration page, click Send Survey and enable it.
- Select the survey to send.
For more information, see Configure Surveys.
Manage translations
If your Freshdesk account supports multiple languages, you can use the Manage Translations feature to display Web Chat Topics in the customer’s browser language. This enhances global accessibility and helps customers interact in their preferred language.
Note: The Manage Translation feature will be visible on the Topic Configuration page only when you have more than one language in your account. You can add multiple languages from the Helpsesk Settings page.
To configure:
- On the Web Chat Topic configuration page, click Manage Translation.

- Add translations for each supported language.
Languages that do not have any translated topic content yet will have a red asterisk. Example:
If you support French, Dutch, and Bulgarian, the topic names and welcome messages can display in those languages based on the user’s browser settings.
Map topics to web widget
After you create and configure Web Chat Topics, the next step is to map them to your Web Widget. This ensures that the right topics appear for customers on specific portals or websites and allows you to tailor the chat experience based on context.
Mapping determines which topics are visible in each Web Widget. This flexibility is especially useful when:
- You have multiple widgets across different websites, regions, or portals.
- Different customer segments need access to different types of topics.
- You want to control the visibility of topics without deleting or recreating them.
For example, an e-commerce store may have:
- A Sales widget on the homepage with topics like Promotions and Bulk Orders.
- A Support widget on the order page with topics like Order Tracking and Returns.
To map your topic to a widget:
- Log in to your account as an admin.
- Go to Admin > Channels >Web Chat > Widgets.
- Click Configure next to the widget to which you want to map the topic.
- Click on the Content tab.
- Click Live Chat and choose the topic to map.

- Click Save.
For information on mapping topics to a widget, see Create Widget.
Understand customer and agent experience
Once you’ve mapped Web Chat Topics to your Web Widget, the customer experience becomes more guided, intuitive, and context-aware. Each topic determines what the customer sees and how their conversation flows from the moment they open the widget to interacting with an AI Agent (if configured), and finally to connecting with a human agent when needed.
Example:
- The customer opens the Web Chat Widget and selects the "Order Tracking" topic.
- If a Pre-chat form is enabled, the customer enters the required details (such as name, email, or order number).
- If an AI Agent is mapped to the topic, it starts the conversation first, using information from the pre-chat form to provide personalized assistance.
- If the customer still requires assistance from a human agent, the AI Agent seamlessly transfers the conversation to the appropriate team, mapped to the relevant topic.
- On the agent’s side, all contextual information, pre-chat form details, and any AI Agent conversation history are visible in the Web Chat ticket, allowing the agent to respond quickly and effectively.
By the end of this flow, customers receive a more focused, transparent, and efficient support experience, while agents have the context they need to resolve issues faster.